

TL;DR: Substance Painter to Blender in one paragraph
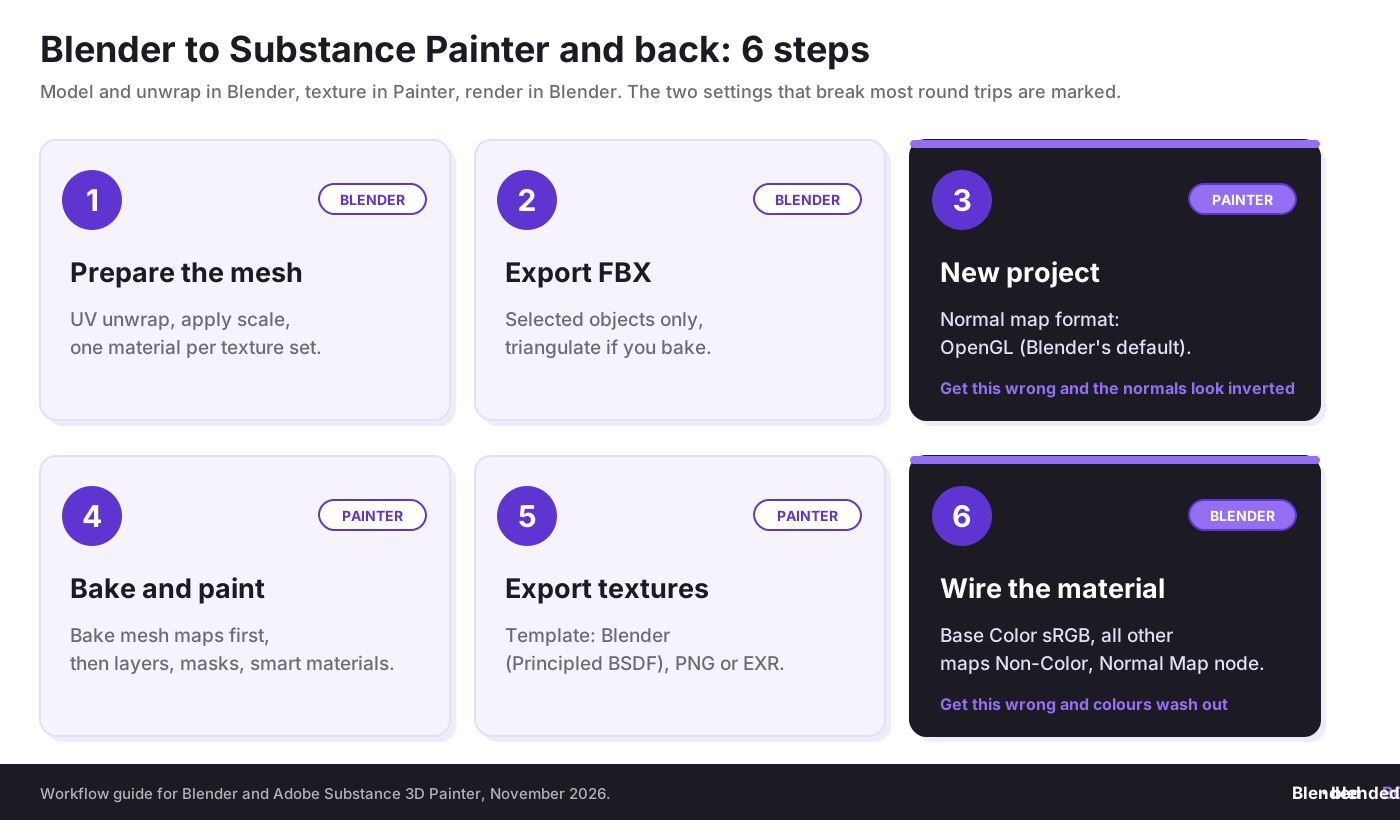
To go from Blender to Substance Painter, UV unwrap the model, apply its scale and export it as FBX; in Painter, start a new project with the OpenGL normal map format. To go from Substance Painter to Blender, export with the Blender (Principled BSDF) output template, plug each map into the Principled BSDF and set every map except Base Color (and Emissive) to Non-Color, with the normal map going through a Normal Map node. Node Wrangler (Shift+Ctrl+T) can wire the whole material in one step.
💡 Need clean UVs first? Start with UV Unwrapping in Blender.
Substance Painter to Blender: how the round trip works
The Substance Painter to Blender workflow is a round trip: you model and UV unwrap in Blender, send the mesh to Adobe Substance 3D Painter to bake and paint the textures, then bring the exported texture maps back into Blender and connect them to a Principled BSDF material for Cycles or Eevee. Nothing is linked live by default; what travels is an FBX (or OBJ) file one way and a folder of image maps the other way.
Almost every problem people post about (washed-out colours, inverted bumps, shiny surfaces that should be matte) comes from three settings: the normal map format in Painter, the output template you export with, and the colour space of each image in Blender. This guide walks through the six steps, then gives a map-by-map table and a troubleshooting table.
Want to optimize your texturing pipeline?
Learn how to professionally build PBR materials directly in Blender.
👉 Start exploring PBR materials now
Blender to Substance Painter: prepare and export the model
1. Prepare the mesh in Blender
Painter paints on your UVs, so they have to be clean: no overlapping islands (unless you mean them to share texture), sensible texel density and enough margin between islands. See UV unwrapping in Blender if you are starting out. Then apply the scale and rotation (Ctrl+A in Object Mode) so the model arrives at the size you expect.
Plan your materials too. Each material slot on the mesh becomes a separate texture set in Painter, with its own set of exported maps. One material for a prop means one set of textures; a character split into body, clothes and eyes gives three.
2. Export the mesh from Blender as FBX
Use File > Export > FBX with only the objects you want to texture selected (enable Selected Objects). FBX keeps UVs, material slots and custom normals; OBJ also works for a static mesh. If you will bake a high-poly model onto this low-poly one, export the high-poly version as a second file with matching names. Triangulating the low-poly mesh before export keeps the baked normals consistent between Painter and Blender.
Struggling with texture quality?
Master UV mapping techniques tailored for clean 3D designs.
👉 Learn UV Mapping Best Practices
Texturing in Substance Painter: the project settings that matter
3. Create the project with the OpenGL normal map format
In Painter, File > New, select the FBX and open the advanced settings. Adobe documents the Normal Map Format setting as either DirectX (X+, Y-, Z+) or OpenGL (X+, Y+, Z+). Blender reads normal maps in the OpenGL convention by default, with the Y axis in the green channel pointing up, so choose OpenGL for a Blender project. Pick the document resolution in the same dialog.
4. Bake mesh maps, then paint
Bake the mesh maps (normal from the high-poly, ambient occlusion, curvature, position, thickness) in the Texture Set Settings before you add smart materials or masks: generators and smart masks read those baked maps. Then paint with layers, fill layers and masks as usual. If you only need hand-painted details on a simple model, texture painting in Blender may be enough without a second program.
Substance Painter to Blender: export the textures
5. Export with the Blender (Principled BSDF) output template
Open File > Export Textures. Painter ships with a list of default output templates, and one of them is Blender (Principled BSDF), described by Adobe as a preset for Blender (Principled BSDF). It names and splits the maps the way a Principled BSDF expects them. PBR Metallic Roughness works too; it is the generic template for a regular metallic/roughness workflow. Export as 8-bit PNG for colour maps, and 16-bit PNG or EXR for normal and height maps if you see banding.
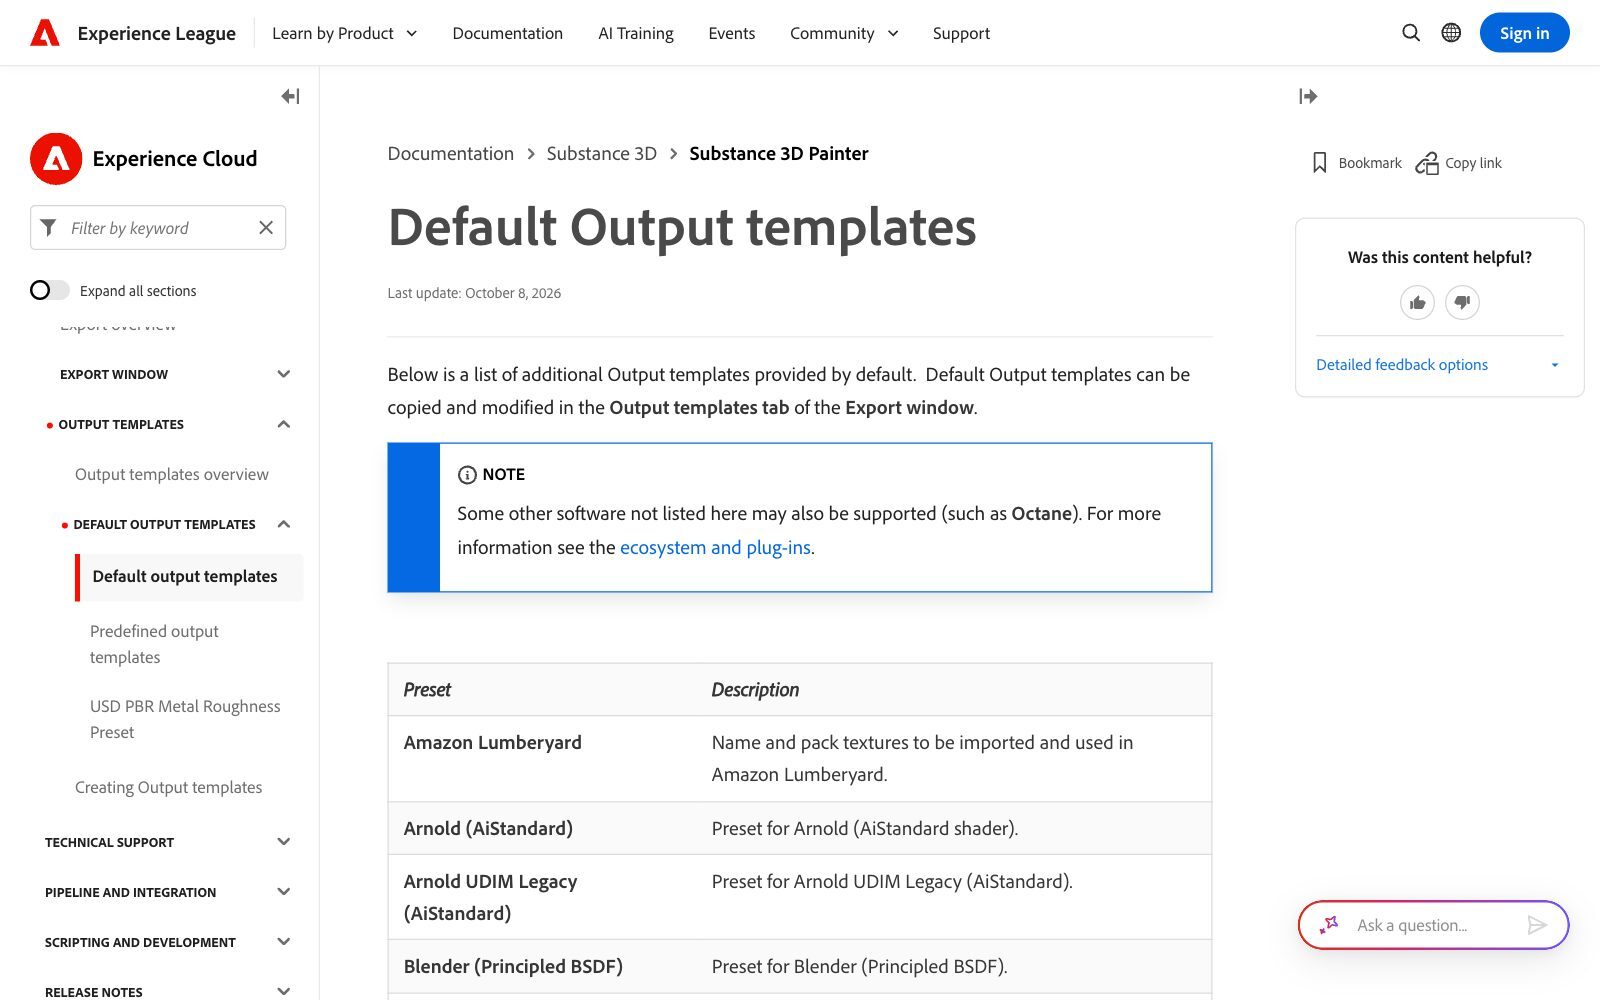
Before you export, check the normal map entry in the export list: if it says DirectX, either switch the project to OpenGL or flip it on the Blender side (see the troubleshooting table below).
Import Substance Painter textures into Blender
6. Connect each map to the Principled BSDF
The fastest way is Node Wrangler, which ships with Blender and is switched on in Preferences > Add-ons. Select the Principled BSDF in the Shader Editor and press Shift+Ctrl+T: the manual describes this as Add Principled Texture Setup, which loads the texture files you pick and connects them by name. Our Node Wrangler add-on guide covers its other shortcuts. The free Substance Textures Importer extension on the Blender Extensions platform (for Blender 4.2 and newer) does a similar job for whole folders of Painter exports.
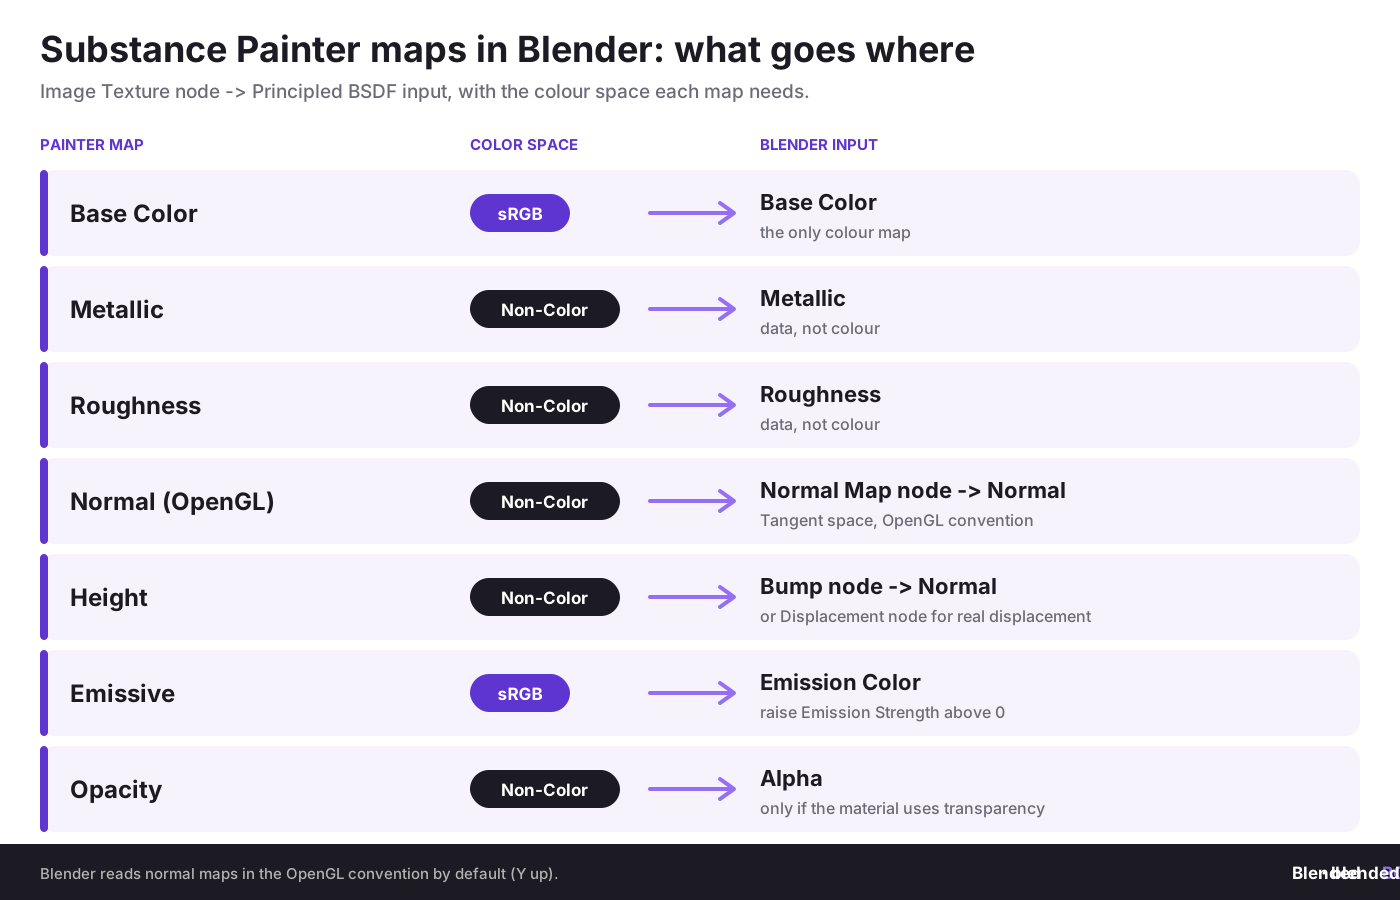
Whichever way you connect them, check the colour space of every Image Texture node. Only colour maps stay sRGB; everything that stores data must be Non-Color. The Blender manual says that for tangent space normal maps the image texture should be set to Non-Color mode to give correct results. For more on Image Texture nodes, read using image textures in Blender materials.
Substance Painter to Blender troubleshooting
If the material looks wrong after import, find the symptom here before you start re-exporting:
Normal maps deserve extra care: our guide to normal map baking in Blender for game assets explains tangent space and cage settings.
Substance Painter vs Blender texture painting: do you need both?
Blender can paint textures and build procedural materials on its own, and for stylised or simple assets that is often enough. Painter earns its place on assets with many layers of wear, edge damage and material variation, because its smart materials and masks are driven by baked mesh maps and stay editable. Many artists keep modelling, UVs, lighting and rendering in Blender and use Painter only for the texturing stage. Adobe also makes a separate Substance 3D add-on for Blender, which loads Substance 3D materials directly into Blender and feeds their textures into the BSDF shader; it is not a live link to Painter.
Protect the textured asset before you sell or share it
A finished, textured model is the version people want to copy. Before it goes to a client or a marketplace, keep the .blend file, the Painter project and the exported maps together, note any third-party smart materials or textures and their licences, and keep a dated record that the work is yours. Read more on protecting Blender models from theft, metadata and watermarking in Blender and selling 3D models online, plus our guide to selling Blender 3D models online. If you send FBX or OBJ files to clients, it helps to know what neutral exchange formats reveal about a model.
Prove the textured model is yours
BlendedBoris timestamps your Blender work on a blockchain as dated proof of authorship, straight from Blender, before you share or sell it.
👉 Try the BlendedBoris add-on for Blender
Conclusion
Blender to Substance Painter and back is a reliable pipeline once three settings are right: an OpenGL project in Painter, the Blender (Principled BSDF) or PBR Metallic Roughness output template, and Non-Color on every data map in Blender. Set them once, save the export as your own template, and the round trip becomes a two-minute job.
FAQ: Substance Painter and Blender
How do I export textures from Substance Painter to Blender?
Open File > Export Textures, choose the Blender (Principled BSDF) output template (or PBR Metallic Roughness), pick a folder and file format, and export. In Blender, connect each map to the Principled BSDF and set every map except Base Color and Emissive to Non-Color.
How do I get a model from Blender into Substance Painter?
UV unwrap it, apply scale and rotation, and export it with File > Export > FBX (Selected Objects). In Painter, use File > New, select the FBX and set the normal map format to OpenGL.
Is there a Substance Painter add-on for Blender?
Adobe's Substance 3D add-on for Blender loads Substance 3D materials into Blender; it does not connect to Painter. Third-party bridge add-ons exist that automate the export and import; check that they support your Blender and Painter versions before you rely on them.
Why does my Substance Painter normal map look wrong in Blender?
Usually it was exported in the DirectX format, or its Image Texture node is not set to Non-Color. Blender expects OpenGL normals by default.
Should I use OpenGL or DirectX normal maps for Blender?
OpenGL. Blender uses the OpenGL convention by default for rendering and baking, with the Y axis in the green channel pointing up.
Do Substance Painter textures work in both Cycles and Eevee?
Yes. The maps plug into the Principled BSDF, which both render engines use. Displacement from a height map needs extra material settings, and Eevee and Cycles handle it differently, so test it in the engine you render with.
Is Substance Painter better than Blender for texturing?
For layered, realistic texturing with wear and masks, Painter is faster to work with. For simple or stylised assets, Blender's own texture painting and procedural materials are often enough, and they are free.
What is the best Blender to Substance Painter workflow for game assets?
Model and UV in Blender, bake from a high-poly onto a triangulated low-poly in Painter, export with the template for your engine, and keep Blender for previews and renders. Our Blender to Unity pipeline guide covers the FBX side.


