

TL;DR: Destruction Simulations: Breaking Objects Realistically means planning physics before shards so your break shots look believable, stay editable, and keep their commercial value.
You get better results when you match fracture patterns to material, force, scale, internal structure, and debris timing instead of relying on random chunking. The article shows which Blender methods fit each job, why hybrid setups often look best, how to bake scenes so revisions do not wreck production, and why your source files, caches, and fracture systems should be treated like IP from day one.
💡 Want to go deeper into procedural VFX workflows? Check out our Geometry Nodes guide to procedural animation for node-based setups that feed VFX and simulation pipelines.
Destruction Simulations: Breaking Objects Realistically starts with a blunt question: why do so many 3D breaks still look fake even when the render quality is excellent? In Blender, film, product visualization, and game asset pipelines, destruction fails when artists focus on shards first and physics later. For engineers, designers, SMEs, and IP-sensitive studios, that mistake costs time, hardware budget, and in some cases ownership control over valuable simulation assets.
What is destruction simulation? It is the process of making a digital object crack, fracture, detach, collide, and settle in a way that matches material behavior, scale, force, and timing. For Blender users and startup teams, destruction simulation serves as both a visual craft and a technical asset pipeline, because the fracture setup, cache, debris system, and final baked result can become reusable commercial IP.
Why it matters for your business: realistic destruction improves credibility in product ads, engineering demos, cinematic sequences, and marketplace assets. Unlike a pre-cut break animation, a simulation-based setup can react to changing inputs, camera changes, and client revisions, which makes it far more useful for production.
Real-time and offline destruction stay hard for one reason: objects do not fail as single shells. They fail as materials, layers, joints, and weak points.
Violetta Bonenkamp, co-founder, CADChain
Need more control before you start breaking objects?
If you want procedural setup logic before fracture work, review how physics simulations in Blender work for cloth, fluid and smoke before you add rigid body debris.
👉 See the Blender physics workflow
Why does realistic destruction matter now?
The pressure on visual realism is higher in 2026 because clients compare Blender output with high-end game trailers, VFX reels, and physically convincing product demos. A weak destruction shot is spotted fast. Mark Brown’s breakdown How Games Do Destruction (Game Maker’s Toolkit, October 2025) shows how many routes studios take: swapping an intact object for a pre-broken version, slicing meshes in real time, turning voxels into physics objects, or checking whether a structure can still carry the weight above it. The production lesson for Blender is the same: pick the method that fits the shot, then give the pieces believable physics and constraints.
The challenge for startups and SMEs is simple. You need realism, but you also need repeatability, manageable cache sizes, and a legal trail showing who made what. Violetta Bonenkamp has argued for years through CADChain that digital assets should be treated as business property from the moment of creation, not only when a dispute starts. That view applies to Blender destruction rigs too. A fracture setup, debris generator, and baked cache can hold more commercial value than the final still frame.
Research and production practice across games, training systems, and engineering simulation also show that realism depends on physics layers. Rigid body impact alone is not enough. Material tagging, particle effects, contact timing, and environment response all contribute. A 2022 review of disaster simulation training systems, available on PubMed Central, describes an earthquake training system that used a physics engine for moving furniture and falling objects and a particle system for fire and smoke. The same layered principle applies inside Blender scenes.
What makes an object break realistically?
Let’s break it down. Realistic destruction means the viewer can infer why the object failed, where it failed, and what the material is. A ceramic vase, pine table, cast concrete block, laminated phone screen, and injection-molded plastic enclosure should not fail in the same way.
- Material identity: Glass shatters with sharp fragment logic, wood splinters along grain, concrete crushes and chips, and plastic bends before rupture.
- Force direction: Impact from above, torsion, shear, and explosive pressure create different fracture maps.
- Scale: Miniatures often break too slowly or with oversized debris, which instantly looks wrong.
- Internal structure: Hollow objects, layered products, screws, seams, and reinforced sections define failure paths.
- Secondary effects: Dust, tiny chips, motion blur, and sound sync sell the shot.
A practical answer from Game Development Stack Exchange on destruction damage of household objects makes an uncomfortable but useful point. No general system magically understands the inside of every TV, table, or appliance. Artists and technical directors still need to define materials, likely weak zones, and debris classes. That is why destruction remains a craft, not a button.
Prove you made the fracture rig, not just the render
BlendedBoris adds a blockchain timestamp to your Blender files from inside Blender, so your source meshes, fracture setups and baked scenes carry dated proof of authorship.
👉 Explore BlendedBoris
Which destruction methods work best in Blender?
Blender supports several approaches, and each one fits a different production goal. The mistake is treating them as interchangeable.
1. Pre-fractured rigid body simulation
This is the standard route for many artists. You cut an object into pieces, assign rigid body physics, set collision shapes, and trigger motion through impact or activation. It works well for masonry, stylized props, walls, and many product shots. It is fast to iterate and easy to art direct.
Its weakness is obvious. If the fracture pattern ignores force flow, the result looks procedural rather than physical. The fix is to vary shard scale, preserve larger structural chunks, and place denser fracture fields around the impact zone.
2. Cell fracture plus hand cleanup
Cell fracture gives a good starting point for brittle breakup. In Blender, it is useful for stone, plaster, low-cost environment destruction, and prototype work. Cell Fracture was bundled with Blender up to version 4.1 and is now a free extension on extensions.blender.org; once installed, it appears in the Quick Effects submenu of the Object menu. But raw output is rarely final. You still need to bevel edges, control interior materials, reduce impossible slivers, and adjust mass values.
3. Geometry Nodes assisted fracture workflows
This route gives tighter procedural control, and our introduction to Geometry Nodes covers the basics. You can generate impact zones, instance debris, tag materials, and prepare attributes for later simulation. For pipelines that repeat similar destruction across product families or marketplace packs, Geometry Nodes can save days of cleanup.
4. Hybrid rigid body plus particles and volumes
Most photorealistic shots use a hybrid stack. Large chunks are rigid bodies. Small chips become particles. Dust becomes a volume or particle-driven effect. Fine glass dust or plaster haze should not be solved as hundreds of thousands of mesh fragments. That wastes memory and still looks worse.
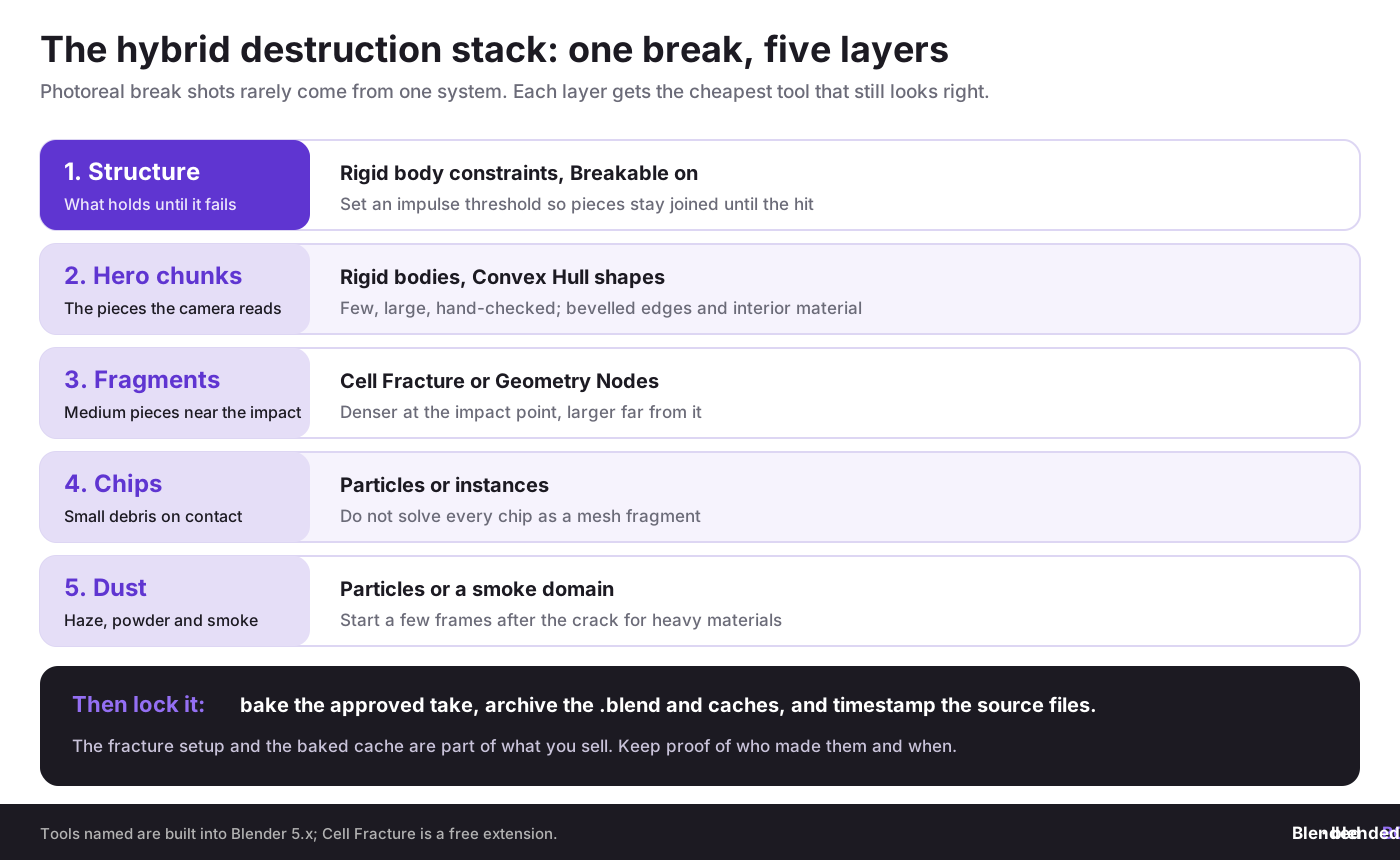
5. Scripted break states for product and ad work
In commercial production, full physical truth is not always the target. Sometimes you need the object to break in a camera-friendly way while still feeling plausible. That means predefining internal parts, using hidden constraints, and timing failures to match the story beat. This is common in ads where a laptop, bottle, or packaging object must break cleanly enough to read on screen.
The table compares the five methods side by side.
Want interaction before destruction?
Many believable break shots start with contact logic such as footprints, pressure zones, or effect masks, and finish with chips and dust that react to the impact. The particle systems guide shows how to emit and control the small debris that follows the fracture event.
👉 Build the debris layer
How should you plan a destruction shot from day one?
Here is why many destruction scenes collapse under revisions. Teams start with fracture and only later ask what the shot needs. Start with production questions instead.
- Define the story of failure. Ask what causes the break, which material fails first, and what the viewer must notice.
- Classify the material system. Is the object brittle, ductile, layered, hollow, reinforced, glued, screwed, or laminated?
- Pick the hero fragments. Choose the chunks that matter in close-up and simulate the rest more cheaply.
- Map impact and weak points. Use stress logic, seams, corners, drilled holes, thin walls, and support loss as likely failure zones.
- Separate debris tiers. Large chunks, medium fragments, dust, and micro-debris need different systems.
- Plan the cache strategy. Name every version, freeze approved stages, and store test notes so that client changes do not destroy your schedule.
This is where the CADChain perspective becomes unusually useful for artists. Violetta Bonenkamp and Dirk-Jan Bonenkamp have both pushed the idea that digital design workflows need file-level evidence, ownership records, and transfer discipline. In Blender terms, that means your .blend file, fracture source meshes, baked caches, texture variants, and export-ready debris packs should be treated as controlled production assets, not disposable experiments.
What is a realistic Blender workflow for breaking objects?
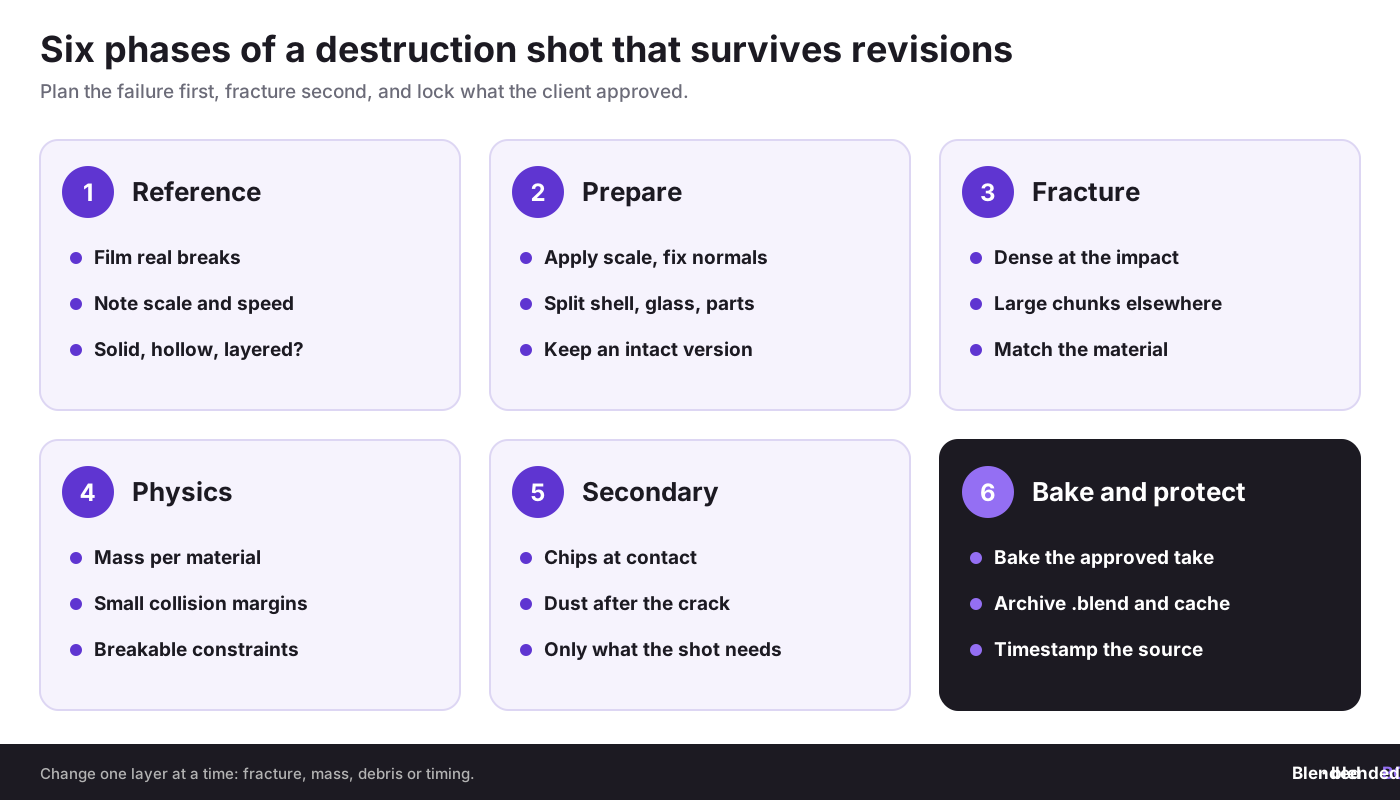
Phase 1: Assessment and reference collection
Start with real footage and material studies. Record phone videos of dropped ceramics, cracked plaster, snapped packaging, or broken branches. Study industrial references too. The point is not perfect physics. The point is pattern literacy.
- Gather references for material failure, debris spread, and dust timing.
- Measure approximate object scale and likely impact speed.
- Note whether the object is solid, hollow, layered, or assembled from separate parts.
- List which details must remain readable in camera.
Phase 2: Prepare the source object
Clean topology matters even when the object will shatter. Apply scale. Fix normals. Separate functional components such as frame, shell, glass, screws, labels, and internal blocks. A TV or coffee machine should not be simulated as one sealed mesh if the shot depends on believable internals.
For Blender marketplace creators, this phase often becomes the hidden source of asset value. A clean destructible version and a clean intact version can be sold as separate deliverables, licensed to studios, or repurposed for future packs.
Phase 3: Fracture with intent
Use different fracture density by region. Impact zones get smaller, more chaotic fragments. Load-bearing or distant areas keep larger chunks. Wood should keep directional logic. Concrete should keep crushed centers and chipped corners. Glass should show radial and concentric break behavior if seen close enough.
Phase 4: Set mass, collision, and constraints
Mass should reflect material and fragment size. Tiny pieces that behave like bowling balls break the illusion. Collision margins should be small enough to avoid hovering shards. Constraints help hold an object together until the right force threshold is reached, which often looks better than pieces exploding apart at frame one. In Blender, enable Breakable on a rigid body constraint and set its threshold, the impulse needed to break it; the Connect command in the Rigid Body submenu of the Object menu adds constraints between selected pieces.
Phase 5: Add secondary simulation layers
This is where good shots become convincing shots. Add dust release on impact. Add tiny chips at collision points. Add a short delay between structural failure and dust bloom for heavier materials. For water-filled or coated objects, blend in fluid or splash logic only if the shot earns it.
Phase 6: Bake and lock approved results
Bake once the motion, timing, and debris behavior are approved. Do not keep re-simulating from unstable setups late in production. If your scene also uses cloth, smoke, or fluid elements, you need a controlled caching plan. The simulation baking for performance guide is useful here because destruction scenes often become unmanageable when every system remains live.
Which material types need different break logic?
The word “realistic” only means something in material context, not as a general measure of visual quality. Interior surfaces need their own PBR materials too.
What do most artists get wrong in destruction simulations?
Next steps start with avoiding the usual failures. These are the mistakes that show up in Blender reels, game assets, and even expensive client projects.
Mistake 1: Uniform fracture everywhere
Real objects do not fail with evenly distributed chunk size. Stress concentrates. Impacts localize. Seams open first. Uniform fracture tells the viewer that software, not force, made the break.
Mistake 2: No internal structure
A broken speaker, appliance, chair, or tool should reveal something inside. Even a simplified internal layer helps. Otherwise the object reads as an empty shell prop.
Mistake 3: Bad scale and mass
Scale errors destroy realism faster than shader errors. Small pieces should not move like concrete slabs, and heavy chunks should not bounce like foam.
Mistake 4: Too much debris on every shot
Many scenes look overproduced because every break becomes an explosion. A dropped mug can fail with ten readable pieces and a light dust cue. More particles are not always better.
Mistake 5: No legal control over source files
This is where many creative teams become careless. They send source .blend files, high-value geometry setups, and baked caches through email threads or freelance platforms with weak license language. Dirk-Jan Bonenkamp’s legal position across CADChain has been consistent: if file history, transfer terms, and authorship are vague, disputes become expensive fast. EU SMEs that outsource destruction work should protect their Blender models, keep version logs, contributor agreements, and export records from day one.
How can EU studios and SMEs protect destruction assets as IP?
This question is ignored too often because artists see simulation as temporary labor. It is not. A destruction workflow can contain script logic, node systems, fracture maps, texture atlases, timing choices, and reusable asset packs. That is commercial know-how. The Blender license states that what you create with Blender is your sole property, and the copyright basics for 3D artists apply to fracture rigs and caches as much as to renders.
- Keep source and delivery separate: deliver rendered output or approved exports unless the contract clearly covers source transfer.
- Log authorship and version history: date-stamped records matter when collaborators, clients, and marketplaces overlap.
- Use written license terms: define reuse, resale, modification, exclusivity, and training-data restrictions.
- Tag files and archives consistently: who created the fracture setup, who owns the final commercial rights, and which elements remain reusable library content.
- Preserve chain of custody: if a dispute starts, the cleanest evidence often wins.
From the CADChain point of view, blockchain is useful here as infrastructure, not as buzz. Violetta Bonenkamp has framed this well in CAD and creative contexts alike: a digital certificate or immutable record does not replace copyright law, contract law, or trade secret discipline, but it can strengthen proof of timing, authorship, and file event history. For a Blender studio selling destruction-ready asset packs across Europe, that can matter a lot when a model reappears on another marketplace under a different name.
"Your simulation cache may look temporary, but in a dispute it can become evidence."
Timestamp destruction assets before you sell or hand them over
Register your .blend files with BlendedBoris before they go to a client, a freelancer or a marketplace. If a pack reappears under another name, you have a verifiable record of who made it and when.
👉 Protect your Blender work with BlendedBoris
How should startups and marketplace sellers package destruction assets?
If you plan to sell destructible Blender assets, sell clarity. Buyers want predictable results. Legal teams want clean ownership. Production teams want assets that do not break their schedule.
- Include intact and broken states. Buyers need pre- and post-failure versions.
- State software version and dependencies. Blender release, add-ons, node dependencies, and tested render engines should be listed clearly.
- Document what is baked and what is editable. This reduces refund requests and support tickets. Our guide to file organization for multi-asset product packs shows a folder layout buyers understand.
- Provide material notes. Tell buyers whether the asset represents ceramic, tempered glass, softwood, concrete, or stylized equivalents.
- Define license boundaries. Single project use, multi-project studio use, resale prohibition, and kitbashing permissions should be explicit. See Creative Commons vs copyright for Blender assets before you pick a licence.
For European sellers, plain-language licensing matters because cross-border commercial use is common and misunderstandings pile up fast. A German agency, Dutch startup, French product team, and Polish freelancer may all touch the same asset chain. Clear contracts beat assumptions.
Which metrics show that your destruction simulation is working?
Most artists judge by taste alone. Production teams need a firmer checklist.
- Viewer readability: can a viewer tell what broke, why, and where within one second?
- Material credibility: does the break match the expected material family?
- Motion believability: do fragment speed, bounce, and settling feel right for the scale?
- Secondary effect timing: do dust, chips, and contact effects support the event instead of masking weak physics?
- Production stability: can the cache be reproduced, revised, and rendered on schedule?
- Commercial clarity: are the source assets, bakes, and licenses documented well enough for handoff or resale?
What does a practical destruction pipeline look like for a small studio?
A small EU studio does not need a giant VFX department to produce strong destruction work. It needs discipline.
That last step matters more than people admit. Archive the approved shot, source mesh state, and contract notes. If the client asks for a derivative ad six months later, you save money. If a dispute starts over reuse or ownership, you save much more.
Building a destruction scene that stays fast enough to revise?
Large fracture shots become heavy quickly, especially when smoke, dust, cloth, and rigid bodies overlap. A solid bake plan keeps Blender usable and keeps handoff cleaner for teams and clients.
👉 Lock the simulation before final renders
What should you do next if you want better break scenes?
Start small. Pick one object and break it three ways: brittle, heavy, and stylized-realistic. Compare the reads. Watch where the illusion fails. Then improve only one layer at a time: fracture pattern, mass, secondary debris, or timing. Teams that test this way improve faster than teams that keep rebuilding giant hero shots.
Also, treat your destruction work like business property. Violetta Bonenkamp’s startup and IP approach is useful here because it forces creators to ask uncomfortable questions early. Who owns the fracture system? Can the freelancer reuse it? Is the baked cache part of the paid deliverable? Do marketplace terms conflict with client exclusivity? Those questions are boring until they become very expensive.
Closing thoughts
Realistic destruction is never about random chaos. It is about controlled failure, readable material behavior, and a production setup that survives revisions. In Blender, the best destruction shots combine art direction with physics literacy, and they also respect the hidden value of the source files, caches, and reusable systems behind the final image.
For EU SMEs, studios, engineers, and digital artists, that means two things. First, build break scenes with material truth, not generic shards. Second, manage the files, rights, and evidence trail as carefully as the render itself. That is where the CADChain mindset from Violetta Bonenkamp and Dirk-Jan Bonenkamp becomes highly relevant: creation, ownership, and transfer should stay visible from the start.
If this article pushed you beyond simple fracture tools, the natural next step is a broader look at Geometry Nodes for procedural animation, together with our guide to physics simulations in Blender. Destruction gets far better when it sits inside a full procedural and production-ready pipeline.
People Also Ask:
What are destruction simulations?
Destruction simulations are computer-generated processes used to model and analyze the breaking, shattering, or deformation of physical objects under various forces. These are widely employed in games, films, virtual reality, engineering, and scientific research for creating dynamic fracture effects or testing mechanical properties. They allow creators and engineers to predict real-world behavior in controlled environments.
How do games achieve realistic destruction effects?
Games achieve realistic destruction through advanced physics engines such as Havok or Chaos, procedural generation, and rigid body dynamics simulations. Developers use techniques including constraint-based fracturing, particle systems, and texture swapping. For example, Red Faction: Guerrilla used pre-broken building meshes that collapse under stress, while Teardown turns loose voxels into separate physics objects.
What tools are commonly used for destruction simulations in Blender?
Blender’s main destruction tools are rigid body physics (built on the Bullet physics engine), rigid body constraints with a Breakable option, the free Cell Fracture extension, and Geometry Nodes for procedural fracture and debris. Users create realistic breaking effects by combining these with particle systems, smoke simulation for dust, and Dynamic Paint for contact effects. Tutorials on platforms like YouTube guide users through step-by-step workflows for producing these effects.
Why are destruction effects significant in virtual reality (VR)?
Realistic destruction effects enhance immersion in virtual reality by simulating lifelike interactions and environmental changes. Apps like Sledge Destruction Simulator replicate the physical responses of objects to user actions, providing a sense of realism and engagement. This has applications in gaming, training simulations, and architectural modeling.
What is the most advanced destruction physics simulation available today?
Several systems are noted for advanced destruction physics, including Unreal Engine 5's Chaos Physics system, which provides detailed and controllable destruction workflows. This system enables fracture propagation, material dynamics, and particle effects to simulate breaking objects with high fidelity. It is widely used in modern game development and cinematic productions.
What are common challenges in creating realistic destruction animations?
Challenges include achieving natural fracture patterns, optimizing computational performance, and integrating dynamically generated debris with scene lighting and rendering. Additionally, balancing realism with artistic control often requires extensive experimentation, particularly in complex environments like urban destruction or high-speed collisions in simulations.
How does the Cell Fracture Add-On work in Blender destruction animation?
The Cell Fracture extension splits a mesh into Voronoi-style cells. You choose the point source that seeds the cells (the object’s own vertices, its particles, child objects or annotation strokes), limit the number of pieces, and add noise, recursion, a margin between pieces and an interior material. It sits in the Quick Effects submenu of the Object menu, and the pieces work with Blender’s rigid body physics during simulations.
What are some techniques for creating destruction in Unreal Engine 5?
In Unreal Engine 5, destruction can be achieved using fracture tools, field solvers, and material propagation systems. Techniques include layering materials, embedding internal geometry, and using Niagara for particle and fluid effects. Developers also manipulate Chaos Cache Managers for smooth simulation playback and camera integration.
What industries use destruction simulations regularly?
Destruction simulations are prominent in industries like gaming, film production, construction, engineering design, and disaster management. They are used for impact analysis, safety testing in automotive and aerospace sectors, and dynamic scene creation in artistic fields. Virtual reality also relies heavily on destruction effects for interactive experiences.
Where can beginners learn about destruction techniques?
Beginners can explore platforms like YouTube, Substack tutorials, and professional courses offered by fxphd. Free resources include Blender forums, Reddit discussions, and documentation provided by physics engine developers such as Unreal Engine. These offer insights and step-by-step guides for creating destruction effects.
FAQ on Realistic Destruction Simulations in Blender
How do voxel-based models enhance destruction realism?
Voxel-based models improve destruction realism by representing objects as clusters of smaller units, enabling accurate fragmentation and physical interactions. Combining this approach with particles can simulate dynamic effects, like debris settling naturally. Learn more about particle usage in Blender from Blender particle systems guide.
Why is controlled failure critical in destruction setups?
Controlled failure ensures objects break in ways that mirror real-world material integrity. By simulating structural constraints and weak zones, artists can maintain logical authenticity during cinematic scenes or product visualizations. This process is key to creating visually credible outcomes in digital environments.
Can smaller studios achieve high-quality destruction realism?
Yes, small studios can leverage scalable tools like Blender's fracture systems and procedural workflows to produce efficient destruction scenes. With disciplined asset management and baking workflows, high-quality results are achievable without large budgets or extensive personnel.
What steps minimize memory overload in destruction scenes?
Reducing debris density, optimizing particle resolution, and baking physics simulations early helps avoid memory overload in complex destruction scenes. Prioritize lightweight caching strategies for fluid, smoke, and debris layers. This ensures smoother rendering even in demanding environments.
Why does scale accuracy matter in simulations?
Accurate scaling ensures debris behaves proportionally to material type and size, preventing unrealistic fragmentation or floating shards. For example, miniature models should not exhibit behavior like full-sized concrete structures breaking. Correct scale settings maintain believability in visual effects.
What technologies support physics-heavy destruction?
Tools like Blender's Geometry Nodes enable procedural setups for debris generation and tagging attributes for physics systems. Advanced hybrid workflows often combine rigid bodies, particles, and simulation caches for lifelike results. Explore innovative frameworks in simulation computing via JuliaHub computing article.
Why do destruction simulations often fail during revisions?
Simulations fail when they lack detailed asset trails or poorly defined cache strategies. Start with clear shot requirements, bake approved layers, and document weak zones to ensure robust revisions. Unstructured workflows increase instability as projects evolve.
How can startups protect destruction systems as commercial IP?
To protect destruction setups, document fracture workflows, authorship, cache outputs, and licensing agreements. Use digital evidence trails like blockchain tools for validating ownership. This practice safeguards a studio’s technical assets for resale or legal disputes.
What’s the role of dynamic secondary effects in destruction realism?
Secondary effects, including dust releases, splinter chips, and motion blur, amplify realism by reflecting material-specific dynamics. Timed physics interactions, such as debris settling a split-second after impact, add convincing depth to the scene.
Are industry breakthroughs impacting destruction pipelines?
Innovations in high-performance interactive content frameworks and AI-enhanced rendering systems are streamlining destruction pipelines for faster workflows and physics automation. These advancements reduce manual cleanup while retaining material accuracy across multiple scenes.


