
TL;DR: Hair Simulations and Grooming in Blender needs both motion control and file control
Hair Simulations and Grooming in Blender helps you build hair that looks polished in stills and keeps its shape in motion, but the real win comes from planning the groom, the sim, the cache, and the ownership trail together. You’ll get better results by styling with guide curves, simulating only the hair the viewer can read, baking clean shot versions, and treating grooms, caches, and exports as assets that can be copied or disputed. If you still groom with the legacy particle system, check this guide to particle systems for hair, grass and crowds.
👉 Review your hair workflow now before you share the next file.
Hair Simulations and Grooming in Blender: Groom, Simulate, Cache and Protect
Hair Simulations and Grooming in Blender can look deceptively simple, so why do so many teams get great stills and terrible motion? For artists, design studios, and EU SMEs building characters, product mascots, digital doubles, or creature assets, hair is where visual quality, compute cost, and intellectual property risk collide very fast.
Hair grooming in Blender means shaping strands, clumps, density, parting, curl, and silhouette. Hair simulation means calculating how those strands react to gravity, inertia, collisions, wind, and animation over time. For startups and production teams, this matters because believable hair often decides whether a character feels premium or unfinished.
Why it matters for your studio or startup: if your groom breaks in motion, the whole asset loses value. And if your groom files, caches, textures, or exported Alembic strands are shared carelessly, the artistic and commercial value can leak just as fast as the visual quality does. That is why Violetta Bonenkamp and Dirk-Jan Bonenkamp often frame 3D production as both a creative workflow and an IP workflow.
By the end of this guide, you'll understand how Hair Simulations and Grooming in Blender work in 2026, how to set them up for real production, which mistakes cost the most time, and how to protect hair-heavy assets when freelancers, vendors, and clients enter the pipeline.
Great grooming wins the still. Great simulation wins the shot. Great file control keeps you owning both.
Violetta Bonenkamp, co-founder, CADChain
Protect your Blender work before you share it.
Hair grooms, caches, and scene files often move through freelancers, studios, and clients with weak traceability. A better ownership trail can save months of dispute later.
👉 Secure your 3D authorship workflow
What is Hair Simulations and Grooming in Blender?
Hair Simulations and Grooming in Blender refers to the full process of creating strand-based hair or fur, shaping it artistically, assigning materials, and then animating its motion through physics or procedural setups. Since Blender 3.3 introduced the new Curves hair object, and through Blender 5.2 LTS in 2026, this increasingly relies on the hair curves system, the built-in Geometry Nodes hair node groups, guide-based styling, and production-aware caching.
In plain terms, grooming answers: what should the hair look like? Simulation answers: how should it move? If you confuse those two jobs, you usually get a groom that collapses under physics or a simulation that ignores the intended style.
Why does Hair Simulations and Grooming in Blender matter now?
The challenge is familiar. A team builds a convincing groom for a hero shot, then the first walk cycle starts and strands cut through cheeks, ears, collars, and shoulders. This concern has been raised repeatedly by the Blender community and also by Blender developers discussing the next generation of grooming tools in The Future of Hair Grooming on the Blender Developers Blog.
The pressure is even higher in commercial work. A single creature asset may need cinematic closeups, game-ready variants, marketplace previews, and client revisions. Hair must hold shape, react naturally, and stay manageable across rigs, versions, and render budgets.
Community discussions and training channels keep showing the same pattern. Artists can groom much earlier than they can simulate well. That gap creates missed deadlines, rework, and expensive cache reruns. The Blender Artists thread on hair grooming versus animation with the new hair system captures this tension clearly.
- Limited budgets: Hair scenes can become very heavy, so bad planning burns artist hours and GPU time.
- Fast iteration pressure: Startups and SMEs often need a good-enough groom fast, then a premium version later.
- Marketplace value: Hair quality often separates low-price assets from premium packs.
- IP exposure: Grooms, guide curves, hair textures, and baked caches are all reusable production assets that can be copied.
Which hair system should you use in Blender in 2026?
Blender now has three practical routes to moving hair, plus plain keyframing. They share grooming ideas but differ in how motion is produced:
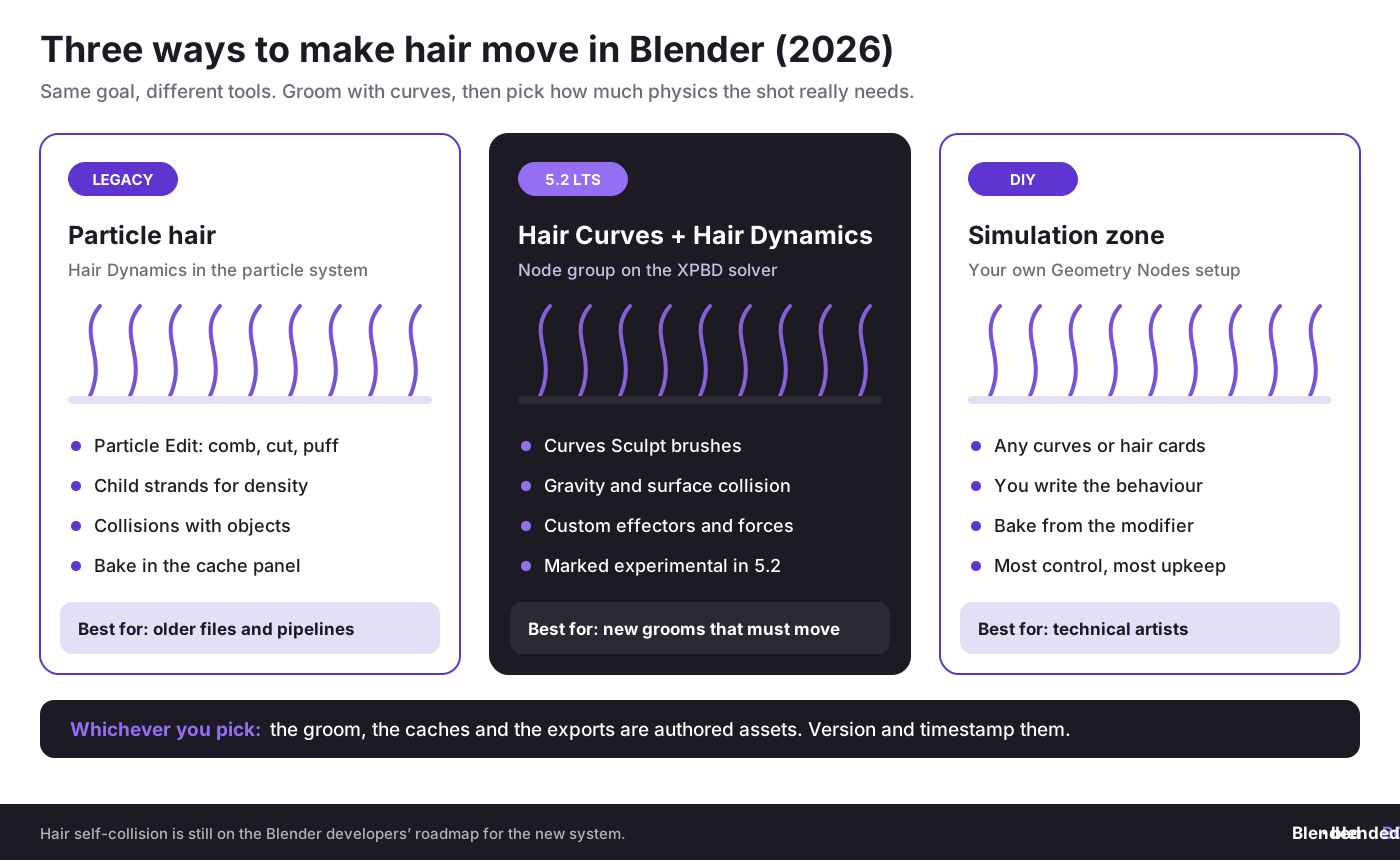
For most new character work, groom with Hair Curves and keep the legacy particle route for older files. Our particle systems guide covers the legacy hair settings in more detail.
Which fundamentals should you understand before touching the brushes?
Core concept 1: Hair curves are not old particle hair
Definition: Blender’s newer hair system treats hair more like editable curves and procedural data than the legacy particle-hair workflow. That gives better control over guides, brush behavior, and node-based processing.
Why it matters for teams: curves-based grooming is easier to transfer, vary, and art direct. It also fits modern node workflows much better. If your team still thinks in particle-hair habits only, your grooming decisions can become hard to maintain.
Blender example: a fur asset for an e-commerce mascot can use a low-count guide groom and then generate dense child strands procedurally for final render, keeping viewport work lighter. The introduction to Geometry Nodes explains the node basics behind this kind of setup.
Core concept 2: Guides control style, generated strands control density
Definition: guides are the sparse editable strands you comb, cut, smooth, curl, and part. Interpolated or generated strands follow those guides to create the visible hairstyle or fur coverage.
Why it matters for startups: guide-based thinking saves time. You are not styling every hair. You are styling the behavior of groups of hair.
Blender example: for a wolf groom, you may use different guide sets for guard hairs, undercoat, whiskers, and ear tufts. A training reference on photoreal fur from 80 Level’s Blender hair grooming tutorial for photorealistic animal fur shows how layered workflows create believable results.
Core concept 3: Simulation is a controlled compromise
Definition: hair simulation in production is rarely pure realism. It is a tuned system where stiffness, damping, collisions, clumping memory, pinning, and guide influence are adjusted to preserve the designed shape while still reacting to motion.
What changed in Blender 5.2 LTS: the July 2026 release added a first version of a new hair and cloth dynamics system built on Geometry Nodes. Hair Dynamics ships as a built-in node group asset on a new XPBD Solver node, with gravity and surface collision included and custom effectors for colliders and forces. The updated Empty Hair operator sets up the surface for you and adds a Capture Rest Geometry modifier to it. The system is still marked experimental, and hair self-collision is on the developers’ list of future improvements, so test it on a copy before you rely on it for client shots. The legacy particle hair system with its own Hair Dynamics is still available for older files.
Why it matters for business work: clients do not pay for physics purity. They pay for a believable result that stays on schedule. Long curly hair should not behave like a wet rope just because the solver can calculate it.
As Violetta Bonenkamp often argues in IP-heavy 3D workflows, the asset that survives production pressure is the asset that holds business value. Hair is a perfect example because style intent and technical control must stay linked.
How do you implement Hair Simulations and Grooming in Blender step by step?
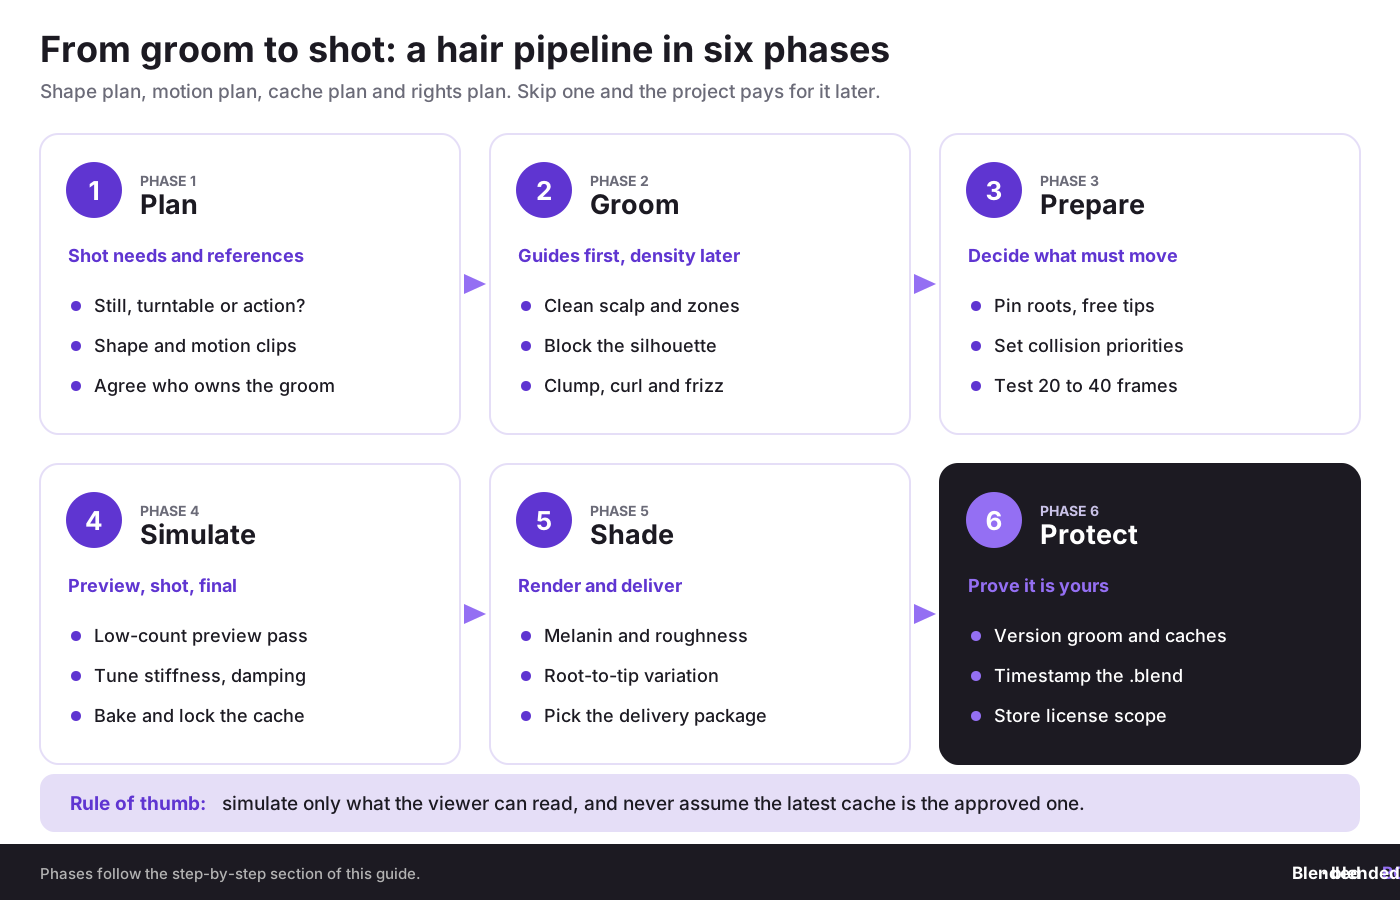
Phase 1: Assessment and planning
Here is why this phase matters. Most failed hair work starts with no target. Are you building peach fuzz, short fur, medium layered hair, long straight hair, tight curls, braids, or stylized clumps? Each one needs a different density, guide logic, collision plan, and shading setup.
- Audit your shot needs: still image, turntable, closeup facial acting, fast action, or wind-heavy sequence.
- Collect references: front, side, back, hairline, parting, silhouette, and movement clips.
- Map constraints: deadline, device memory, renderer, rig quality, clothing collisions, and delivery format.
- Define legal ownership: decide who owns the groom file, who owns the textures, and who may reuse caches or export data.
That last point is often ignored. Dirk-Jan Bonenkamp’s legal view is simple and sharp: if authorship, ownership, and transfer rights are not defined before files circulate, the dispute usually appears after commercial success, not before. In EU freelance production this matters a lot, especially across Dutch, German, French, and Polish subcontractor chains.
Phase 2: Building the groom foundation
Start with clean scalp topology or a clear fur-emission surface. Uneven normals, broken UV logic, or unstable rig deformation will sabotage hair before any brush stroke matters. If the head itself still needs work, start with sculpting character heads in Blender and clean retopology.
- Create emission zones: separate scalp regions, eyebrows, eyelashes, beard, body fur, and stray zones.
- Establish guide groups: top, fringe, sideburns, crown, nape, and secondary breakup areas.
- Block the silhouette first: ignore tiny flyaways until the big shape works from all camera angles.
- Add variation deliberately: clump size, length randomness, roughness, kink, and curl should support the style, not randomize it to death.
- Test under lighting early: hair that looks full in flat light may look sparse under rim light.
If you are using procedural setups, study how node-based control can support grooming logic before simulation. A helpful companion piece is Animation Nodes vs Geometry Nodes in Blender, because node thinking helps you separate repeatable controls from hand-made edits.
Phase 3: Preparing for simulation
Do not hit simulate the moment the groom looks decent. First reduce the system to what must move. Many productions simulate guides or selected sections, then derive visible density from that motion.
- Pin roots properly: weak root control creates sliding and shape collapse.
- Set collision priorities: scalp, forehead, ears, shoulders, collars, and hats.
- Separate rigid from mobile zones: bangs and tips may need more motion than crown sections.
- Use test frame ranges: 20 to 40 frames can reveal most failures before you bake long sequences.
- Define recovery behavior: does the hair return toward the groomed shape or hang loose after motion?
Phase 4: Simulating and caching
Hair simulation gets expensive fast, and poor cache discipline can wreck teamwork. Name caches clearly, version them by shot, and never assume the latest cache is the approved one. The same naming discipline from organizing multi-asset product packs works for hair caches.
A practical production rule is to run low-density previews first, then bake approved passes. If you need a wider view of cache discipline across physics workflows, review simulation baking for Blender performance. The same logic applies to hair, even if the article discusses cloth, smoke, and fluid from another angle. For the solver basics behind those systems, see physics simulations in Blender.
- Preview pass: low strand count, quick viewport checks, collision review.
- Shot pass: approved guide motion, tighter collision tuning, art-directed tweaks.
- Final bake: locked cache, renderer test, lighting review, and export archive.
Timestamp the groom before it leaves your machine
BlendedBoris registers your Blender files with a blockchain timestamp, so you can show which groom version you made and when, before you send it to a client or a marketplace.
👉 Protect your Blender hair assets
Phase 5: Shading, rendering, and delivery
Even the best simulation fails visually if shading is weak. Hair needs strand thickness logic, melanin or color variation, roughness breakup, root-tip modulation, and enough lighting contrast to reveal form.
For commercial delivery, decide what the buyer or client actually receives. Is it the .blend file, Alembic cache, preview renders, texture maps, groom guides, or a locked render-only package? This is where creative and legal discipline must meet.
Selling groomed characters or fur assets?
Before uploading to a marketplace or sending to a client, define what file package is part of the license and what stays internal. That alone can cut reuse disputes.
👉 Build a safer 3D asset business
Which grooming practices work best in 2026?
Practice 1: Build style in layers
What it is: create separate functional layers such as base volume, breakup layer, flyaways, and hero strands.
Why it works: layered hair is easier to art direct and easier to simulate partially. It also makes revision requests less painful.
How to do it: start with the silhouette layer, add support clumps, then add small irregularities. Keep stray hairs for the end. In animal grooms, split coarse and soft fur instead of forcing one setup to do both.
Common pitfall: too much noise too early. The result looks busy but unreadable.
Practice 2: Simulate only what the viewer can read
What it is: limit full simulation to sections that meaningfully contribute to motion on camera.
Why it works: most shots do not need every strand physically active. They need convincing motion where the eye focuses.
How to do it: keep the crown stiffer, free the tips, and use more movement around bangs, ponytails, curls, or fur edges. For background characters, fake the rest with shape variation and camera framing.
Common pitfall: simulating full density and then trying to rescue performance later.
Practice 3: Use references for motion, not just shape
What it is: gather phone clips or licensed references of real hair movement under similar head turns, walking speed, and wind conditions.
Why it works: artists often overanimate hair. Real hair lags, bunches, catches, and settles unevenly.
How to do it: compare reference on frame 1, peak motion, and settle frames. Tune stiffness and damping against that rhythm, not against guesswork.
Practice 4: Treat groom files as business assets
What it is: manage hair setups, caches, and exports like valuable design files, not temporary scraps.
Why it works: hero grooms take time to build, are easy to copy, and are often reused across shots, SKUs, or product lines.
How to do it: timestamp versions, assign authorship, log transfers, and match license terms to deliverables. This is where the CADChain way of thinking becomes useful even for Blender artists. Blockchain-backed proof is not a magic shield, but a file-history layer can strengthen evidence when ownership is challenged.
Dirk-Jan Bonenkamp’s legal angle fits 3D hair work perfectly: if you cannot show who created, changed, transferred, and licensed the asset, you are weaker in a dispute even when the art is clearly yours.
What are the most common mistakes in Hair Simulations and Grooming in Blender?
Mistake 1: Grooming without a motion plan
Artists often build a hairstyle for a still image and only later ask it to survive action. The impact is brutal. The groom falls straight down, clips through the body, or loses the intended volume. Test the groom on a real walk cycle before you call it finished.
How to avoid it: decide early whether the shot needs idle motion, dramatic movement, or near-static hold. Groom toward that target.
Mistake 2: Ignoring scalp design and emission zones
Bad placement at the roots causes sparse coverage, odd parting, and unnatural flow. Many beginners try to fix this with more density, which makes the scene heavier but not better.
How to avoid it: design your scalp map and region masks with as much care as the visible strands.
Mistake 3: Overtrusting collisions
Collisions help, but they are not a miracle. Hair will still need art direction, especially near ears, eyelashes, collars, and layered clothing. The idea that a perfect physics setting will remove all manual cleanup is fantasy.
Mistake 4: Baking too late or too chaotically
Teams often test endlessly in live mode, then bake at the last minute and discover version confusion, broken paths, or mismatched shot caches.
How to avoid it: adopt named bake checkpoints and archive approved caches by sequence and shot.
Mistake 5: Weak licensing and file-sharing control
This is the quiet killer for studios and asset sellers. A freelancer exports your groom. A client reuses the fur setup beyond the original contract. A marketplace buyer assumes resale rights. Nobody notices until the same hairstyle appears in a competing product.
How to avoid it: define license scope in writing, keep version evidence, and separate preview deliverables from editable source packages.
How should EU SMEs and startups protect Blender hair assets?
Let’s break it down. In Europe, copyright can arise automatically upon creation, but enforcement depends heavily on evidence, contracts, and jurisdictional detail. If a Dutch studio hires a contractor in Spain for grooming, then sends caches to a game team in Germany and a render vendor in Poland, ownership and permitted use must be defined before the files spread. Blender itself is free software under the GNU GPL, and the blender.org license page states that what you create with Blender is your sole property, so the groom belongs to whoever authored it or acquired the rights by contract. Read copyright basics for 3D artists and whether 3D models automatically have copyright before you sign a freelance deal.
- Record authorship early: keep dated drafts, source files, notes, and approval history.
- Use written assignment clauses: many SMEs wrongly assume payment equals ownership transfer.
- Separate source and delivery packages: send renders or locked exports unless editable strands are truly required.
- Track versions: hero groom v03 and v09 may have very different commercial value.
- Store licensing scope with the asset: internal use, one campaign, one game, one film, or perpetual use.
Violetta Bonenkamp’s position has long been that creators and engineering teams share the same hidden problem: once the file leaves your environment, control becomes weak unless technical, legal, and evidentiary layers support one another. That argument applies to Blender hair assets as much as to industrial CAD.
For digital artists, blockchain-backed certificates or file-fingerprint records should be seen as supporting evidence, not as a replacement for contract law or platform terms. Used well, they can help prove timeline, authorship, and transfer history. Used badly, they become expensive decoration. BlendedBoris adds a blockchain timestamp to your Blender work from inside Blender, so each approved groom version has dated evidence of authorship.
What metrics should you track on hair-heavy Blender projects?
Most teams track render time and forget everything else. That is too narrow. Hair production needs creative, technical, and commercial metrics together.
- Guide count: tells you whether the groom is getting bloated.
- Viewport playback speed: reveals whether artists can iterate sanely.
- Cache size per shot: important for storage and handoff planning.
- Collision-fix hours: one of the clearest hidden-cost numbers.
- Revision count per hairstyle: useful for pricing marketplace packs or client work.
- Licensing status: source-owned, client-owned, exclusive, or reusable internal asset.
How does the approach change by business stage?
Pre-seed and small studio stage
Your reality is limited budget and no appetite for week-long simulation experiments. Use simple guide counts, strong silhouette work, and selective motion. Prioritize sellable results over fully physical setups.
What to prioritize: workflow speed, repeatable asset types, clear contracts with freelancers.
Growing studio or Series A creative startup
Now you need repeatability across several characters or SKUs. Build naming standards, shot templates, and cache approval rules. Start documenting who created each groom and what parts are reusable.
What to prioritize: pipeline consistency, review loops, legal ownership of outsourced work.
Established studio, marketplace brand, or Series B plus
At this stage, hair becomes a library and a rights-management problem as much as an art problem. You may have recurring fur systems, character families, variant hairstyles, and multi-market licenses. A shared Asset Browser library keeps approved grooms, hair node setups and materials reusable.
What to prioritize: asset registry, delivery controls, permissions, and monetization of reusable groom systems.
What is a practical 4-week action plan?
- Week 1: pick one hero character or fur asset, collect shape and motion references, and define the business use case.
- Week 2: build the groom in layers, lock the silhouette, and test with basic rig motion.
- Week 3: simulate selected guide zones, tune collisions, and produce a test bake.
- Week 4: render approvals, archive versions, define the delivery package, and record ownership and license terms.
Glossary of useful terms
- Guide hair: editable strands that control the visible groom.
- Child strands: generated hairs that follow guide behavior for density.
- Collision object: geometry that prevents strands from passing through surfaces.
- Cache: saved simulation data used to replay motion without recalculating every frame.
- Alembic: a common interchange format for animated geometry and caches.
- Hair curves: Blender’s modern strand representation used for grooming workflows.
- Authorship evidence: records that help show who created an asset and when.
- License scope: the exact allowed use of an asset by a buyer, client, or partner.
Closing thoughts
Hair Simulations and Grooming in Blender rewards patience, but it punishes vague thinking. You need a shape plan, a motion plan, a cache plan, and a rights plan. Skip one of those and the project usually pays for it later.
The strong takeaway from both the Blender community and the CADChain founders’ perspective is simple. A groom is not just decoration. It is authored data with production cost, resale value, and legal weight. That makes hair work relevant not only to artists, but also to design leads, founders, IP teams, and digital-asset businesses.
If this article pushed you to think beyond brushes and into systems, the next smart step is to study how node-based workflows, effects logic, and broader production thinking connect across Blender. A natural follow-up is our guide to simulation baking for performance in cloth, fluid, and smoke, where the bigger production picture becomes much clearer.
Want your Blender pipeline to create value, not confusion?
When your assets become sellable IP, workflow discipline and ownership records matter as much as visual quality. Start building both from the same project file.
👉 Grow a safer Blender business
People Also Ask:
How can I create realistic hair simulations in Blender?
To create realistic hair simulations in Blender, you can use the legacy particle system combined with Hair Dynamics. Begin by adding a particle system to your object, set it to 'Hair,' and adjust its length and density to match your vision. Use combing and trimming tools to shape the strands. Activate Hair Dynamics to simulate movement and add physics for realism. Fine-tune settings like stiffness, damping, and collision to ensure natural results. Since Blender 3.3 you can also groom with the newer Hair Curves object and Geometry Nodes hair node groups, and Blender 5.2 LTS adds an experimental Hair Dynamics node group for curves.
What are the two main workflows for hair creation in Blender?
Blender offers two workflows for hair creation: procedural and destructive. The procedural workflow operates via Geometry Nodes or Hair Curves, making it effective for flexible, reusable setups. In contrast, the destructive workflow focuses on manual adjustments and is suitable for hero characters requiring precision styling. Choosing one depends on your project needs, with many artists combining both workflows for optimal results.
What tools are recommended for manual hair grooming in Blender?
Blender's manual grooming tools provide detailed control over hair styling. In Curves Sculpt mode these include the Comb, Snake Hook, Add, Delete, Density, Grow/Shrink, Pinch, Puff, Smooth and Slide brushes, which let you shape strands and groups of strands; the legacy particle Edit mode has Comb, Smooth, Add, Length, Puff and Cut. For additional precision, the Use Sculpt Collision option and the Shrinkwrap Hair Curves node group help keep hair from passing through the scalp. Manual adjustments are ideal for achieving highly stylized or custom hairstyles.
How do Hair Curves improve hair modeling in Blender?
Hair Curves, introduced in Blender 3.3 in 2022, simplify hair modeling as the successor to the older particle-based system, with a geometry-based approach. This method allows for more intuitive editing, better performance, and non-destructive workflows. Artists can easily switch between styles without losing prior work.
Can Blender simulations handle curly or braided hairstyles?
Yes, Blender is well-equipped to handle complex hairstyles like curls and braids. Geometry Nodes offer a way to create wave patterns, and the built-in Curl Hair Curves and Braid Hair Curves node groups help with curls and braids. Hair particle settings like clump and kink are also effective for curls, allowing detailed control over tension and spiral angles.
Is Blender suitable for creating animal fur?
Blender is highly effective for creating animal fur. Detailed setups involve particle systems, texture painting, and hair shader materials. Tutorials often guide users through layering shorter and longer fur strands, simulating movement with soft physics, and adding color variation through texture maps.
How does Blender's Hair Dynamics enhance realism?
Hair Dynamics in Blender adds motion and interaction to hair strands, making them respond naturally to forces like gravity and wind. It accounts for collisions with objects; the new curves-based Hair Dynamics in Blender 5.2 LTS includes surface collision, while hair self-collision is still on the developers’ to-do list. Adjusting settings such as stiffness, mass, and damping can create a more lifelike appearance.
What are the key differences between older and newer Blender hair systems?
Earlier Blender versions relied on particle systems for hair, which were less intuitive and harder to modify. Newer systems like Hair Curves and Geometry Nodes prioritize usability and flexibility, enabling real-time edits and advanced stylization without destructive changes.
Are tutorials available for mastering Blender hair grooming?
Yes, many tutorials are available for both beginners and advanced users. These guides cover everything from basic setups to advanced workflows, such as simulating realistic movement or designing complex hairstyles. YouTube, Udemy, and community forums are valuable resources for learning.
What are the best practices for animating hair in Blender?
For animating hair, keyframe interpolation and the Hair Dynamics feature are essential. Use forces like wind and turbulence for natural movement, and ensure collision settings are enabled for interactions with characters or objects. Test simulations frequently to avoid clipping or unnatural behavior.
FAQ on Hair Simulations and Grooming in Blender
How can teams improve the realism of hair motion in Blender animations?
To enhance realism, combine simulation with manual adjustments, focus on guide physics settings like stiffness and damping, and use references of real-life hair movement. Test short frame ranges before full bakes to identify clipping or unnatural motion. Explore tutorials like the Dynamic Hair Simulation tutorial for practical steps.
What are the biggest challenges with Blender’s hair simulation tools?
The main challenges are controlling collisions, maintaining the groom's original style under simulation, and dealing with performance bottlenecks during high-density hair simulations. Teams should prioritize testing settings with low-density strands to avoid costly revisions later.
Why are hair curves better than the legacy particle system in Blender?
Hair curves in Blender provide more precise control over grooming with editable guides and integrate seamlessly with geometry nodes. This makes it easier to create variations and maintain visual quality across iterations. Learn more in the Blender Manual on Curves Sculpt mode.
What should artists know about shading and materials for hair in Blender?
Shading should reflect natural hair properties, including root-to-tip transparency variation, anisotropic highlights, and subtle color gradients. Ensure material nodes are optimized for both performance and appearance in your final renders.
Can dynamic hair simulations slow down production pipelines?
Yes, dynamic simulations are resource-intensive. Use low-density previews to test motion, limit simulation to essential sections, and predefine collision zones. Plan for additional bake times when working with complex hairstyles to avoid pipeline bottlenecks.
What steps can help create robust hair assets for shared production workflows?
Version files clearly, separate guides and child strands, and document simulation parameters. Use locked caches for approved simulations to maintain consistency across teams. Metadata and licensing notes are particularly important for client or marketplace use.
How does hair react to environmental factors like wind in Blender?
Hair reacts to environmental forces like wind if force fields are added to the scene. Calibrate the wind’s strength and direction to ensure believable movement while preserving style intent. Test effects incrementally to avoid drastic simulation errors.
Are there workflow differences for stylized hair in Blender?
Stylized hair typically involves exaggerated shapes, fewer strands, and vibrant materials. Use guide layers to define bold silhouettes and animation-friendly motion paths. Stylized looks often rely more on artistic brushwork than physics-driven simulation.
What are some time-saving tips for grooming complex characters?
Focus on grooming base layers first and progressively add details. Use symmetry for initial setups and rely on procedural density settings for finer strand additions. Refer to tutorials like those on the Blender Hair Tutorials playlist for specialized tools.
How should small studios protect their hair assets from misuse?
Define clear licenses, watermark preview files, and limit editable file distribution. Maintain version control and include metadata to trace authorship. Photorealistic assets are easily reused, so secure your deliverables with locked versions where possible.


