
TL;DR: Motion Graphics in Blender Using Geometry Nodes gives you faster, reusable animation systems instead of hand-built scenes.
You can build loops, product visuals, text systems, and abstract motion by controlling instances, fields, and time in one procedural setup. This cuts revision time, keeps brand output consistent, and makes it easier to version, license, and prove ownership of the source file across teams and clients. The article also warns you to avoid bloated node trees, early instance realization, and messy file handoffs, because the editable graph often holds more business value than the final render.
👉 Want to go further with VFX and simulation too? Read advanced Blender techniques for the next step.
Motion graphics in Blender with Geometry Nodes: build systems, not single shots
Motion Graphics in Blender Using Geometry Nodes starts with a simple question: why are so many teams still building repeatable animation by hand when Blender can generate, vary, and animate entire systems procedurally?
Motion graphics in this context means animated visual systems such as repeating forms, text treatments, abstract loops, product reveals, logo transitions, particle-like arrays, and data-inspired visuals. Geometry Nodes in Blender is the node-based procedural system that builds and modifies geometry, instances, attributes, and animation logic without destructive edits.
For engineers, designers, SMEs, startups, and IP professionals, that matters because procedural motion graphics shorten revision cycles, make brand systems easier to maintain, and create reusable assets that can be licensed, versioned, and protected more cleanly than one-off manual scenes. From the perspective of CADChain co-founders Violetta Bonenkamp and Dirk-Jan Bonenkamp, the real issue is not just visual quality. It is CONTROL, authorship, reuse rights, and proof of creative contribution across a distributed digital workflow.
A procedural node tree is not just an artistic setup. It is a record of creative logic, authorship choices, and production value that can become commercially and legally relevant once assets start moving across teams, clients, and marketplaces.
Violetta Bonenkamp, CEO and co-founder, CADChain
Protect your Blender work before it starts circulating.
If you build procedural assets, loops, or reusable node setups, document ownership early and keep a clean version trail for client work and marketplace sales. BlendedBoris adds a blockchain timestamp to your Blender files from inside Blender, so every version of a node setup carries dated proof of who made it.
👉 See how BlendedBoris protects your Blender files
What is Motion Graphics in Blender Using Geometry Nodes?
Motion Graphics in Blender Using Geometry Nodes is a procedural animation workflow where you generate forms, distributions, offsets, timing patterns, deformations, and variations through nodes instead of hand-editing each object. In Blender, this usually combines geometry generation, instance control, fields, attributes, materials, drivers, scene time, and in some cases simulation.
For startups and SMEs, this serves as a reusable content engine. A single node graph can output ten campaign variations, localized versions for EU markets, or product sequences for trade fairs in Germany, the Netherlands, or France with far less manual scene rebuilding.
Why it matters for your business: unlike purely keyframed object-by-object animation, a geometry-nodes-based setup keeps structure consistent while making variation cheap. That is useful when your team needs social loops, web hero animations, explainers, investor-deck visuals, or 3D marketplace products built from the same visual language.
What should readers expect from this guide?
By the end of this guide, you will understand how Motion Graphics in Blender Using Geometry Nodes works in production, how to build a repeatable setup, how to avoid common procedural mistakes, what metrics matter when you commercialize the output, and where copyright and evidence issues begin once files are shared with clients or collaborators.
Why does this matter now for EU creators, startups, and manufacturing-facing teams?
The challenge is simple. Teams need more animated content than ever, but they also face tighter budgets, shorter deadlines, and more asset reuse across channels. In 2026, a single Blender scene may feed LinkedIn ads, product pages, conference loops, onboarding videos, Kickstarter pages, and 3D marketplace packs.
Geometry Nodes tutorials keep appearing because procedural workflows reduce repetitive labor. Public learning signals from sources such as School of Motion’s looping animation guide for Blender Geometry Nodes, community Q&A threads, and video tutorials all point to the same trend: artists and technical designers want repeatable systems, not just isolated shots.
Violetta Bonenkamp often frames this from a founder angle. If your visual pipeline depends on manual repetition, you lose margin. If your visual assets are procedural, documented, and reusable, you gain a stronger business position. Dirk-Jan Bonenkamp adds the legal angle: once a procedural asset generates value, the burden shifts to proving who created it, who licensed it, and what exactly was transferred.
Here is why this matters even more in Europe. Many SMEs work with external freelancers, distributed agencies, and hybrid in-house teams across borders. A Dutch startup may brief a Blender artist in Poland, a motion designer in Spain, and a product marketer in Belgium. Without clean ownership records, editable source control, and contract clarity, the same procedural asset can become a dispute rather than a business asset.
- Limited resources: procedural setups reduce repeated scene building.
- Rapid campaign turnover: one node tree can create many brand-consistent variants.
- Cross-team reuse: designers, marketers, and technical artists can work from the same system.
- IP visibility: procedural logic creates traceable creative decisions that are easier to document than loosely scattered manual edits.
Which fundamentals actually matter before you animate anything?
Core concept 1: Instances
Definition: instances are repeated copies of geometry that reference the same source object or geometry data. In Geometry Nodes, they are the backbone of many motion graphics setups because they let you place hundreds or thousands of elements without turning the scene into a heavy mesh too early.
Why it matters for business use: instances keep scenes lighter and faster while you design variation systems. That makes client review easier and also reduces revision pain when art direction changes.
Blender example: you can instance cylinders on a grid, offset their scale with a noise field, animate the field through scene time, and create an audio-reactive-looking surface without manually touching each cylinder.
Related terms: Instance on Points, Realize Instances, point distribution, index, fields.
Core concept 2: Fields and attributes
Definition: fields are systems that evaluate values over geometry context such as position, normal, index, or time. Attributes are stored data linked to elements like points, edges, faces, curves, or instances.
Why it matters: this is where motion graphics becomes procedural rather than repetitive. Once you control scale, rotation, color, offset, or visibility through fields, you are designing a system instead of a static scene.
Blender example: using the Index node to offset each instance in time creates wave behavior across an array, a method discussed in Ryosuke’s write-up on Geometry Nodes for motion graphics.
Related terms: index, position, random value, named attribute, capture attribute, scene time.
Core concept 3: Time control
Definition: time control means any method that makes your node system change over frames. In Blender this can come from Scene Time, keyframes, drivers, math offsets, textures, simulation state, or external data.
Why it matters: without time control, you only have procedural modeling. With time control, you have motion design.
Blender example: animate a 3D noise texture moving through Z-space and use it to displace a field of circles or lines. Because the texture moves, every element samples a slightly different value on each frame, which reads as flowing motion.
Related terms: scene time, drivers, keyframes, looping, phase offset.
How do you implement Motion Graphics in Blender Using Geometry Nodes step by step?
Phase 1: Assessment and planning
Before opening the Geometry Nodes editor, define what the motion graphic must do. This sounds obvious, yet many teams skip it and build beautiful setups that fail in production. Ask four practical questions: what is the message, what repeats, what changes between versions, and what must stay editable until final approval?
- Audit your scene goal. Is this a loop, a logo sting, a product reveal, a social ad, or a marketplace asset pack?
- Identify the variable layer. Will you vary count, spacing, timing, color, scale, text, camera path, or surface distribution?
- Define render constraints. Eevee for speed, Cycles for higher realism, or viewport previews for approvals. Our Eevee vs Cycles comparison helps you pick.
- Map ownership and delivery. Decide whether the client receives final renders only, a locked .blend, or editable node groups.
For procedural product visuals, teams often benefit from a parametric mindset. If your work sits between design and engineering, thinking in parameters is a useful habit because many motion graphics systems are really parametric design systems with animation layered on top.
Phase 2: Build the foundation node graph
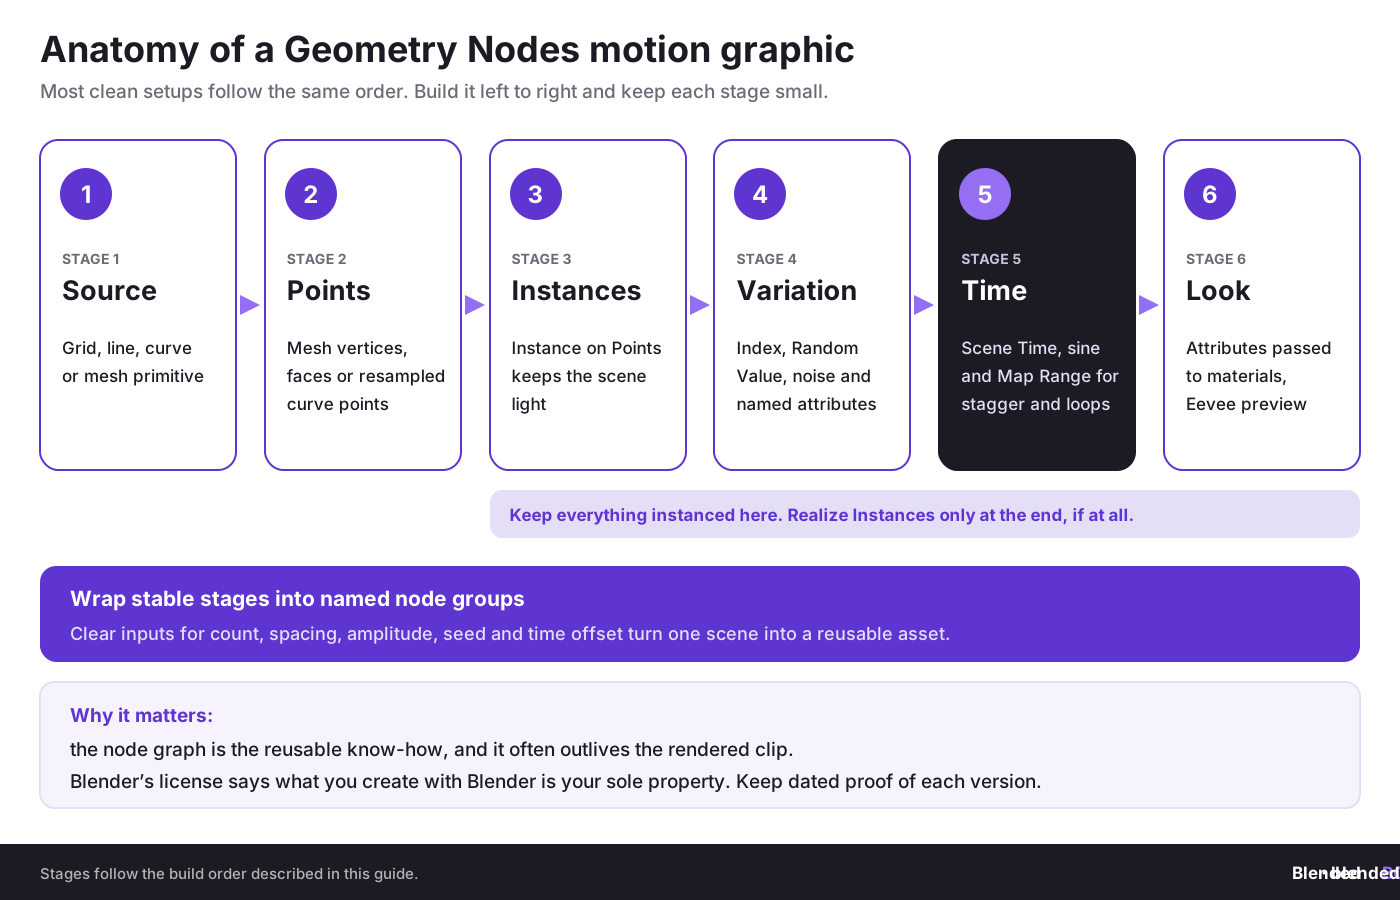
Start with a minimal graph. Resist the temptation to throw in random nodes just because a tutorial used them. Most strong motion graphics setups in Blender come from a clean sequence: generate points or curves, place instances, control transforms with fields, add materials, then animate.
- Geometry source: grid, line, curve, mesh primitive, or imported object.
- Distribution logic: mesh vertices, points on faces, resampled curve points, or custom point generation.
- Instance logic: place objects or procedural primitives on those points.
- Variation logic: use index, noise, random value, proximity, or named attributes.
- Animation logic: offset values with Scene Time, sine waves, color ramps, and math nodes.
A classic beginner-friendly setup is a grid of cubes or cylinders where height changes over time through a wave texture or noise field. This gives you the motion-design fundamentals immediately: repetition, variation, timing, rhythm, and shading response.
Phase 3: Add timing, loops, and art direction
This is where many Blender users either win or ruin the scene. Good motion graphics is not just movement. It is controlled movement. Use time offsets so elements do not all animate at once. Use ranges and clamps so the animation has readable limits. And test loops early, not at the end.
- Use index-based offsets for staggered timing.
- Use sine or wave logic for rhythmic looping.
- Use color ramps to art-direct falloff instead of leaving raw noise.
- Preview in Eevee to test speed, silhouette, and material response.
- Switch to Cycles only if the scene truly needs higher-fidelity lighting or transparency behavior.
The Procedural Motion Graphics with Geometry Nodes tutorial on YouTube, recorded for Blender 2.92, remains a useful reference point for understanding how attribute-driven motion evolved into current node workflows, even though Blender’s node system has matured since those earlier versions.
Need a stronger procedural base before you animate?
A lot of bad motion graphics comes from weak geometry logic. Start with cleaner node structures, then layer animation on top.
👉 Strengthen your procedural foundation
What are the best motion graphics setups to build first in Blender?
1. Animated instance grids
These are ideal for product-tech visuals, abstract loops, and data-branding scenes. Build a grid, place instances, then drive scale, rotation, or position with time and fields. This works well for startup landing pages and industrial dashboards because the result feels technical without requiring character animation.
2. Curve-based line systems
Curves are excellent for clean motion design. Use resampled curves, trim logic, and curve-to-mesh for animated strokes, ribbons, or paths. Add per-point offset for wave travel. This is useful for explainer sequences in medtech, manufacturing, and SaaS.
3. Typographic motion systems
Text remains a weaker area in Blender than in dedicated motion tools, but Geometry Nodes can still support procedural text-based layouts: the String to Curves node turns text into curves, so each character can be offset, scaled or revealed on its own. The ongoing community interest around text mograph tools is visible in the Blender developer discussion on text mograph node design.
4. Surface-driven abstract forms
Place instances on a product mesh or abstract surface, then vary them by normal, curvature, position, or proximity. This works very well for automotive-style reveals, cosmetics packaging loops, and technical hero animations.
5. Looping procedural deformations
Looping is commercially valuable because it suits websites, booths, social clips, and app backgrounds, especially when you render with a transparent background for layering. Many of the cleanest loops come from periodic math functions, not random noise alone. If the loop breaks, the asset loses commercial polish immediately.
Here is how the five setups compare before you pick one:
What works best in 2026 for professional Blender motion graphics?
Practice 1: Build node groups as products, not just scene fixes
What it is: package repeated logic into named node groups with exposed controls for count, spacing, amplitude, seed, time offset, and material behavior.
Why it works: reusable node groups make versioning easier and turn your animation logic into an asset that can be deployed across campaigns or sold in a marketplace.
How to implement:
- Wrap stable logic into groups early.
- Name every exposed parameter clearly.
- Save a clean template file with preview outputs and documentation.
Common pitfall: hiding messy logic inside a node group without structure.
How to avoid it: document inputs, keep defaults sensible, and test from a fresh file.
Metrics to track: revision time, file reuse rate, template adoption.
How to avoid it: document inputs, keep defaults sensible, and test from a fresh file.
Metrics to track: revision time, file reuse rate, template adoption.
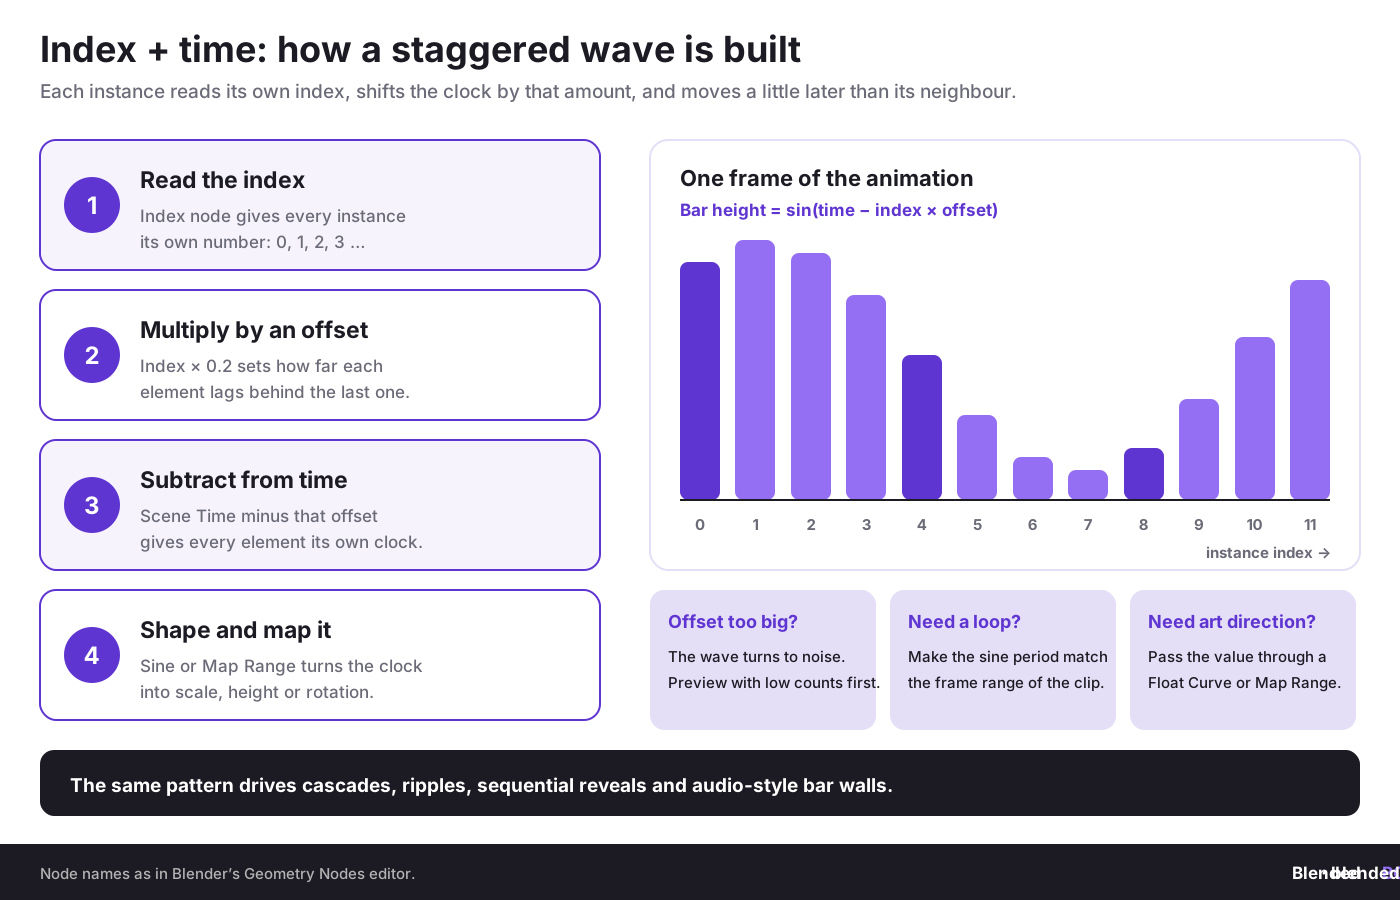
Practice 2: Use index and time together for controlled stagger
What it is: combining per-element index with time offsets to create waves, cascades, and sequential reveals.
Why it works: the eye reads ordered variation better than uniform motion. It creates rhythm and hierarchy, both central to motion design and to the animation principles of timing and spacing.
How to implement:
- Capture or read the index.
- Multiply by an offset factor.
- Add that result to time-driven math before sending it to scale, rotation, or position.
Common pitfall: offsets that are too strong and break readability.
How to avoid it: preview on low counts first, then scale up.
Metrics to track: readability in first 3 seconds, loop smoothness, client approval speed.
How to avoid it: preview on low counts first, then scale up.
Metrics to track: readability in first 3 seconds, loop smoothness, client approval speed.
Practice 3: Separate geometry logic from shading logic
What it is: keep geometry generation clean, then pass attributes to materials rather than mixing all visual decisions directly inside geometry logic.
Why it works: it makes the scene easier to change and reduces the risk of breaking animation when you only want to change the look. If shader nodes are new to you, start with node editor basics.
How to implement:
- Store useful values such as height, offset, or mask as attributes.
- Read those values in the shader where needed.
- Keep material versions separate for style testing.
Common pitfall: baking too much art direction into one giant geometry graph.
How to avoid it: pass clear data downstream and shade later.
Metrics to track: look-dev turnaround, graph size, bug rate after style changes.
How to avoid it: pass clear data downstream and shade later.
Metrics to track: look-dev turnaround, graph size, bug rate after style changes.
Practice 4: Plan IP and delivery terms before client handoff
What it is: deciding upfront whether the buyer receives rendered video, editable .blend files, reusable node groups, source textures, or the full procedural system with commercial rights.
Why it works: many disputes start after delivery, not before production. Procedural assets often hold more value than the final rendered clip because they can generate future work.
How to implement:
- State deliverables in writing.
- Separate source files from outputs in the contract.
- Keep dated versions and authorship records of major graph changes.
Common pitfall: sending the editable scene as a convenience and losing control over reuse.
How to avoid it: license source access deliberately, not casually.
Metrics to track: source-file requests, reuse fees, dispute frequency.
How to avoid it: license source access deliberately, not casually.
Metrics to track: source-file requests, reuse fees, dispute frequency.
Where do artists and SMEs make the biggest mistakes?
Mistake 1: Building giant node trees before proving the visual idea
Founders and artists both make this mistake because they confuse procedural power with production sense. The impact is obvious: bloated graphs, slow revisions, and scenes nobody wants to touch. Fix it by testing the visual thesis with the smallest possible graph first. If you already overbuilt it, isolate the one behavior that matters and rebuild around that.
Mistake 2: Realizing instances too early
This kills viewport performance and often turns a flexible system into a heavy mesh mess. Keep things instanced until you truly need unique geometry behavior. Recovery means moving the Realize Instances node later in the graph or redesigning the part that forced early realization.
Mistake 3: Treating tutorials as finished production methods
A tutorial solves one visual problem. A production setup solves revision, naming, speed, handoff, and maintainability. Use tutorials for principles, not as law. Then refactor. If you skip this, every client change becomes expensive.
Mistake 4: No authorship trail for procedural source files
This one matters far more than many Blender users admit. The moment a procedural setup is sold, licensed, or shared, its node graph becomes a business asset. From Dirk-Jan Bonenkamp’s legal point of view, evidence loses force when version history is weak, file provenance is unclear, and contributor roles were never recorded. If you already made this mistake, gather dated exports, invoices, messages, draft files, and repository logs now, before a dispute appears.
In digital design disputes, the side with the cleaner timeline often looks more credible than the side with the louder opinion.
Dirk-Jan Bonenkamp, CLO and co-founder, CADChain
How should you measure success with procedural motion graphics?
Foundational metrics
- Revision time per scene: how long a new version takes after client comments.
- Render cost per deliverable: useful for agencies and SMEs with tight production budgets.
- Template reuse rate: how often one graph powers more than one campaign or sale.
- Approval round count: a direct signal of clarity and usability.
Advanced metrics after a few months
- Marketplace conversion rate: if you sell node setups, procedural kits, or animated assets.
- Licensing revenue per source asset: the amount earned from editable systems versus final renders.
- Dispute-prevention score: a practical internal metric based on contract clarity, source control, and asset registration coverage.
- Cross-channel output count: how many deliverables come from one procedural setup.
For SMEs, this matters because motion graphics should not be judged only by aesthetics. A beautiful node setup that cannot be reused or monetized properly is a weak business asset.
What does the workflow look like at different business stages?
Pre-seed or seed stage
Your reality: small team, limited budget, high need for polished visuals. Approach: build simple template-based loops and hero animations from one modular system. Prioritize: speed, consistency, and ownership clarity. Defer: overcomplicated simulations unless the visual payoff is obvious. Success looks like: one Blender system generating website, pitch, and social assets for the same brand.
Series A stage
Your reality: more campaigns, more stakeholders, stronger need for consistency. Approach: formalize node libraries, naming, asset handoff rules, and brand motion language. Prioritize: repeatability and team onboarding. Defer: custom one-off graphs for every campaign. Success looks like: a motion design kit that several team members can use safely.
Series B and beyond
Your reality: scale, legal exposure, many partners, bigger content demand. Approach: treat procedural assets as controlled IP. Track versions, contributor roles, and licensing terms. Prioritize: governance of source files and approved asset libraries. Defer: informal freelancer handoffs without source and rights documentation. Success looks like: a library of reusable procedural motion assets with clear commercial rights.
Want motion with physics-style behavior too?
Some of the strongest Blender motion systems now mix Geometry Nodes with simulation logic for trails and controlled secondary motion.
👉 See how Blender’s simulation tools extend the workflow
What does copyright and proof of ownership look like for Geometry Nodes work?
This is where the Blended BORIS angle becomes useful. Many Blender artists assume copyright attaches automatically, which is broadly true for original creative work in Europe. But legal rights and practical enforceability are not the same thing. If a client, collaborator, or marketplace dispute appears, you will need evidence, not vibes.
From Violetta Bonenkamp’s perspective, creators should think of a procedural Blender file as a layered asset. The final render is one layer. The .blend source is another. The node graph logic is another. Embedded materials, imported geometry, linked textures, and external add-ons may each carry different rights and restrictions.
Dirk-Jan Bonenkamp would push the next step: define what is being licensed. Is it video output only? Editable source? Internal-use license? Commercial resale rights? Exclusive transfer? In EU business practice, especially for SMEs working across borders, lack of specificity creates needless exposure.
- Keep dated source versions with clear filenames and change notes.
- Store client approvals tied to scene versions.
- Separate third-party assets from original procedural logic.
- State transfer terms clearly in contracts and invoices.
- Consider certificates, hashes, or ownership records if the asset has long-term commercial value.
For artists selling procedural setups on marketplaces, this can become even more serious. If buyers resell your node group, rename your .blend, or strip credits, a clean evidence trail becomes commercially useful. Blockchain-backed records are not magic, and Violetta has been clear on this point in CADChain-related work. They are infrastructure for evidence and audit trails, not a substitute for contracts or copyright law.
Blender’s license page is clear on ownership: “What you create with Blender is your sole property.” Proving it later is a separate job. BlendedBoris adds a blockchain timestamp to your Blender files from inside Blender, so each version of a node group, loop or motion template carries dated evidence of who made it and when. For the legal background, read copyright basics for 3D artists and whether 3D models automatically have copyright.
What practical weekly action plan should you follow?
Week 1: Research and intent
- Pick one motion graphics format to build, such as a 6-second loop or website hero.
- Collect 5 reference clips and identify the repeated system behind them.
- Decide what needs to stay editable until delivery.
- Define whether you are selling renders, source, or both.
Week 2: Prototype the system
- Build the smallest working node graph.
- Test index-based variation and one time-control method.
- Render viewport previews for review.
- Name node groups and exposed controls properly.
Week 3: Production cleanup
- Separate geometry logic from shading.
- Create a loop-safe timeline.
- Prepare render settings for Eevee or Cycles, following how to render animations efficiently.
- Archive the first clean version with date and notes.
Week 4 and beyond: Reuse and protect
- Turn repeatable logic into a reusable asset.
- Track how many deliverables come from the same graph.
- Attach contract language to future handoffs.
- Register or record ownership evidence for commercially valuable source files.
Glossary of terms you should know
- Geometry Nodes: Blender’s node-based system for generating and modifying geometry procedurally.
- Instance: a repeated reference to geometry that stays lightweight until realized.
- Field: a context-aware value evaluated across geometry, such as position or index.
- Scene Time: a node input used to drive time-based changes over frames.
- Realize Instances: a node that converts instances into actual geometry elements.
- Procedural asset: a reusable system whose output is generated by rules rather than manual edits.
- Authorship evidence: records that support who created or modified a digital asset and when.
Key takeaways for teams using Motion Graphics in Blender Using Geometry Nodes
- Motion Graphics in Blender Using Geometry Nodes is a business workflow, not just an artistic trick. It saves time, creates reusable systems, and supports fast campaign variation.
- The clean path is clear: define the message, build a minimal graph, add controlled timing, then package the result for reuse.
- Most failures come from overbuilt graphs, weak timing logic, and poor source-file discipline.
- Commercial value often sits in the editable node setup, not just the final render. That means delivery terms and ownership evidence matter.
- EU startups and SMEs should treat procedural Blender assets like valuable IP. Especially when teams, agencies, and freelancers work across borders.
Closing thoughts: where should you go next after Geometry Nodes motion graphics?
Procedural motion graphics is often the gateway drug. Once you see what Geometry Nodes can do for repeatable animation, the natural next question is how far the pipeline can go when you add effects logic, simulation behavior, and more advanced production structure.
That is also where the CADChain and Blended BORIS perspective becomes sharper. The more valuable your procedural setups become, the more they need to be treated as traceable creative systems with ownership logic, licensing intent, and controlled reuse. Pretty visuals are nice. Defensible visual assets are better.
If this article pushed you from curiosity into production thinking, the next smart read is Advanced Blender Techniques: Geometry Nodes, VFX and Simulation Pipelines. It connects the procedural motion layer you just learned with the broader pipeline decisions that separate hobby experiments from serious commercial Blender work.
Selling or licensing procedural motion setups?
Node groups, loop templates and editable .blend files can be worth more than the rendered clip, so treat them like IP assets, not casual attachments. BlendedBoris timestamps your .blend files on the blockchain from inside Blender, so you can show who made each version before it reaches a client or a marketplace.
👉 Timestamp your Blender work with BlendedBoris
People Also Ask:
Is motion graphics possible in Blender?
Yes, motion graphics can be created in Blender, including advanced techniques with Geometry Nodes. Blender Studio’s Geometry Nodes from Scratch course covers the fundamentals, and our guide to abstract motion graphics in Blender shows typical results.
Can geometry nodes animate objects in Blender?
Geometry nodes support animation, allowing dynamic changes and seamless control of object transformations and behaviors over time.
What makes Blender suitable for motion graphics?
Blender offers extensive customization with geometry nodes, modifiers, and an intuitive interface, making it ideal for professional and amateur motion graphic designs.
How do geometry nodes enhance motion graphics in Blender?
Geometry nodes simplify procedural workflows, enabling precise control of complex designs and animation patterns without manual adjustments.
What are examples of geometry nodes projects in Blender?
Geometry nodes have been used for particle effects, abstract animations, and customizable geometric patterns. Tutorials showcase applications like procedural landscapes and logo animations.
Which Blender features complement geometry nodes for motion design?
The shader editor, animation tools, and physics simulations work alongside geometry nodes, creating cohesive and intricate graphic visuals.
Are free geometry nodes project files available for practice?
Free files are widely shared by creators on platforms like Blender Artists, Reddit forums, and tutorials on YouTube, providing hands-on practice opportunities.
What can geometry nodes achieve compared to modifiers?
Geometry nodes offer higher flexibility and procedural control, surpassing modifiers by enabling non-linear workflows suited for intricate designs.
Do professionals favor Blender for motion graphics?
Yes, professionals choose Blender for its cost-free access and powerful tools, with geometry nodes being particularly noted for depth and customization.
What software rivals Blender in motion graphics?
Other popular tools include Adobe After Effects, Cinema 4D, and Houdini, but Blender stands out for its price point and modern procedural capabilities.
FAQ on Motion Graphics in Blender Using Geometry Nodes
What makes procedural motion graphics in Blender stand out?
Procedural motion graphics enable repeatable systems, faster revisions, and brand-consistent visuals. Unlike manual keyframing, they use rules and node logic for flexibility and scalability, ideal for startups and SMEs. For advanced examples, explore Abstract Animations in Blender.
What industries benefit most from motion graphics in Blender?
Industries like architecture, manufacturing, SaaS, and gaming benefit from Blender motion graphics to enhance communication, demonstrate concepts, and lower animation costs. Geometry Nodes excel in creating scalable, data-driven visuals that align with technical needs.
How do Geometry Nodes compare to Animation Nodes in Blender?
Animation Nodes is a third-party add-on built for motion-graphics style node animation, while Geometry Nodes is built into Blender and keeps being developed with each release. For new projects, Geometry Nodes is usually the safer choice because it ships with Blender. Check Animation Nodes vs Geometry Nodes for detailed insights.
How can Geometry Nodes improve logo animations and transitions?
Geometry Nodes allows procedural control over logo reveals, transitions, and text treatments, making motion systems adaptable for firms needing consistent styles during branding campaigns. Nodes simplify repetitive tasks and support scalable outputs.
Can Geometry Nodes handle looping animations successfully?
Yes, Geometry Nodes excel in creating looping animations using math nodes, noise textures, and time-based controls. Loops are ideal for social media banners, web backgrounds, and trade show visuals due to their cyclical predictability.
How do procedural workflows save time during content creation?
Procedural workflows reduce manual repetition by automating design logic, enabling faster revisions and dynamic variants. SMEs gain efficiency across platforms like LinkedIn, YouTube, and conference screens without rebuilding scenes from scratch.
What are key copyright concerns with procedural assets in Blender?
Procedural setups often hold more value than renders, making ownership documentation vital. Record dated versions, approval trails, and export clear contracts for IP protection. Legal clarity ensures smooth client handoffs and dispute prevention.
Can Geometry Nodes handle simulations alongside procedural modeling?
Yes. Since Blender 3.6, Geometry Nodes include Simulation Zones, where the result of one frame feeds the next. They suit trails, growth effects and particle-like secondary motion, and the results can be baked once approved. For cloth, liquids and smoke, Blender’s built-in physics solvers remain the usual tool.
What are practical first steps for beginners using Geometry Nodes?
Start with simple grids or curves, use instance nodes, and explore field-based variations. Avoid overcomplicated graphs initially. Our Geometry Nodes introduction to procedural animation and the node editor basics guide are good places to start.
What advantages does Blender offer over other motion design software?
Blender combines node-based workflows with real-time rendering through Eevee, supporting faster visualization. It avoids destructive edits and is free and open source, so there are no licensing fees and studios can customize it with Python add-ons.


