

TL;DR: Advanced Blender Techniques: Geometry Nodes, VFX & Simulation Pipelines help you turn Blender work into a repeatable production system, not a fragile one-off scene.
If you want faster variants, fewer rebuilds, steadier simulation results, and cleaner handoffs, you need procedural asset logic, early baking, planned compositing, and clear control over editable source files. The article’s main point is simple: your team gets more speed, stronger file provenance, and better legal protection when Blender scenes are treated like business assets. It also shows a 12-week path to audit your setup, build reusable node groups, control caches, and separate source logic from client-facing exports.
👉 For more on protecting source files and ownership records, check this Blender IP guide and review your pipeline before the next handoff.
Advanced Blender techniques: how Geometry Nodes, VFX and simulations become one pipeline
Advanced Blender Techniques: Geometry Nodes, VFX & Simulation Pipelines start with a hard question: are you building impressive scenes, or are you building a repeatable production system that survives deadlines, handoffs, and IP risk?
For Blender artists, engineers, design teams, and EU SMEs, advanced work is no longer about one clever node tree or one beautiful explosion. It is about procedural control, predictable simulation behavior, clean compositing, and defensible ownership records when assets move across freelancers, studios, and clients.
From the point of view of Violetta Bonenkamp, co-founder of CADChain, and Dirk-Jan Bonenkamp, CLO at CADChain, the real dividing line in 2026 is simple. Teams that treat Blender as a toy lose time and control. Teams that treat Blender as a production asset environment gain speed, auditability, and better legal footing.
What is this topic, in plain terms? Advanced Blender Techniques: Geometry Nodes, VFX & Simulation Pipelines means using Blender's procedural node system, physics stack, and compositing chain as one coordinated workflow. For startups and SMEs, that workflow cuts rework, supports variant creation, and makes file history easier to prove when disputes appear.
Why it matters for your company: unlike one-off manual modeling, a structured Blender pipeline lets a small team generate many outputs from a controlled source setup. That matters in product visualization, motion design, training media, digital twins, and marketplace content where speed, version control, and ownership all affect revenue.
In Blender 5.1, Geometry Nodes and Simulation Nodes are no longer niche tricks. They are production tools, and the teams that ignore pipeline discipline pay for it in render delays, broken caches, and messy legal evidence.
Violetta Bonenkamp, CEO and co-founder, CADChain
Protect your Blender work before it travels.
If your team shares .blend files, simulations, textures, or marketplace assets with clients and contractors, you need clear authorship records and file control habits from the start. BlendedBoris adds a blockchain timestamp to your Blender files from inside Blender, so each version carries dated proof of who made it.
👉 See how BlendedBoris protects your Blender files
Why do advanced Blender pipelines matter now?
The pressure on Blender users changed. Clients ask for more variants, faster turnarounds, and higher realism, while teams stay lean. A two-person startup may need product shots, animated explainers, and simulation-heavy social clips in the same week. Manual methods break fast in that setting.
Blender itself shows the direction. The official Blender 5.2 LTS manual pages on Geometry Nodes and Simulation Nodes describe procedural modeling and time-based simulation as parts of the same node system, so both can live inside one file and one render path.
The challenge for startups and SMEs is not artistic ambition. It is workflow debt. Teams build a flashy setup, then discover that the geometry is hard to version, the caches are too heavy to share, and the legal trail is weak when a contractor reuses the work elsewhere.
Here is why this matters in Europe. Cross-border creative production is normal. A Dutch startup may commission a Blender artist in Poland, a compositor in Spain, and a freelance TD in Germany. If you do not define authorship, licensing scope, source file access, and export rights, your pipeline becomes a legal problem disguised as a creative project.
- Limited team size: procedural systems reduce repeated manual labor.
- Client variation requests: node-based setups let you generate many versions without rebuilding scenes.
- Render and cache pressure: baking and scene planning keep schedules sane.
- IP exposure: source files, modifiers, and simulation caches can reveal more know-how than the final render.
What are the core building blocks of an advanced Blender pipeline?
Let’s break it down. In this context, a pipeline is the route from input geometry to final delivery. In Blender, the three building blocks are Geometry Nodes, simulation systems, and VFX compositing. They overlap, and strong teams design them as one system rather than three separate departments.
Core concept 1: Geometry Nodes as procedural logic
Geometry Nodes is Blender’s node-based system for creating and modifying geometry through rules. In production terms, it is controlled repetition. You define how objects scatter, deform, instance, animate, select, or react, then expose parameters for quick changes.
Why this matters for business teams: a procedural asset is easier to reuse across products, campaigns, and clients. A packaging startup can build one bottle generator and output ten label variants. A furniture brand can produce whole product families from one node rig. If you need a refresher on the procedural side, see this Geometry Nodes introduction to procedural animation.
Related terms in the correct context include attributes, fields, instances, repeat zones, simulation zones, and node groups. In Blender, these terms refer to geometry processing, not shader-only logic. For a closer look at fields, instances, node groups and zones, read our Geometry Nodes deep dive on procedural modeling.
Core concept 2: Simulation Nodes and physics state
Simulation Nodes let one frame influence the next. That means you can create custom time-based behavior inside Geometry Nodes, from growth systems and trails to collision responses and particle-like motion. Blender’s manual explains that these simulations are cached during playback and can be baked to disk for non-sequential rendering, for example on a render farm. Baking needs a saved .blend file, because the bake is stored relative to it.
For startups, this matters because simulation work is where schedules often collapse. A fluid splash or procedural destruction clip looks easy in the pitch deck and painful in production. Teams that understand cache rules, baking, and dependency order avoid last-minute disasters. For a more focused look, read advanced particle and crowd simulations.
Core concept 3: VFX compositing as the final control layer
VFX compositing in Blender is the stage where rendered passes, live-action footage, masks, color adjustments, and effects merge into the final shot. It is where realism often gets fixed, and where weak planning gets exposed.
For SMEs and production teams, compositing is not decoration. It is cost control. If your 3D render is flexible enough to combine with plate photography or green-screen footage, you can revise a shot without restarting everything. If your VFX side needs more context, review compositing basics in Blender and, for live-action plates, camera tracking and matchmoving in Blender.
How do Geometry Nodes, VFX, and simulations connect in real projects?
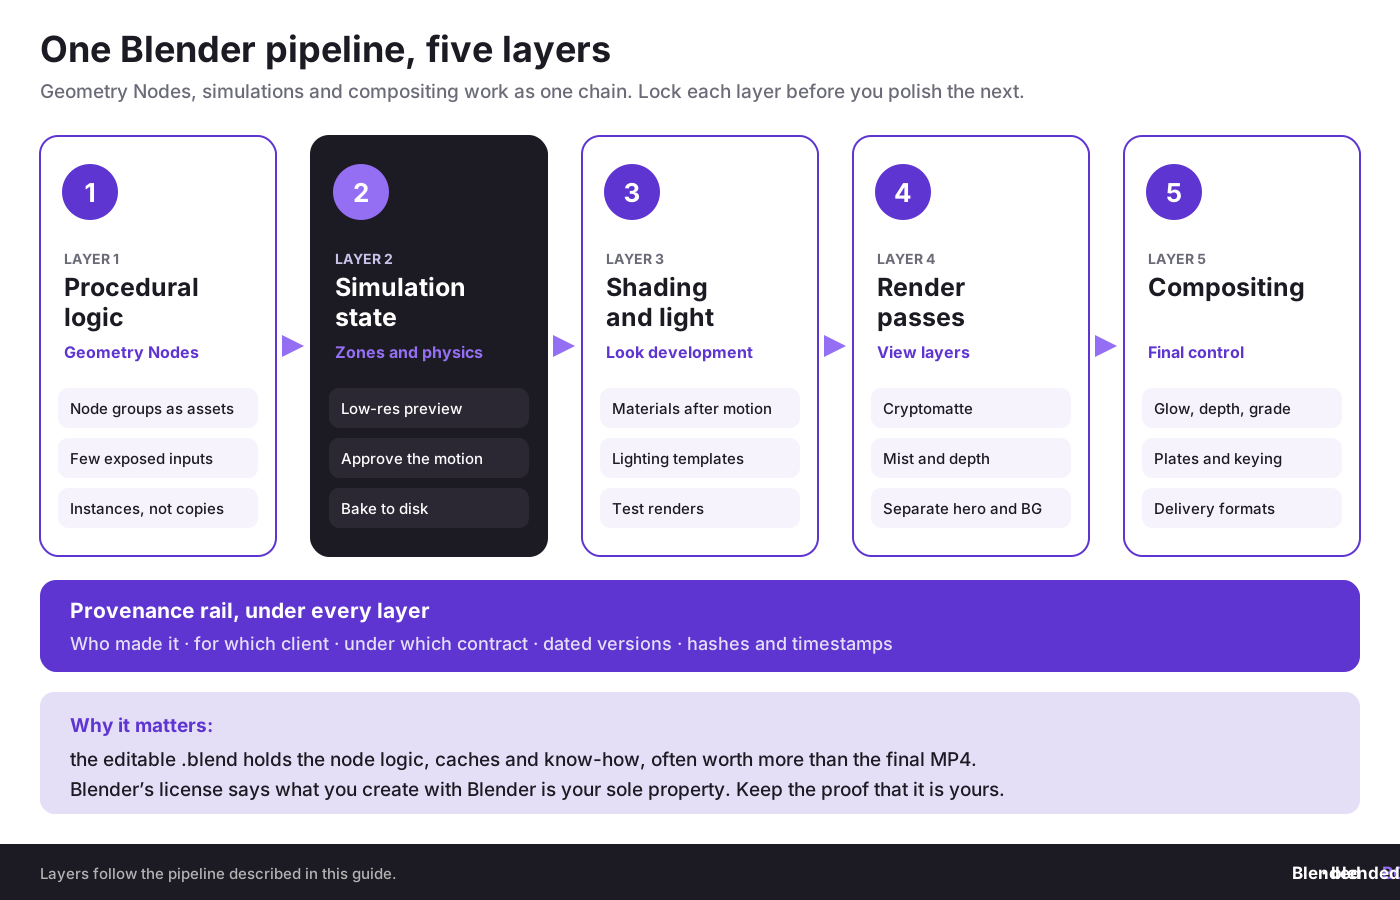
A mature Blender project moves through a chain: model logic, animation logic, simulation state, shading, lighting, render passes, compositing, and delivery. Problems appear when artists treat these as isolated tasks.
Take a practical example. A German industrial startup wants an animation of modular piping for a trade fair screen. A node-based pipe generator creates the structure. A simulation system adds procedural growth and directional changes. The render outputs Cryptomatte and Mist render passes. Compositing adds glow, depth, and typography. That is one pipeline, not four unrelated tricks.
This is why so many users look for pipe generation and motion examples in public sources, from the official manual to community Q&A threads and video walkthroughs. The examples change, but the pattern stays the same: one procedural structure, one time-based layer, and one compositing pass that ties them together.
Here is how the main Blender systems divide the work in an advanced pipeline:
In motion design, the same logic applies. A clean procedural setup allows text, instances, and effect timing to remain editable. That is why many artists move from static modeling into motion graphics in Blender once they see how fast client revisions arrive.
Violetta Bonenkamp’s recurring point in IP-heavy digital production is blunt: if the value sits in the file logic, not just the final image, then your protection model must cover the file logic.
How can your startup or SME implement an advanced Blender pipeline in 12 weeks?
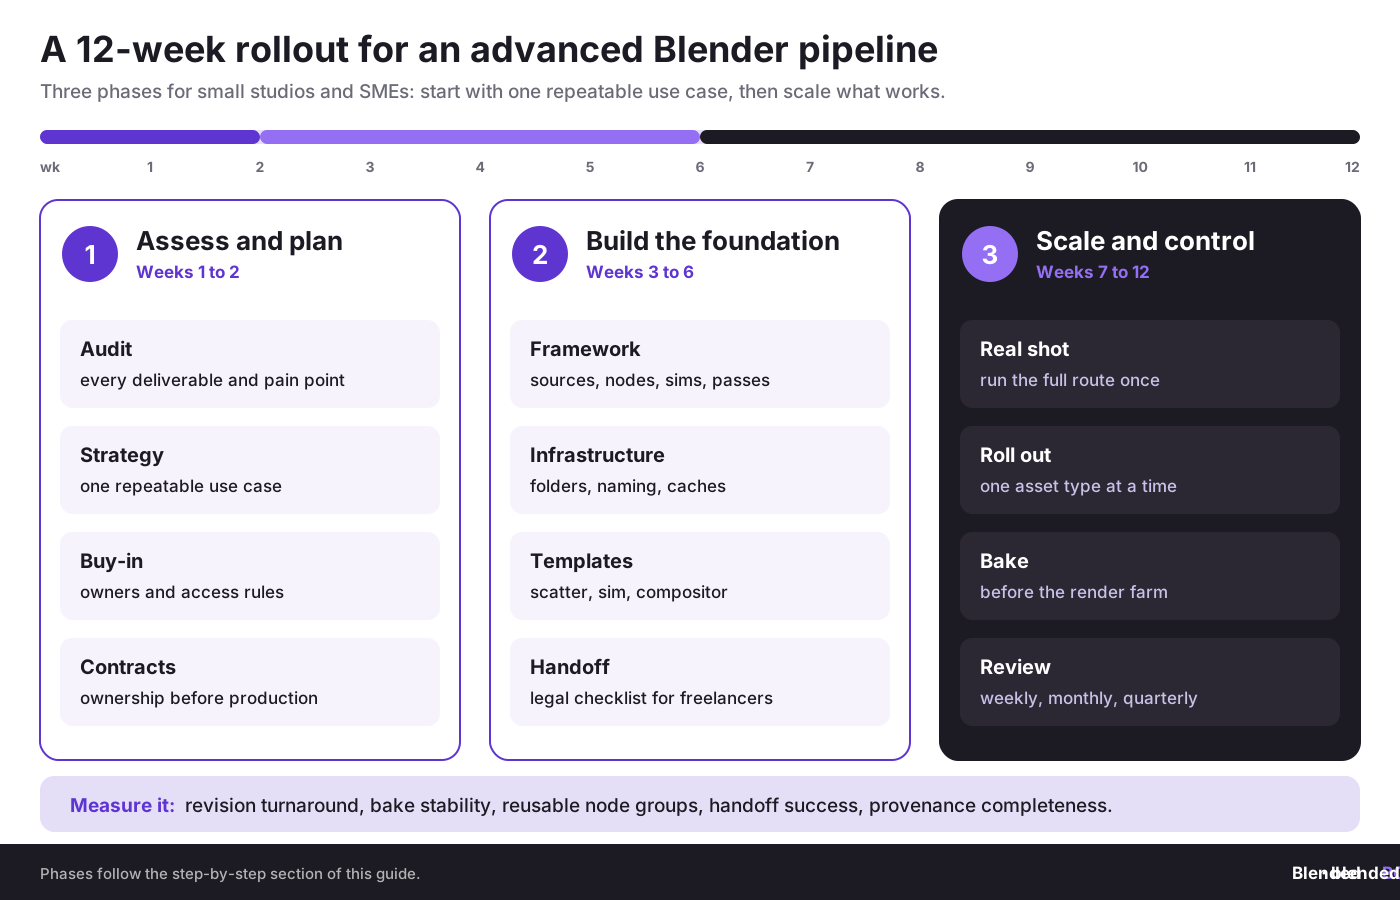
Below is a practical rollout plan for small studios, manufacturing marketers, design teams, and technical founders who want a real Blender pipeline rather than a folder full of fragile scenes.
Phase 1: Assessment and planning, weeks 1 to 2
Step 1.1: Audit your current state
- List every deliverable you produce in Blender: stills, loops, explainers, product renders, simulation shots.
- Mark which assets are manual, procedural, or simulation-heavy.
- Identify where revisions hurt most: modeling changes, cache rebuilds, render delays, or compositing fixes.
- Review who touches source files, and whether license terms match that reality.
Step 1.2: Define your pipeline strategy
- Choose one repeatable use case first, such as product variants, motion graphics packages, or procedural environments.
- Set project goals in plain language: fewer rebuilds, faster variants, lighter scene handoff, safer source control.
- Define success measures such as version turnaround time, bake reliability, and number of reusable node groups.
- Map legal ownership before production starts, especially in outsourced work.
Step 1.3: Build internal buy-in
- Show the team one painful before-and-after case.
- Assign one pipeline owner for Geometry Nodes and one for rendering and compositing.
- Make source asset access rules explicit.
- If you are in the EU, check contractor agreements for copyright transfer, neighboring rights, confidentiality, and derivative work scope.
Phase 2: Foundation building, weeks 3 to 6
Step 2.1: Choose your framework
A simple framework works well for most teams: source collections, node groups, simulation layers, render passes, and delivery outputs. Keep each layer named and documented. Hidden cleverness impresses nobody at 2 a.m.
Step 2.2: Set up your infrastructure
- Create a shared folder structure for assets, caches, HDRIs, textures, and exports.
- Save .blend files before simulation baking so disk caches can exist reliably.
- Standardize naming for node groups, collections, modifiers, and output passes.
- Document what may be linked, appended, or exported.
- Use version comments with meaning, not chaos like final_final_realfinal.
Step 2.3: Build your foundation elements
- Create one reusable scatter or instancing setup.
- Create one reusable simulation scene template.
- Create one compositor template with pass routing.
- Create one legal handoff checklist for clients and freelancers.
If your work includes product systems or configurable forms, you will benefit from parametric node workflows, because they turn Blender into a controllable design engine rather than a static scene editor. If you are choosing between node systems, read Animation Nodes vs Geometry Nodes in Blender.
Phase 3: Scale and control, weeks 7 to 12
Step 3.1: Test on a real shot
- Choose a short but realistic project.
- Run the full route from procedural generation to final composite.
- Track cache time, viewport speed, bake size, render time, and revision pain points.
- Record where artists still bypass the system.
Step 3.2: Roll out gradually
- Expand only after one asset type works well.
- Train the team on node group reuse, not random duplication.
- Separate hero shots from reusable templates.
- Bake long-running simulations before handing scenes to render nodes or farms.
Step 3.3: Build feedback loops
- Weekly review of failed bakes, heavy modifiers, and scene file bloat.
- Monthly review of source file access and licensing exposure.
- Quarterly review of reusable node groups and archived shots.
- Keep a short internal wiki page for every production-ready setup.
Want a safer commercial workflow for Blender files?
Blender source files can contain far more business value than the exported image. Treat them like IP assets, not casual attachments in email threads. BlendedBoris timestamps your .blend files on the blockchain from inside Blender, so you can show who made each version before it reaches a client or a marketplace.
👉 Timestamp your Blender work with BlendedBoris
Which advanced Blender practices work best in 2026?
Practice 1: Build node groups as products, not experiments
What it is: treat every useful Geometry Nodes setup as a reusable asset with exposed controls, naming rules, and intended use cases.
Why it works: production speed comes from controlled repeatability. Public learning resources such as Geometry Nodes from Scratch at Blender Studio keep reinforcing structure because procedural chaos scales badly.
- Group recurring logic into modular node trees.
- Expose only meaningful controls for artists and clients.
- Write one-line usage notes inside the file or team wiki.
Common pitfall: adding too many custom controls. How to avoid it: limit user-facing inputs to what affects output decisions.
Practice 2: Bake simulations early when shots are approved
What it is: once a simulation behavior is signed off, move from live recalculation to a baked state.
Why it works: Blender’s simulation system caches during playback, but approved shots should not depend on unstable live playback when delivery dates matter. This becomes even more important in cloth, smoke, and fluid work, which is why teams rely on simulation baking for performance.
- Preview with low resolution or simplified geometry.
- Approve motion behavior before fine detail.
- Bake to disk and archive the shot state.
Common pitfall: tweaking materials and lighting while the simulation logic still changes. How to avoid it: lock motion first, beauty second.
Practice 3: Keep simulation scope narrow
What it is: simulate only what the camera needs, not what your ego wants.
Why it works: every extra object, collision, and dependency multiplies failure risk. In destruction shots, water work, and particle-heavy motion, focused scope is the difference between a finished project and a workstation hostage situation. If those areas matter to you, compare approaches in realistic destruction setups and fluid, cloth and smoke simulation workflows.
- Simulate inside the camera volume first.
- Use instances and proxies where possible.
- Split hero effects from background filler.
Common pitfall: full-scene physics on the first pass. How to avoid it: prototype with a cropped domain and limited frame range.
Practice 4: Separate source logic from delivery logic
What it is: keep the editable procedural source file separate from client-facing exports and approved deliverables.
Why it works: Dirk-Jan Bonenkamp’s legal view is direct here. The source file often contains trade secrets, reusable methods, and hidden production know-how. If you hand over the whole source when the contract covers only final output, you may be gifting away your margin.
- Define what the client buys: renders, mesh exports, editable source, or limited-use files.
- Store proofs of authorship, version history, and transfer dates.
- Use written terms for derivative rights and subcontractor reuse limits.
Common pitfall: vague statements like "all project files included." How to avoid it: list file classes and usage rights with precision.
What mistakes hurt Blender teams most?
Mistake 1: confusing a cool setup with a pipeline
Why teams make it: social media rewards novelty, not maintainability. A clever node trick gets applause. A documented system gets deadlines met.
The impact: nobody else can edit the scene confidently, and every revision starts with reverse engineering.
- Name node groups and modifiers clearly.
- Build predictable input sockets.
- Write a short scene note for handoffs.
Mistake 2: leaving legal terms for the end
Why teams make it: they assume trust is enough, especially with friendly clients or repeat freelancers.
The impact: later disputes over source files, asset reuse, or authorship become hard to solve cheaply. In EU cross-border work, this can trigger confusion over governing law, copyright assignment form, and moral rights limits.
- Set copyright, license scope, and source file terms before production.
- Keep dated approvals and delivery records.
- Use blockchain-backed proof or timestamped records as support evidence, not magic dust.
Mistake 3: overbuilding simulations for shots that do not need them
Why teams make it: realism seduces. Artists add physically correct behavior where a cheat would look identical in the final frame.
The impact: cache sizes explode, render schedules slip, and clients never notice what cost you the extra two days.
- Start from camera needs.
- Replace true simulation with procedural motion where possible.
- Use compositing to sell scale, glow, dust, and depth.
Mistake 4: weak provenance tracking for assets
Why teams make it: file history feels boring until a marketplace claim, client conflict, or subcontractor leak appears.
The impact: proving who made what, when, and under which brief becomes expensive. From a CADChain perspective, this is the same old problem seen in industrial CAD. Once the file leaves your hands, control drops sharply unless you built evidence and access habits from day one.
- Keep version logs tied to creators and legal entities.
- Store hashes, timestamps, and client delivery notes.
- Separate employee authorship from company ownership in your records.
How should you measure success in an advanced Blender pipeline?
Most teams measure only render time. That is too narrow. A strong Blender pipeline is judged by repeatability, change tolerance, cache stability, and evidence quality when files move.
Foundational metrics to track first
- Revision turnaround time: hours from client change request to updated preview.
- Bake stability: how often approved simulations need reruns.
- Reusable node groups: count of production-ready procedural modules.
- Scene handoff success: how often another artist can open and work without emergency explanation.
- File provenance completeness: whether authorship, ownership, and delivery dates are recorded.
Advanced metrics after three months
- Variant output ratio: number of approved variants per source setup.
- Cache-to-render ratio: whether simulation prep time is swallowing delivery margin.
- Source leakage exposure: count of editable files shared outside defined scope.
- Marketplace reuse rate: how many assets generate sales or client reuse from one procedural base.
A simple dashboard can live in your project manager or even a spreadsheet. The point is not software glamour. The point is seeing where your Blender system makes money and where it quietly burns it.
How does the right Blender approach change by company stage?
Pre-seed and seed stage
Your reality: tiny team, little spare cash, high uncertainty.
- Focus on one procedural asset family only.
- Prefer Geometry Nodes over heavy simulations where a visual cheat works.
- Write clear contracts before sharing source files.
Prioritize: repeatable output and file ownership clarity. Defer: giant hero simulations and overengineered asset libraries.
Growth-stage startup or Series A equivalent
Your reality: more deliverables, more clients, more freelancers.
- Build standardized node groups and compositor templates.
- Introduce baking discipline and delivery checklists.
- Track who created each source asset and under what agreement.
Prioritize: handoff stability and legal certainty. Defer: experimental systems with no client pull.
Established SME or larger studio
Your reality: broader pipeline, more parallel projects, and higher reputational risk.
- Treat Blender files as managed IP assets.
- Use role-based access for editable sources.
- Store stronger evidence of authorship, version history, and approved transfers.
Prioritize: library governance, cache infrastructure, and contract precision. Defer: informal file sharing habits that worked when the team had two people.
What does a practical Blender asset governance checklist look like?
This is where Violetta and Dirk-Jan’s view becomes unusually useful for artists and design-led companies. They come from a world where files are treated as business assets first. That logic fits Blender better than many creators want to admit.
- Create at source: record who made the asset, for which client, and under which contract.
- Track changes: keep dated version notes for procedural, simulation, and compositing changes.
- Separate rights: distinguish preview rights, delivery rights, and editable source rights.
- Reduce oversharing: export only what the next party needs.
- Preserve evidence: keep timestamps, hashes, screenshots, and approval records.
- Control marketplace reuse: state whether a base procedural setup may be resold, adapted, or reused for other clients.
That may sound strict for artists. It is also what stops panic later. A procedural scene can encode years of know-how. In many commercial cases, the .blend file is more valuable than the MP4.
Blender’s license page is clear on ownership: “What you create with Blender is your sole property.” Proving it later is a separate job. BlendedBoris adds a blockchain timestamp to your Blender files from inside Blender, so each version of a node setup, simulation scene or composite carries dated evidence of who made it and when. For the legal background, read copyright basics for 3D artists and whether 3D models automatically have copyright.
Dirk-Jan Bonenkamp’s legal stance fits Blender teams surprisingly well: contracts matter, but contracts without file-level evidence leave gaps.
Which sources and learning paths are worth your time?
A strong learning mix in 2026 still combines official documentation, structured training, and targeted examples. The official Blender manual remains the best place to confirm exact node behavior. Blender Studio offers structured learning. Community tutorials help when you need one specific effect fast.
Useful starting points include Blender Studio’s Geometry Nodes from Scratch course, the Geometry Nodes and Simulation Zone pages of the Blender manual, and focused guides on this blog about procedural animation with Geometry Nodes, the node editor basics, and Blender scripting with Python for automating the repetitive parts.
If you want a future-facing technical angle, Blender’s developer-side thinking on node-based particles also matters. The proposal on representing particle systems with nodes shows how deeply node logic now shapes physics thinking in Blender.
Glossary of key terms
- Geometry Nodes: Blender’s node system for creating and modifying geometry through procedural rules.
- Simulation Zone: a node context where one frame affects the next, allowing time-based behavior.
- Bake: writing simulation results to cache so playback and rendering become repeatable.
- Compositing: combining render passes and footage into the final image or shot.
- Instance: a repeated reference to geometry that saves memory compared with full duplicates.
- Procedural asset: an asset generated by rules and parameters rather than only manual edits.
- Provenance: the recorded history of who created, changed, and delivered a file.
- Editable source file: the working .blend or linked file containing node logic, modifiers, and setup data.
Key takeaways
- Advanced Blender Techniques: Geometry Nodes, VFX & Simulation Pipelines matter because they turn Blender from a scene editor into a repeatable production system.
- The winning path is clear: assess your current pain points, build reusable procedural assets, bake approved simulations, and formalize source file rights.
- For startups and EU SMEs, the business gains come from faster variants, fewer rebuilds, better handoffs, and cleaner ownership records.
- Most teams fail through workflow debt, not artistic weakness. Undocumented node setups, oversized simulations, and vague contracts cause the damage.
- Your best long-term advantage is not one flashy effect. It is a controlled pipeline that protects time, margin, and IP.
Where should you go next after mastering advanced Blender pipelines?
If this article clicked for you, the natural next topic is not random inspiration. It is pipeline speed. Once Geometry Nodes, VFX, and simulations are under control, the next question becomes how to remove repetitive work, reduce setup time, and build better internal systems.
That is why the smartest follow-up read is Blender add-ons and productivity systems. It connects directly to what comes after procedural mastery: automation, team consistency, and fewer human mistakes.
Final thought. Blender has matured fast, but production maturity still depends on discipline. Violetta Bonenkamp would frame it as ownership and business logic. Dirk-Jan Bonenkamp would frame it as evidence and enforceable rights. Both are right. If your advanced Blender workflow creates value, then your pipeline must protect that value from the first node to the final export.
People Also Ask:
What are Geometry Nodes in Blender used for?
Geometry Nodes in Blender are used for creating procedural and parametric workflows in 3D models. Artists can automate repetitive tasks, generate complex shapes efficiently, and create dynamic effects without manual adjustments. This tool is widely applied in creating motion graphics, organic forms, and intricate simulations.
How do you get started with VFX in Blender?
To get started with VFX in Blender, begin by exploring the Compositor and its nodes to combine and manipulate rendered layers. Then, learn about 3D camera tracking, importing real-world footage, and incorporating animated 3D elements into videos. Tutorials and practice projects are excellent resources to refine these skills. On this blog, start with compositing basics and camera tracking in Blender.
What are Simulation Nodes in Blender?
Simulation Nodes are Geometry Nodes setups built around a Simulation Zone, added in Blender 3.6, where the result of one frame feeds the next. They let you build custom time-based effects such as growth patterns, trails, point collisions and particle-like motion. Results are cached during playback and can be baked to disk once the motion is approved.
What makes Blender suitable for procedural workflows?
Blender’s robust Geometry Nodes system facilitates procedural workflows by enabling non-destructive modeling, animation, and effects creation. Artists can adjust parameters dynamically without affecting the original structure, which improves flexibility and creativity in both small-scale assets and large projects.
What are the best resources to learn advanced Blender techniques in 2026?
In 2026, top resources for learning advanced Blender techniques include official Blender documentation, courses on platforms like Skillshare, and community forums like Blender Artists. Content creators like Erindale and platforms like YouTube provide in-depth tutorials, while Blender Studio offers high-quality paid training for professionals.
How do Geometry Nodes differ from traditional Blender modifiers?
Geometry Nodes offer a node-based procedural approach to creating and modifying objects, unlike traditional modifiers that rely on fixed parameters. Nodes provide more flexibility, allowing users to build custom workflows and combine various effects dynamically, making them a powerful tool for creative challenges.
What are some practical applications of Geometry Nodes?
Practical applications of Geometry Nodes include designing procedural landscapes, creating intricate motion graphics, generating particle-based effects, and automating repetitive modeling tasks. These nodes are widely used in film production, game development, and digital content creation for scalable and efficient workflows.
Can Blender simulate realistic physics for VFX?
Blender supports realistic physics simulations for VFX, including rigid bodies, fluids, cloth, and particle systems. These tools allow artists to recreate natural phenomena like water dynamics, explosions, and soft-body deformations, using scalable parameters to achieve desired levels of realism.
What industries benefit most from Geometry Node techniques?
Industries benefiting most from Geometry Node techniques include film and animation, video game design, architecture, and digital marketing. Procedural workflows help streamline asset creation, automate repetitive tasks, and deliver visually complex deployments, making them ideal for scalable and creative endeavors.
How are simulation pipelines integrated into Blender projects?
Simulation pipelines in Blender are integrated by combining Geometry Nodes with physics simulations and VFX compositing. Artists can layer simulations, adjust parameters dynamically, and export results for rendering or use in real-time engines. This enables seamless workflows for complex animations and real-world replicative effects.
FAQ: Advanced Blender Techniques for Geometry Nodes, VFX & Simulation Pipelines
How can Geometry Nodes save production time for teams?
Geometry Nodes allow users to replicate and manipulate objects procedurally, removing repetitive manual tasks. This makes variant production faster and lets teams focus on creativity rather than setup. For practical workflows, Blender Studio’s Geometry Nodes from Scratch course and our Geometry Nodes introduction are good places to start.
What are common mistakes when implementing Blender pipelines?
Frequent issues include overloading simulations, under-documenting node systems, and failing to track file provenance. These lead to workflow bottlenecks and IP risks. Structured planning and protection practices are key to avoiding pipeline debt and maximizing efficiency.
How do Simulation Nodes enhance time-based effects?
Simulation Nodes create dynamic interactions, like collisions or growth, by linking frame states. They enable controlled physics-based animations, essential for realism in VFX-heavy projects. Learn more about leveraging simulation efficiency in particle systems in Blender.
What strategies ensure IP protection in Blender workflows?
To protect IP, define licensing terms for .blend files, log authorship details, and minimize oversharing editable assets. Use timestamps and version history to record changes for future disputes, especially when pipelines involve cross-border collaborations.
How can procedural assets benefit SMEs?
SMEs benefit from procedural systems by saving time on repetitive tasks like product variants or motion graphics. Structured assets improve scalability while ensuring consistent quality across deliverables, crucial for recurring projects and client retention.
Why are Cryptomatte passes essential for compositing?
Cryptomatte creates ID mattes for objects, materials or assets, so you can isolate one element in compositing without re-rendering. That makes per-object edits such as color correction, glow or defocus faster and more flexible, especially when 3D renders are combined with live footage.
How do Blender pipelines boost cross-functional teamwork?
A robust Blender pipeline establishes naming conventions, version control, and modular logic. These practices let design, animation, and VFX teams collaborate seamlessly, reducing errors during asset handoff and improving project efficiency.
What role do Automation Add-ons play in speeding up pipelines?
Automation add-ons handle repetitive tasks like cache baking and parametric adjustments, freeing up time for creative work. Tools like Python scripting are game-changers for scaling pipelines. Read Blender scripting with Python for implementation tips.
Which industries benefit most from advanced Blender setups?
Industries like product visualization, digital twins, training media, and motion design see the greatest gains. Blender’s procedural and simulation tools reduce modeling costs while enabling scalable content delivery, even for small creative teams.
How should startups prioritize advanced workflows?
Startups should first audit current pain points, then focus on reuse-ready Geometry Nodes setups and secure file control habits. Prioritize efficient delivery systems, avoiding overly complex simulations until growth justifies higher risks.
Can zero-code technology complement Blender pipelines?
Yes, at the edges of the pipeline. No-code website builders such as Webflow can host Blender renders, turntables and 3D previews for clients or stores, while scripts and AI tools can take over repetitive tasks around the Blender work. They lower technical barriers for freelancers and small teams, but the core node, simulation and compositing work still happens in Blender.


