
TL;DR: Photogrammetry Cleanup and Integration in Blender turns raw scans into usable, defensible 3D assets.
If you clean your scan properly, you get a lighter, more editable file with better geometry, clearer textures, correct scale, and fewer downstream problems in rendering, animation, web, VFX, engineering, or sales. The main point is simple: do not treat scan cleanup as a visual fix only. You also need file history, authorship records, permissions, and transfer tracking if the asset will be shared, sold, reviewed, or used as evidence. Keep the raw source untouched, repair only for the asset’s intended use, and document what changed so your model is not just good-looking, but trusted and commercially safer.
👉 Want to go further after scan cleanup? Read advanced Blender techniques for more on geometry nodes, VFX, and simulation workflows.
Photogrammetry cleanup in Blender: from raw scan to an asset you can use and prove
Photogrammetry Cleanup and Integration in Blender starts with a blunt question: are you building a usable 3D asset, or are you just importing a messy scan and hoping nobody looks too closely? For engineers, designers, SMEs, and digital artists, that distinction matters because a scan can become evidence, product content, a manufacturing reference, or a monetizable asset. In all those cases, poor cleanup creates technical debt and IP risk at the same time.
What is photogrammetry cleanup and Blender integration? It is the process of taking a raw 3D scan generated from photos, then repairing geometry, controlling polygon density, fixing textures, aligning scale, and placing the result into a Blender workflow for rendering, retopology, animation, VFX, web delivery, or marketplace sale. For startups and SMEs, this serves a simple business goal: turn captured reality into a file you can actually use, share, protect, and defend.
Why it matters for your business: unlike a raw reconstruction exported from a scan app, a cleaned Blender asset is easier to edit, lighter to store, safer to hand off, and far more credible in front of clients, courts, or procurement teams. That matters in Europe, where cross-border collaboration, outsourced modeling, and GDPR-aware file handling create pressure for clean audit trails as well as clean topology.
A photogrammetry model with bad topology is not just ugly. It is expensive, hard to animate, risky to share, and weak as commercial evidence.
Violetta Bonenkamp, CEO and co-founder, CADChain
This guide looks at the topic through the lens of Violetta Bonenkamp and Dirk-Jan Bonenkamp from CADChain. Their view is useful because they treat 3D files as business assets first. Violetta pushes the idea that creators and engineering teams should think in terms of ownership records, file history, and commercial control, not only visual output. Dirk-Jan brings the legal angle, with a focus on audit trails, GDPR-aware handling, authorship proof, and court-ready evidence for digital design disputes.
By the end of this guide, you will understand:
- How photogrammetry cleanup affects Blender workflows, asset quality, and downstream costs
- How to move from raw scan to production-ready asset in a staged way
- Which mistakes waste the most time for artists, engineering teams, and SMEs
- How to keep authorship, chain of custody, and sharing controls visible while your scan moves through vendors and collaborators
Protect your Blender work before you share it.
If your scan cleanup turns into a commercial asset, authorship records and file history matter almost as much as the mesh itself. BlendedBoris adds a blockchain timestamp to your Blender files from inside Blender, so each cleaned version carries dated proof of who made it and when.
👉 See how BlendedBoris protects your Blender files
Why does photogrammetry cleanup in Blender matter so much in 2026?
The challenge is simple. Raw scans are noisy, heavy, incomplete, and rarely ready for production. You get floating fragments, holes, warped surfaces, stretched UVs, non-manifold edges, and textures that look acceptable from one angle but collapse on close inspection. Teams then try to animate, sell, print, archive, or license these files and wonder why everything slows down.
Public tutorials and community discussions show the same pattern. Blender users in photogrammetry threads on Reddit Blender communities talk about huge files, floor separation problems, retopo bottlenecks, and memory crashes. Step-by-step guides for cleaning a 3D scan in Blender, such as the one on Instructables, show how much manual intervention is still needed. The issue is not that Blender lacks tools. The issue is that users often skip process discipline.
Here is why this matters now. E-commerce teams need fast-loading 3D viewers. Heritage projects need documentary accuracy. Manufacturing companies need scan-derived references that can be measured and reviewed. VFX teams need assets that can sit beside tracked footage, which connects directly with camera tracking and matchmoving in Blender. If cleanup is weak, every later stage gets worse.
For CADChain founders, the business problem sits one layer deeper. Once a useful scan leaves your organization, you often lose control over who edits it, who republishes it, and who claims authorship. A messy model already has low operational value. A messy model with no file-level evidence has low legal value too.
What are the fundamentals you need to understand first?
Core concept 1: reconstruction quality
Definition: reconstruction quality is the fidelity of the 3D mesh and texture produced by your photogrammetry software from overlapping photos. It depends on coverage, lighting, lens consistency, image sharpness, and the reconstruction settings used before the model ever reaches Blender.
Why it matters for startups and SMEs: bad input creates expensive cleanup later. If you are scanning a machine part in Eindhoven, a historic facade in Prague, or a collectible for an online marketplace in Berlin, weak capture means more artist hours, more legal ambiguity, and more failed reuse.
Real-world Blender angle: many users try to solve missing data with remesh and sculpt tools after import. Sometimes that works. Often it only hides capture errors. Community advice on threads about fixing photogrammetry holes on the Blender Artists forum makes this plain. Better photos still beat heroic cleanup.
Related terms: point cloud, mesh reconstruction, overlap, lens distortion, scale reference, texture projection.
Core concept 2: topology repair
Definition: topology repair means turning chaotic scan geometry into a mesh that is stable, editable, and suitable for the next task. That can include deleting noise, welding doubles, filling holes, correcting normals, remeshing, and creating cleaner edge flow through retopology.
Why it matters for business use: topology repair, guided by topology best practices, lowers file weight, reduces crashes, and makes the asset usable for rigging, web viewers, AR, product configurators, or engineering review. It also makes version tracking more meaningful, because a controlled mesh is easier to compare and certify.
Real-world Blender angle: the Sketchfab workflow for cleaning a 3D scan in Blender starts by joining split parts, welding overlapping vertices with the Weld modifier, and centering and orienting the scan before deeper edits. That early discipline saves time.
Related terms: manifold mesh, decimation, voxel remesh, quad remesh, shrinkwrap, bake cage.
Core concept 3: pipeline placement
Definition: pipeline placement means deciding what role the cleaned scan will play after Blender. Is it a hero asset, a reference, a collision mesh, a background prop, a museum record, or a protected commercial file?
Why it matters: you should not clean every scan to the same level. A game-ready prop, an engineering inspection mesh, and a heritage archive model need different tolerances, textures, and metadata.
Real-world Blender angle: if the scan goes into compositing work, it needs lighting and camera consistency, which relates naturally to compositing in Blender. If it goes into a simulation-heavy scene, cache and playback discipline matter, which ties into simulation baking for performance.
Related terms: asset reuse, LOD, baking, scene assembly, metadata, chain of custody.
How do you implement photogrammetry cleanup and Blender integration step by step?
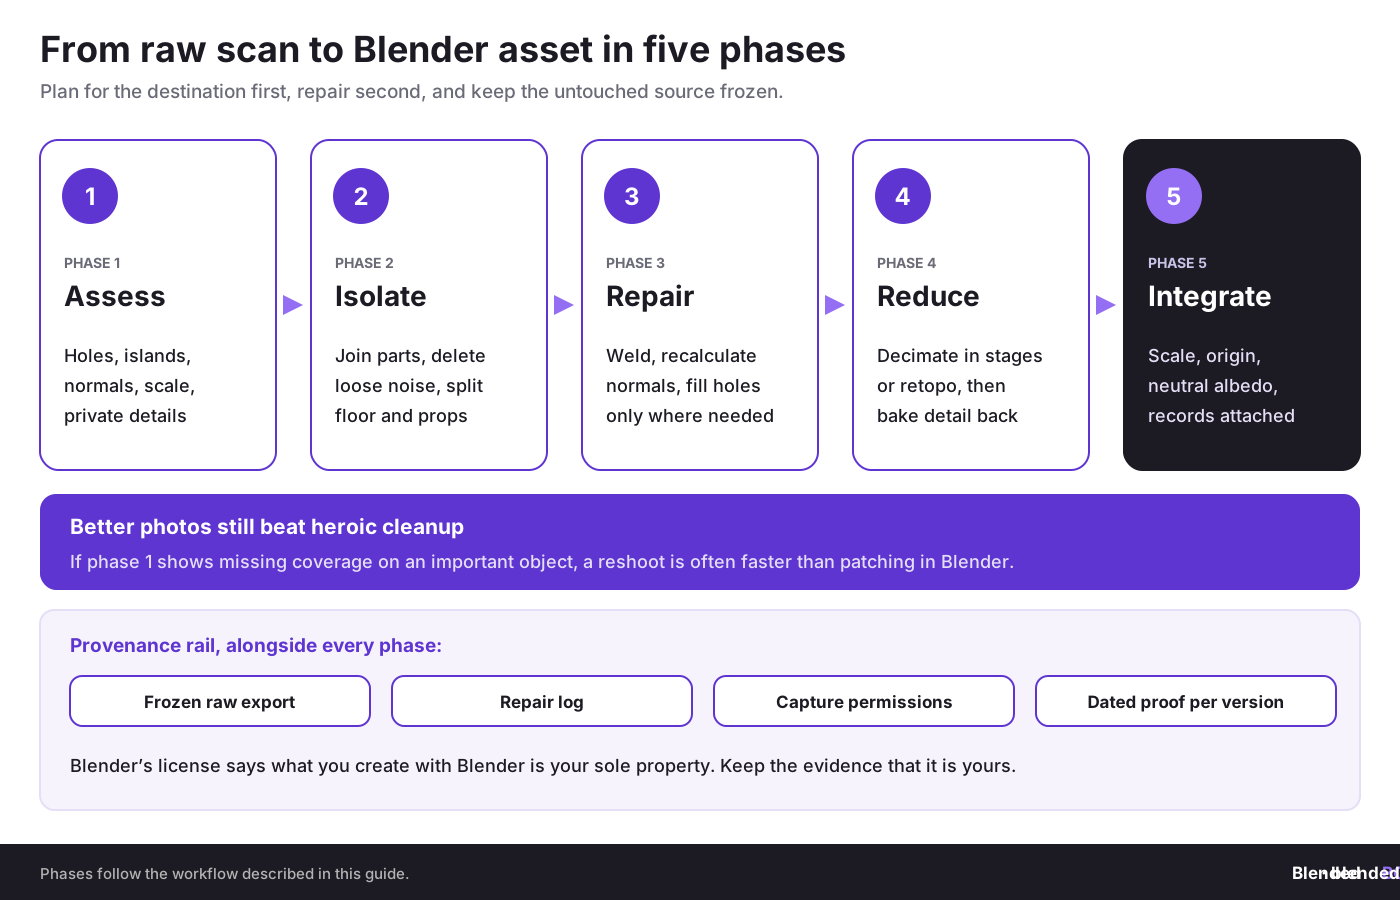
Phase 1: assessment and planning
Let’s break it down. Before touching modifiers, inspect the scan and define the commercial purpose. A lot of wasted Blender work comes from skipping this short planning stage.
Step 1.1: audit your current scan state
- Check whether the mesh has large holes, bridged gaps, floating fragments, and inverted normals
- Look at polygon count, texture resolution, and viewport responsiveness
- Confirm scale using known measurements or field notes
- Ask whether the texture contains identifiable private data, labels, or sensitive site details
Step 1.2: define your Blender asset target
- Hero asset for close renders
- Game or web asset with lower polygon budget
- Reference model for engineering or set dressing
- Protected marketplace product with documented authorship
Step 1.3: build internal control from the start
- Name files consistently (our guide to file organization for asset packs has a naming scheme)
- Keep original raw exports unchanged in cold storage
- Store capture date, location, operator, device, and project rights
- If multiple contractors will touch the file, log versions and roles from day one
This is where the CADChain way of thinking becomes useful. Violetta Bonenkamp often frames digital creation as a rights event, not just a creative event. Dirk-Jan Bonenkamp pushes the same point from the legal side: if authorship and transfer are vague, later enforcement becomes harder. For EU SMEs that outsource cleanup to freelancers across borders, that warning is practical, not theoretical.
Phase 2: geometry cleanup inside Blender
Step 2.1: isolate the useful mesh
Delete loose noise first. Photogrammetry often produces stray islands, chunks of background, or floor data you never wanted. Use Select Linked (L or Ctrl+L), Mesh ‣ Clean Up ‣ Delete Loose, and basic segmentation. Large scenes may benefit from splitting buildings, floors, vegetation, and props into separate objects before any heavy operation.
Step 2.2: repair structural problems
- Run Merge by Distance (Mesh ‣ Clean Up) carefully to weld near-duplicate vertices
- Recalculate normals and inspect flipped areas manually
- Fill or patch holes only where the intended use allows it
- Use voxel remesh when the existing topology is beyond saving, then project back detail later if needed
If you want a visual walkthrough, Clean Up Photogrammetry Mesh in Blender by What Make Art gives a production-oriented example, while Peter France’s video Easily Clean Your 3D Scans shows quick repair choices for bad scans.
Step 2.3: reduce weight without destroying form
Use decimation with restraint. Heavy scans can hit millions of triangles fast, and that can choke scene assembly, especially for small studios. Decimate in stages, inspect silhouette changes, and keep a duplicate high-res source. If the object will be animated or shaded closely, build a retopo mesh and bake surface detail into a normal map instead of crushing the original blindly.
Step 2.4: prepare UVs and texture logic
Some scan exports have messy UVs that are fine for preview but poor for reuse. Reunwrap when needed, then bake the texture from the original scan to the cleaned mesh. If the source missed areas, Blender’s Clone tool in Texture Paint mode can help. The 80 Level note on fixing photogrammetry textures in Blender shows the Clone tool filling texture areas that no photo captured.
Phase 3: Blender integration into a wider production pipeline
Step 3.1: align scale, orientation, and origin
A scan that looks fine in isolation can become useless in a team scene if scale is wrong. Align the origin to a logical pivot, reset rotations where needed, and confirm measurements against known dimensions. This matters even more when a scan supports engineering review or product visualization.
Step 3.2: build material sanity
Raw albedo from a scan often contains baked lighting, shadow contamination, or color imbalance. Neutralize it if the asset must sit under new lights, and rebuild the shader as a proper PBR material. Separate what belongs to geometry from what belongs to shading. In practical terms, that means not trusting the first imported texture set.
Step 3.3: attach metadata and evidence records
This step is skipped far too often. Store authorship, capture date, processing notes, and license terms alongside the Blender file. If the asset has commercial value, register a hash or fingerprint record in your chosen evidence system. CADChain’s philosophy, and it is a useful one here, is that blockchain should act as infrastructure for proof and audit trails, not hype. For a marketplace seller or SME studio, that creates a cleaner story when a client asks, "Who made this first and when?"
Blender’s license page is clear on ownership: “What you create with Blender is your sole property.” That covers your cleanup, retopology and texture work, while rights in the scanned object itself depend on who owns it. Proving your part later is a separate job. BlendedBoris adds a blockchain timestamp to your Blender files from inside Blender, so each cleaned version of a scan carries dated evidence of who made it and when. For the legal background, read copyright basics for 3D artists.
Which workflow works best for different use cases?
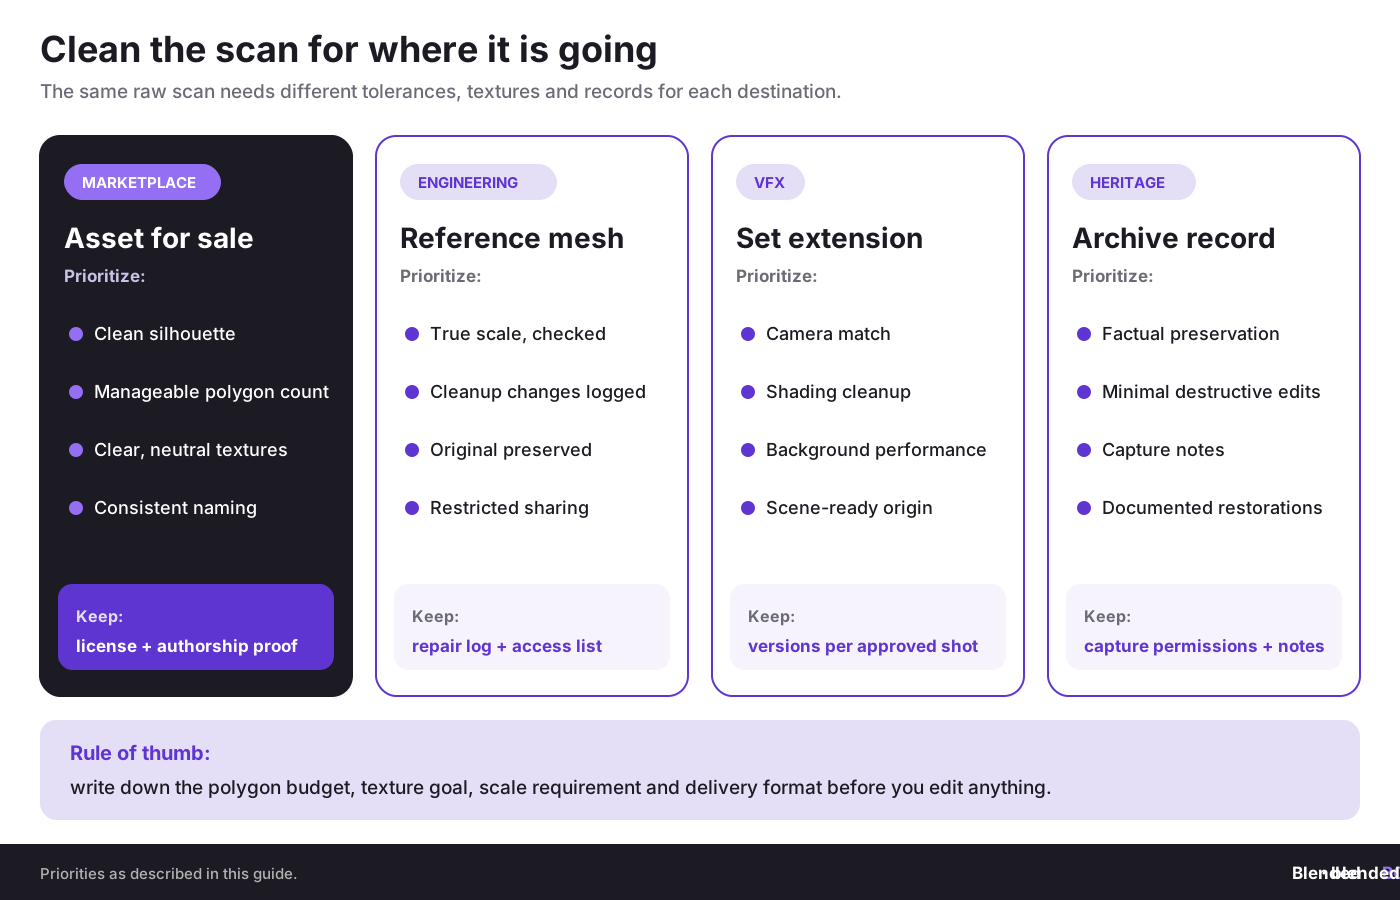
Not every scan deserves the same treatment. Here is a practical comparison:
- Marketplace asset: prioritize clean silhouette, manageable polygon count, texture clarity, naming consistency, license terms, and proof of authorship.
- Engineering reference: prioritize true scale, documented cleanup changes, preserved originals, and restricted sharing.
- VFX set extension: prioritize camera match, shading cleanup, background performance, and scene-ready origins.
- Heritage archive: prioritize factual preservation, minimal destructive edits, capture notes, and documented restoration choices.
Violetta Bonenkamp’s recurring message fits photogrammetry well: if a digital object can create revenue, legal exposure, or reputational risk, then it deserves file-level thinking, not folder-level hope.
What tools and references can strengthen your Blender workflow?
Blender does not sit alone in the photogrammetry chain. You may reconstruct elsewhere and import results into Blender for cleanup and scene work. If you use COLMAP, Meshroom, OpenMVG, or similar tools, the Blender Photogrammetry Importer documentation is useful: the add-on reads Colmap, Meshroom, MVE, Open3D, OpenSfM, OpenMVG, Regard3D and VisualSfM results and imports cameras, point clouds and meshes. That matters if you need alignment between the scan, source cameras, and later compositing.
There is also growing interest in lighter and more automated workflows. A September 2025 BlenderNation article describes a free workflow that runs COLMAP on video footage and brings the tracked camera and point cloud into Blender through that importer, which helps when you need more than just the mesh. Our guide to camera tracking in Blender covers the built-in alternative.
Useful tool categories for this phase:
- Reconstruction software for the initial scan
- Blender modifiers such as Weld, Decimate, and Remesh
- Sculpt mode for local repair and surface smoothing
- Retopology tools or external quad remesh tools where needed
- Evidence and versioning systems for authorship and transfer records
Here is which built-in Blender tool fixes which scan problem:
Do not let a cleaned scan become an unprotected commercial file.
The moment your Blender asset is ready for clients, vendors, or marketplaces, file history and rights records start to matter. BlendedBoris timestamps your .blend files on the blockchain from inside Blender, so you can show who made each version before it leaves your hands.
👉 Timestamp your Blender work with BlendedBoris
What best practices actually work in 2026?
Practice 1: clean for the intended destination
What it is: define the asset’s final role before you touch topology.
Why it works: a hero prop, heritage model, and web asset require different tolerances. You save hours by not over-cleaning or under-cleaning.
How to do it: write down the target polygon budget, texture goal, scale requirement, and delivery format before editing.
Common pitfall: artists keep polishing every scan as if it were a portfolio centerpiece.
How to avoid it: force a yes or no decision on whether the asset is archival, commercial, cinematic, or technical.
Practice 2: preserve the untouched source
What it is: keep the original export frozen and separate from all Blender edits.
Why it works: if a client disputes changes, if an engineer needs the raw reference, or if an IP claim appears later, you still have the initial state.
How to do it: archive the source, hash it, document who captured it, and never overwrite it.
Common pitfall: one file gets duplicated informally and nobody knows which version is original.
How to avoid it: use version naming and access rules from the first working day.
Practice 3: separate geometric truth from visual patching
What it is: do not confuse texture fixes with geometry fixes.
Why it works: a cloned texture can hide a missing area visually, but it does not restore measurable form. This is a major issue when scans are used by design teams or manufacturing companies.
How to do it: document whether a repair is structural, cosmetic, or interpretive.
Common pitfall: teams hand off a beautiful but misleading model as if it were fully factual.
How to avoid it: keep a short repair log and attach it to the project folder or asset handoff.
Practice 4: treat scan files as IP-bearing assets
What it is: attach authorship, usage rights, and transfer evidence to the file lifecycle.
Why it works: the more valuable your asset becomes, the less acceptable casual sharing becomes. This is especially true for freelancers, studios, startups, museums, and product teams selling 3D assets.
How to do it: use contracts, metadata, version logs, and where appropriate, certificate or blockchain-backed evidence records. CADChain’s position is clear here: audit trails should support real legal and business use.
Common pitfall: people wait until infringement happens.
How to avoid it: record first, publish second.
What mistakes do teams make most often?
Mistake 1: trying to fix a bad scan only in Blender
Why it happens: teams assume every defect is a mesh problem.
The impact: hours disappear into cleanup that should have been prevented during capture.
How to avoid it:
- Review photo overlap and lighting before reconstruction
- Reshoot important objects where possible
- Use scale markers and more camera angles on reflective or perforated surfaces
Mistake 2: decimating before understanding silhouette risk
Why it happens: artists panic when files are heavy.
The impact: edges collapse, forms flatten, and the asset loses the very detail that made the scan useful.
How to avoid it:
- Duplicate before decimating
- Check silhouette from likely camera distances
- Bake high detail to normal or displacement maps where needed
Mistake 3: ignoring legal ownership of the source object and location
Why it happens: many creators think that making the scan means owning all rights around it.
The impact: in Europe, cultural heritage sites, branded products, private interiors, and commissioned objects can carry restrictions. Scans of people raise their own questions, as the Danish deepfake bill on digital doubles and 3D scans shows. A scan can be technically yours and still commercially complicated.
How to avoid it:
- Confirm permission to capture and distribute
- Separate copyright in the object from copyright in the scan processing
- Use written client terms for commissioned scan work
This is a classic Dirk-Jan Bonenkamp warning area. He tends to focus on practical enforceability. That means less romantic talk about ownership and more hard questions about evidence, consent, transfer, and who had the right to commercialize the file in the first place.
Mistake 4: sharing final Blender files with no control layer
Why it happens: teams want to move fast and trust the NDA.
The impact: once a usable file leaves your hands, practical control often disappears. That is true in product visualization, 3D marketplaces, outsourced game art, and supplier handoffs.
How to avoid it:
- Export only what the collaborator needs
- Log transfers and recipients
- Attach license terms and keep evidence of first creation and edits
How should EU SMEs think about legal and security issues around scans?
For EU SMEs, photogrammetry raises more than art questions. It touches trade secrets, confidentiality, data protection, and evidence. A scan of a factory floor can reveal process layout. A scan of a prototype can disclose unfiled design information. A scan of a museum object can trigger licensing restrictions. That is why Violetta and Dirk-Jan’s combined perspective matters.
From Violetta Bonenkamp’s side: file-level rights matter because digital work spreads fast and often without context. You need practical proof of authorship, transfer, and version history if you want to monetize or defend a digital asset later.
From Dirk-Jan Bonenkamp’s side: legal controls work better when the technical workflow supports them. If you cannot show who handled the file, when it changed, and under which rights, your case gets weaker.
For European teams, a sane minimum looks like this:
- Separate raw data, working files, and deliverables
- Use contributor agreements with freelancers and vendors
- Document permissions for capture locations and objects
- Keep a dated chain of edits and exports
- Avoid exposing personal data or sensitive site details in textures
Blockchain-backed proof is most useful when it supports boring facts: who made the file, when, what changed, and who received it.
Dirk-Jan Bonenkamp, CLO and co-founder, CADChain
How do you measure success after cleanup?
Teams often judge success by appearance alone. That is not enough. A strong photogrammetry asset in Blender should be measured across technical, commercial, and legal dimensions.
Foundational metrics:
- Polygon count relative to target use
- Viewport stability and render readiness
- Hole count and visible artifact reduction
- Texture clarity at intended viewing distance
- Scale accuracy against known measurements
Business and governance metrics:
- Hours spent from raw scan to deliverable
- Number of reuse cases created from one cleaned asset
- Presence of source archive, rights notes, and version history
- Time to answer ownership or provenance questions from clients
What should different business stages prioritize?
Freelancer or early-stage studio
Your reality: little time, small budgets, and pressure to deliver quickly.
Approach: focus on one repeatable cleanup checklist, keep raw sources, and attach simple license and authorship records to every deliverable.
Success looks like: fewer revisions, faster exports, and cleaner proof of who did what.
Growing SME or marketplace business
Your reality: more collaborators, more client files, and more reuse opportunities.
Approach: standardize naming, archive structure, retopo rules, texture rules, and transfer logs. At this stage, treating scans like protected inventory starts paying off.
Success looks like: stable handoffs, fewer lost files, and easier productization of cleaned assets.
Manufacturing company or enterprise team
Your reality: higher legal exposure, supplier chains, and confidential environments.
Approach: preserve originals, control access tightly, document every derivative, and separate reference scans from publishable assets.
Success looks like: useful 3D references without uncontrolled leakage of technical or commercial information.
If your Blender asset has value, prove it early.
A finished scan can support sales, documentation, and licensing, but only if you can show authorship and file history clearly. BlendedBoris records a blockchain timestamp for your Blender files from inside Blender, giving every approved version dated evidence of authorship.
👉 Start protecting your Blender assets
What is your next action plan?
Week 1: review your current scan archive, identify files that are commercially useful, and separate raw sources from edited Blender versions.
Week 2: build a cleanup checklist that covers geometry, textures, scale, file naming, and rights notes.
Week 3: test the checklist on one difficult asset and record the time saved.
Week 4 and beyond: add version logs, delivery terms, and authorship evidence to the same workflow so your 3D team and legal team stop operating like separate planets.
Glossary of terms you should keep straight
- Photogrammetry: creation of 3D data from overlapping photographs.
- Topology: the structure of edges, faces, and vertices in a mesh.
- Retopology: rebuilding a cleaner mesh over a dense or chaotic source.
- Decimation: reducing polygon count by collapsing mesh detail.
- Non-manifold geometry: mesh conditions that break clean surface logic and often cause shading or export issues.
- Chain of custody: documented record of who created, handled, edited, and transferred a digital file.
- Digital fingerprint: a hash or comparable record used to identify a file state at a certain moment.
Closing thoughts: what comes after photogrammetry cleanup?
Photogrammetry cleanup in Blender is where raw capture becomes real value. When the mesh is lighter, the textures are repaired, the scale is correct, and the file history is visible, the asset stops being a rough experiment and starts behaving like a business object. That is the point Violetta Bonenkamp keeps pushing from the commercial side and Dirk-Jan Bonenkamp keeps pushing from the legal side. A 3D file can be art, evidence, inventory, and risk all at once.
For EU SMEs, that means one thing: do not separate visual cleanup from rights cleanup. The same discipline that removes holes and floating fragments should also remove ambiguity around authorship, permissions, and transfer.
And once you have a stable scan asset, the next logical move is to push deeper into advanced procedural and production workflows. If you want to expand from scan repair into node-based processing, complex scene assembly, and broader production systems, continue with advanced Blender techniques for geometry nodes, VFX and simulation pipelines. It is the natural next step after you stop treating photogrammetry as a messy import problem and start treating it as a serious pipeline asset.
People Also Ask:
How to clean up photogrammetry mesh in Blender?
To clean up a photogrammetry mesh in Blender, start in Edit Mode with Merge by Distance and Delete Loose to remove duplicates and floating islands. For surface repair, you can continue by entering Sculpt Mode on your object. Activate Dyntopo for dynamic topology changes, but keep in mind this does not preserve UVs or colors. For detailed editing, use tools like the Bisect Tool or manually delete unwanted polygons and artifacts. Importantly, smoothing techniques refine surfaces and polygons for a cleaner finish. Always save a backup of your original file before beginning cleanup.
Does Blender support photogrammetry workflows?
Blender supports workflows related to photogrammetry, although it does not generate 3D models from photographs natively. It is commonly paired with external tools like RealityScan (formerly RealityCapture) or Meshroom for creating photogrammetric meshes. Once imported into Blender, users can clean, retopologize, texture, and prepare models for rendering or other uses.
What is the process for cleaning up topology in Blender?
To clean up topology in Blender, begin by using Merge By Distance to remove duplicate vertices. Then, switch to Edit Mode to manually adjust any problematic areas. Tools like the Decimate Modifier simplify dense geometry, while the QuadriFlow (Quad) remesh in the Remesh panel can rebuild the mesh as quads for easier editing. Always inspect and refine the topology manually to ensure the mesh's integrity.
How to clean up an STL file imported into Blender?
When working with STL files in Blender, start by importing the file via File > Import > STL (.stl). Enter Edit Mode and use Select All (A) to highlight vertices. Use the Mesh > Clean Up functions, such as Merge by Distance and Delete Loose, to address geometry issues, apply modifiers like Decimate for reducing complexity, and use Shade Smooth or Shade Auto Smooth from the Object menu for a polished look.
What is the best way to prepare photogrammetry scans for 3D printing?
Preparing photogrammetry scans for 3D printing involves importing the scan into Blender, cleaning up the geometry by removing unwanted elements, and ensuring the mesh is watertight. The free 3D Print Toolbox extension (Sidebar > 3D-Print) checks for non-manifold edges and can try to make the mesh manifold. Optimize the polygon count using the Decimate Modifier, then apply smoothing to improve surface appearance. Finally, export the file as an STL or OBJ as required by the printer. Our guide to scale and detail for 3D printing covers wall thickness and scale.
Can Blender be used to enhance photogrammetry textures?
Yes, Blender offers robust texture mapping and editing features that can enhance photogrammetry textures. Use UV editing to properly align textures, or paint directly onto the 3D model in Texture Paint Mode. Tools like baking combined maps (diffuse, normal, and occlusion) help refine the final output.
Are there specific tools for repairing holes in Blender meshes?
To repair holes in Blender meshes, use the Fill or Grid Fill tools within Edit Mode. Highlight the boundary edges of the hole and apply these tools to close the gaps. For better control, use the Knife Tool to create clean edges before filling the area.
Why is retopology important in photogrammetry modeling?
Retopology simplifies complex photogrammetry-generated geometry, creating clean edge flow for easier editing and better shading. It reduces polygon counts, while baked normal maps carry the fine detail, so models are ready for rendering or animation. Blender’s QuadriFlow remesh and manual retopology with snapping make this process faster; see our retopology guide.
How to ensure accurate scaling with photogrammetry imports in Blender?
To achieve accurate scaling, use reference measurements within the imported photogrammetry model. Blender’s Measure tool helps validate dimensions. Adjust the scale by matching the known size of objects within the scene, ensuring proportional and realistic measurements before finalizing.
Can Blender handle large photogrammetry datasets?
Blender can handle large datasets, but performance may depend on your system's hardware. Reducing polygon counts with the Decimate Modifier and limiting texture resolution are recommended methods for optimizing performance. Consider splitting the dataset into smaller chunks if Blender slows down or becomes unresponsive.
FAQ on Photogrammetry Cleanup and Integration in Blender
What are the alternatives to Blender for photogrammetry cleanup?
Besides Blender, tools like Meshroom, RealityScan (formerly RealityCapture), and Agisoft Metashape are popular for photogrammetry processing. These tools focus on reconstruction but can aid with initial cleanup before exporting models to Blender for detailed edits and integration. Select based on your project's complexity and hardware capabilities.
How does Blender handle large photogrammetry files?
Blender’s Decimate modifier and Remesh tools can optimize file sizes without compromising essential details. Consider combining these with Geometry Nodes, which enable selective processing of dense areas. For more advanced manipulation, read our comparison of Animation Nodes vs Geometry Nodes in Blender.
How can photogrammetry workflows benefit SMEs and startups?
Photogrammetry helps SMEs create affordable, accurate 3D representations for product previews, manufacturing prototyping, and merchandising. Blender allows SMEs to edit these assets minimally, integrate them into workflows, and even prepare them for commercial marketplaces, enhancing both efficiency and cost-effectiveness.
What Blender add-ons streamline photogrammetry tasks?
The free TexTools add-on simplifies UV work, the free Photogrammetry Importer brings in cameras, point clouds and meshes from COLMAP, Meshroom and similar tools, and the 3D Print Toolbox extension checks meshes before printing. For a comprehensive guide to useful add-ons, review the best free Blender add-ons for 2026.
How do IP rights affect photogrammetry-based assets?
Intellectual property (IP) rights for photogrammetry-based assets depend on the source object’s ownership and permissions. Always validate legal rights before sharing or selling 3D assets. Your own cleanup and texturing work is protected by copyright like other creative work, and BlendedBoris helps you prove it by recording blockchain timestamps of your Blender files. See whether 3D models automatically have copyright for the basics.
What role do UV maps play in textures after photogrammetry cleanup?
Properly unwrapped UV maps ensure textures are accurately applied to a model’s geometry. During photogrammetry cleanup in Blender, reunwrap and rebake textures if the imported UV map warps or splits. This enhances asset quality, especially for animation and VFX applications.
How does chain of custody work for digital scans?
Chain of custody involves documenting file history, including creation, editing, and transfer. This helps establish authorship and maintain asset integrity during collaborations. Blockchain-backed tools provide secure verification to protect valuable commercial or legal Blender assets.
Why is topology repair essential for 3D scans?
Correcting topology ensures the mesh is stable and optimized for tasks like animation or AR. Blender’s Voxel Remesh, its QuadriFlow remesh or the paid Quad Remesher add-on enable structured geometry, reducing editing crashes, stabilizing shading, and making assets suitable for downstream use cases.
What’s the best approach for texture fixes in Blender?
Use Blender’s Clone Brush or Paint tools to address texture gaps from imperfect scans. Start by baking textures from the original to the cleaned mesh, then manually correct problem areas for photorealistic results suited to production workflows.
Can photogrammetry help in particle system setups?
Yes, cleaned models can be used as emitters for particles like grass, crowds, or debris in VFX workflows. For detailed insights into particle system design, explore Blender’s capabilities for advanced particle systems and simulations.
What are the top mistakes to avoid in photogrammetry cleanup?
Top mistakes include ignoring scale accuracy, over-reliance on decimation that alters silhouettes, and failing to preserve raw exports. Address these by auditing scans early, using controlled cleanup, and maintaining clear file history to avoid downstream usability issues.


