
TL;DR: Toon Shading and Anime-Style Rendering in Blender gives you a clear, repeatable way to make 3D scenes feel like anime, not just shaded models.
You get the best results when you control tone bands, shadow shapes, outlines, materials, lighting, and even normals as one visual system. Eevee is often the fastest choice for anime looks with Shader to RGB and ColorRamp banding, while Cycles can help when you need Toon BSDF or mixed stylized-real lighting. The guide also shows why teams should lock a style bible, test motion early, avoid muddy lighting and bad eye shadows, and keep authorship, version history, and license records tidy when assets move across clients, marketplaces, or contractors.
💡 Want to push your pipeline further? Check out advanced Blender pipelines for more on geometry nodes, VFX, and simulation workflows, then read the full guide and build your anime render setup with confidence.
Toon shading and anime-style rendering in Blender: bands, outlines and proof of authorship
Toon Shading and Anime-Style Rendering in Blender starts with a blunt question: if your 3D scene already looks good, why does it still fail to feel like anime? For most artists and studios, the gap is not geometry alone. It is shadow design, value separation, outline control, color discipline, and a repeatable workflow that survives client review, team handoff, and asset reuse.
Toon shading in Blender is a non-photorealistic rendering method that converts smooth light gradients into clean tone bands, sharp shadow breaks, stylized highlights, and often visible outlines. For startups, SMEs, and design teams, it offers a fast path to a distinctive visual identity, lower render cost in many cases, and a pipeline that can fit games, explainers, product films, digital collectibles, and branded character work.
Why it matters for your studio or startup: anime-style rendering gives you a recognizable visual language without the cost of chasing realism. Unlike photoreal rendering, which often demands heavy texture work, long look-development cycles, and strict lighting realism, toon shading gives you stronger art direction control. That matters when you sell assets, pitch concepts, or protect a signature style across distributed teams in Europe and beyond.
By the end of this guide, you will understand how toon shading works in Blender, how Eevee and Cycles differ for anime looks, how to build a repeatable setup, which mistakes ruin the style, and why IP discipline matters once your stylized assets start moving through marketplaces, clients, and subcontractors.
Blender’s own manual defines Toon BSDF as a shader for cartoon light effects, while Eevee workflows often rely on Shader to RGB and ColorRamp banding. The visual result looks simple. The production logic behind it is not.
Violetta Bonenkamp, CEO and co-founder, CADChain
Need a wider view of stylized rendering before you lock your anime workflow?
Cel shading is one stylized route. Low poly, with flat colors and simple forms, is the other one many Blender artists compare it with before they commit to a look.
👉 See the low poly stylized art guide
What makes anime-style rendering in Blender different from standard stylized rendering?
Anime-style rendering is a narrow subset of non-photorealistic rendering. It does not just mean “cartoony.” It usually combines banded shading, selective speculars, simplified materials, controlled shadow shapes, linework, and shape language that reads clearly from a distance. Good anime rendering often looks 2D at first glance, even when the scene is fully three-dimensional.
That distinction matters because many Blender users stop too early. They switch a ColorRamp to constant interpolation, get two values, and call it done. Then the face breaks under a different camera angle, the hair gets muddy, or the eyes receive ugly cast shadows. A production-ready anime look needs material logic, light logic, and mesh logic working together.
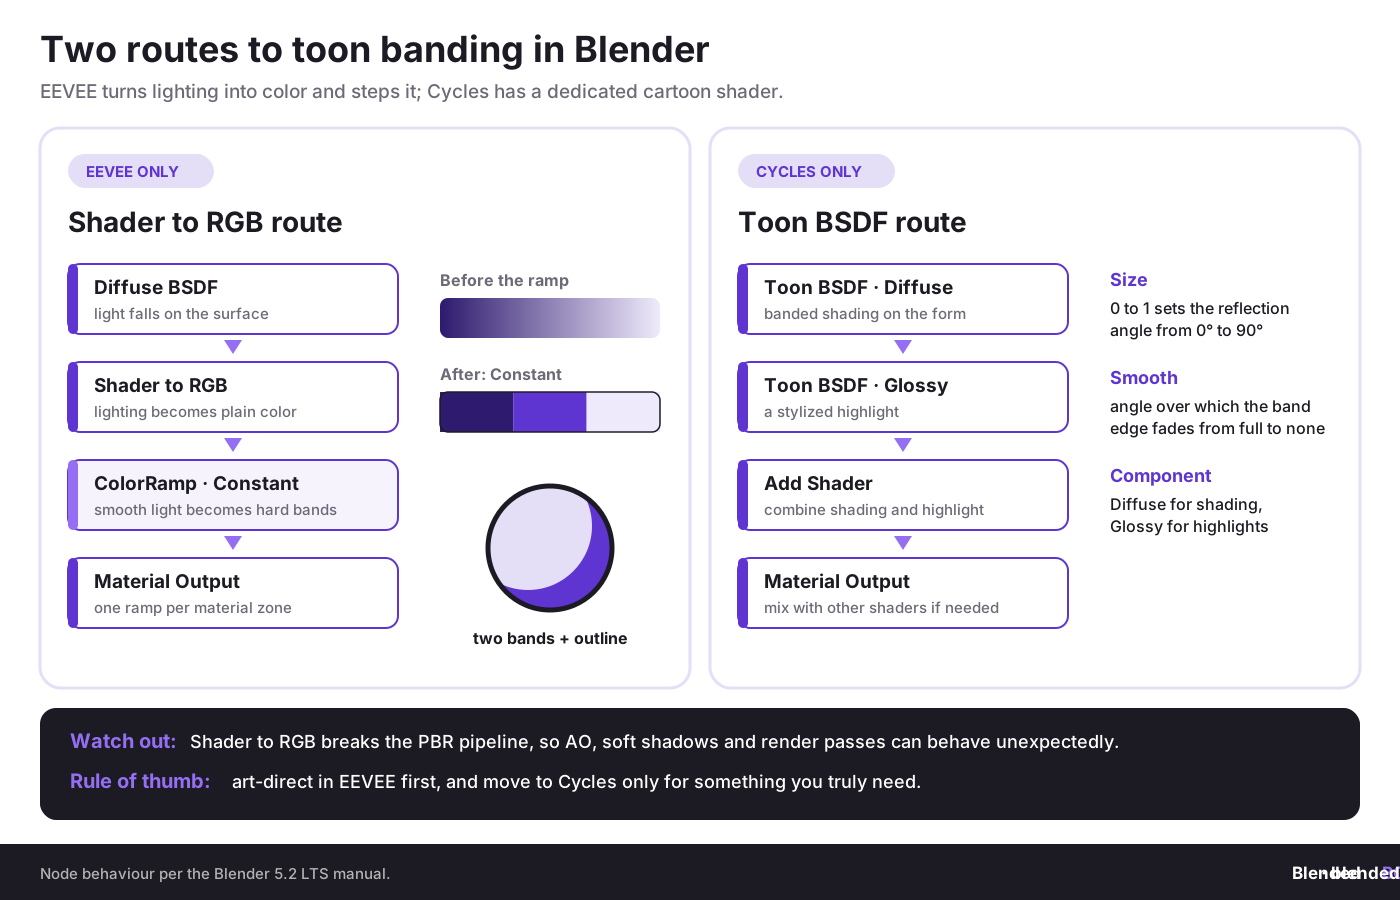
Published tutorials reflect this split. The Blender manual page for Toon BSDF covers the official shader, which works in Cycles only. Community tutorials such as the Yarsa DevBlog basic toon shader walkthrough show the classic EEVEE route: Diffuse BSDF into Shader to RGB, then a ColorRamp set to Constant. If shader nodes are new to you, start with our node editor basics.
Why does toon shading matter now for creators, SMEs, and design teams?
The challenge is simple. Teams need visuals that are memorable, fast to iterate, and cheap enough to revise. That is true for game studios, educational startups, engineering explainers, VTuber brands, digital fashion, and marketplace sellers. In 2026, the market is crowded with realistic renders. A flat anime look can cut through faster because it reads instantly on social feeds, store thumbnails, pitch decks, and mobile screens.
There is also a business reason. Stylized assets often age better than mid-tier realism. A realistic render that is not truly top level can look outdated fast. A clean cel-shaded design can hold value for years if the art direction is consistent.
From Violetta Bonenkamp’s point of view, this is where art direction meets commercial survival. A stylized workflow is not just an aesthetic choice. It is a reusable design system. And once a design system becomes valuable, teams must think about file control, authorship proof, licensing terms, and who touched which version. Dirk-Jan Bonenkamp would frame the same issue in legal terms: the more reusable and distinctive the asset, the more painful a sloppy rights trail becomes later.
Here is why many teams choose anime-style rendering in Blender:
- Fast visual identity: a strong look can emerge before heavy texture work.
- Lower hardware pressure in Eevee: many looks can be art-directed in real time.
- Marketplace fit: stylized characters, hair packs, environments, and shaders sell well when thumbnails are clean.
- Cross-media value: the same assets can serve animation, games, stills, social clips, and explainers.
- IP clarity need: the more signature the look, the more you need authorship records, license logic, and version tracking.
Which Blender render engine works better for anime looks: Eevee or Cycles?
The short answer is that Eevee is usually the first choice for anime-style rendering because it gives immediate feedback and supports the classic Shader to RGB workflow. Cycles can still work well, especially when you want Toon BSDF, more controlled light transport, or a hybrid look that mixes cel shading with selective realism. Our general comparison of EEVEE vs Cycles covers the engines beyond toon work.
Eevee for anime-style rendering
Eevee is popular because you can move a light and watch the shadow band slide in real time. That speed matters when you shape a cheek shadow, refine hair separation, or test a face under different lenses. Many anime Blender artists prefer Eevee because the look is less about physical light truth and more about graphic control.
A common Eevee setup uses Diffuse BSDF into Shader to RGB, then into ColorRamp with constant interpolation. This converts smooth lighting into hard bands. Shader to RGB works in EEVEE only, and the manual warns that it breaks the PBR pipeline, so effects such as ambient occlusion and soft shadows become less predictable. You then map those bands to color regions. In practice, artists often add separate controls for skin, hair, clothes, and eyes because each surface needs different thresholds and shadow softness.
Cycles for anime-style rendering
Cycles supports the Toon BSDF, documented in Blender’s manual as a Cycles-only shader for cartoon light effects. It gives direct control over Size and Smooth, which affect the angle of reflection and the softness of the transition. That is useful if you want controlled diffuse or glossy toon response without rebuilding everything from scratch.
Cycles can also help when your scene mixes stylized characters with richer materials, volumetrics, or harder-to-fake lighting. But many anime artists still prefer Eevee for look development because shader banding and viewport speed are easier to tune there.
A blunt production answer is this: use Eevee to art-direct fast, then test whether Cycles gives anything you truly need. If not, stay in Eevee and keep your pipeline lean.
What are the core building blocks of Toon Shading and Anime-Style Rendering in Blender?
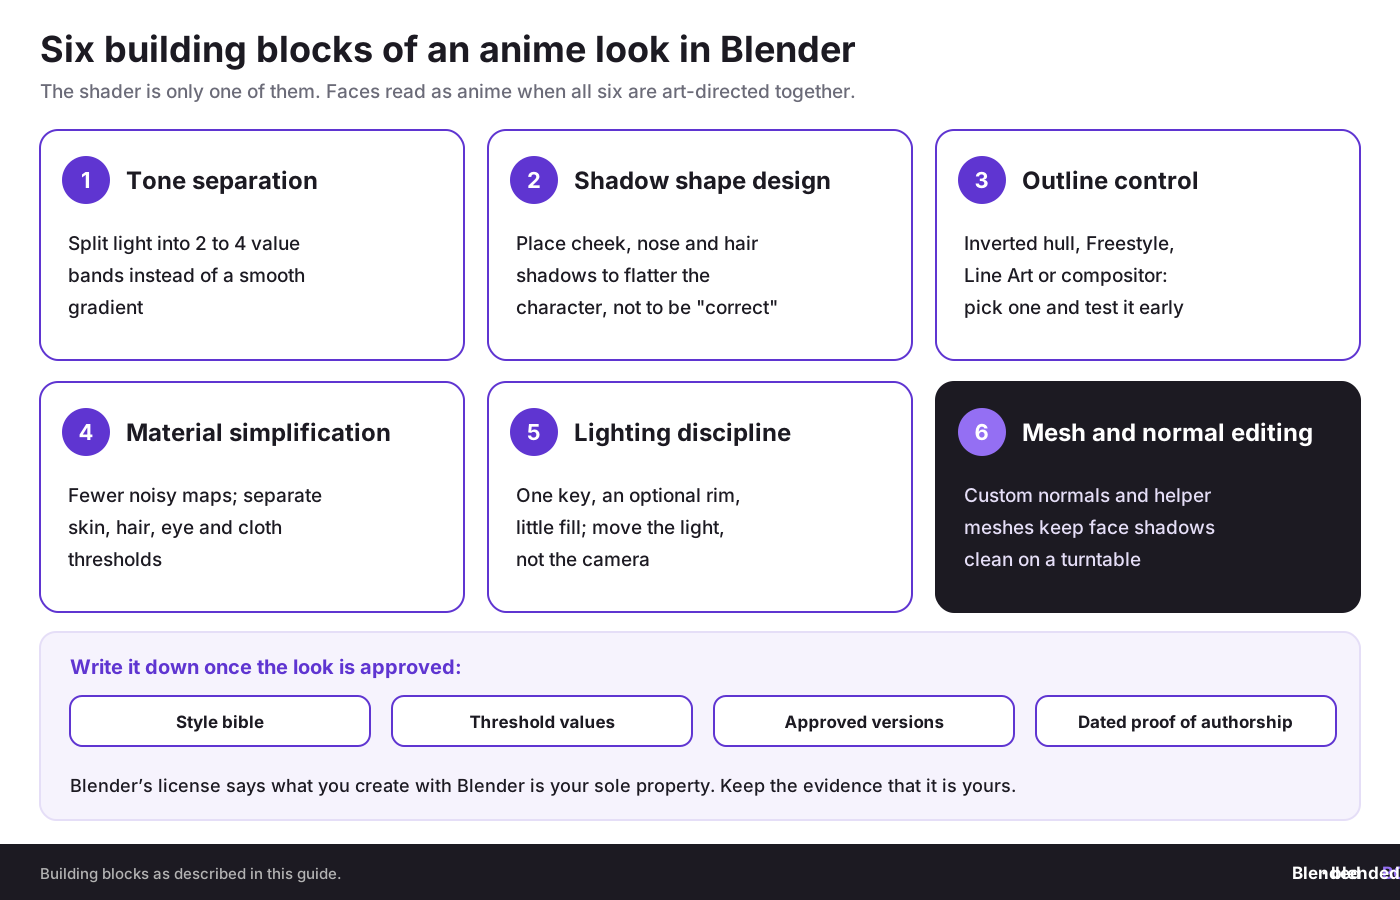
Let’s break it down. Strong anime rendering usually rests on six building blocks, and all six matter more than most beginners expect.
1. Tone separation
Tone separation means splitting light into distinct value zones instead of a smooth gradient. Two-tone shading is the classic entry point, though many production looks use three or four steps if they want extra control on skin, hair, or cloth folds.
If the tone break sits in the wrong place, the face can look puffy, harsh, or flat. That is why anime artists often adjust normals, geometry, or helper meshes rather than relying on lighting alone.
2. Shadow shape design
Anime shadows are designed shapes. They are not passive side effects of real-world light. On cheeks, noses, bangs, collars, and jawlines, the shadow often follows a visual rule that flatters the character instead of a physically correct result.
This is where many beginners fail. They light the model like a product shot and expect anime magic to appear. It will not.
3. Outline control
Outlines help sell the 2D illusion. In Blender, they can come from inverted hull meshes, Freestyle, the Grease Pencil Line Art modifier and hand-drawn Grease Pencil overlays, or compositor tricks. Each method has tradeoffs. Inverted hulls give strong and stable silhouettes for characters. Freestyle is flexible but can need extra tuning. Grease Pencil gives hand-drawn personality and can bridge 2D with 3D beautifully.
If you want that crossover look, plan early how the line layers and the shaded layers will come together. Our guide to render layers and passes in Blender shows how to split a shot for compositing.
Here is how the four outline methods compare:
4. Material simplification
Anime materials usually avoid noisy roughness maps, tiny realism details, and uncontrolled subsurface effects. The goal is clarity. Hair may use broad highlight strips. Skin may use a warm light band and a cooler shadow band, a choice our color theory guide for 3D artists explains. Cloth may keep just enough variation to avoid dead flatness.
5. Lighting discipline
Lighting still matters, just in a different way. You often use fewer lights, more intentional angles, and less fill than in realism. A single key light (see Blender light types) can do more for anime style than a complex studio rig if the shadow edge lands in the right place.
6. Mesh and normal editing
This is the hidden part. Topology and normals often decide whether the face shades like anime or like soft plastic. Some artists edit normals aggressively to paint the shadow transition through geometry behavior rather than light alone. Vertex Arcade’s video PERFECT Anime/Toon Shading in Blender 4.0, listed on BlenderNation Bazaar, edits the normals with Data Transfer modifiers, which points to exactly this production concern.
“If your anime face shades badly, the problem is often not the shader. It is the relationship between topology, normals, and a shadow line you never actually art-directed.”
Violetta Bonenkamp, CEO and co-founder, CADChain
How do you build a clean anime shader in Blender step by step?
Here is a practical workflow for a studio-friendly Eevee setup. It is simple enough for solo artists and structured enough for teams.
Phase 1: Assessment and planning
- Audit the asset: check whether the character mesh has clean face topology, separate material zones, and usable normals.
- Define the target look: pick references with shadow placement, eye style, line thickness, and color values you want to match.
- Decide the output: still render, short animation, game asset preview, or marketplace thumbnail. This affects outline method and render engine choice.
- Set ownership rules: if multiple people touch the file, record who authored the base mesh, the shader, and the final render look.
Phase 2: Shader foundation in Eevee
- Create a material and replace the standard Principled setup if needed.
- Add a Diffuse BSDF node.
- Connect it to Shader to RGB.
- Feed that into a ColorRamp.
- Change the ColorRamp interpolation to Constant.
- Set two or three distinct value zones for light and shadow.
- Map those zones to your chosen colors, not just black and white.
- Test under one key light first before adding any rim or fill.
This is the classic workflow described in community tutorials such as the Yarsa DevBlog walkthrough above. The trick is not the nodes themselves. The trick is how carefully you tune the threshold and color values per material zone.
Phase 3: Shadow shaping
- Start with the face: faces expose every weakness first.
- Adjust the light angle: do not keep moving the camera to hide bad shading.
- Use helper geometry or edited normals: this can stabilize the cheek and jaw shadow.
- Separate problem materials: eyes, teeth, and inner mouth often need custom treatment.
- Animate a turntable: many looks fail once the head rotates, and a facial rig adds expressions that move the shadow line again.
Phase 4: Outline pass
Pick one method and test it early. An inverted hull (a Solidify modifier with flipped normals and a dark outline material that uses backface culling) gives predictable line thickness for character silhouettes. Freestyle can work for illustration shots. Grease Pencil overlays are strong when you want hand-drawn corrections, especially in motion. If your end goal is anime motion graphics or hybrid shorts, the guide on motion graphics in Blender helps connect these choices to animation workflow.
Phase 5: Render and version control
Save iterative versions by look stage, not only by date. Keep at least these checkpoints: mesh approved, shader approved, light approved, outline approved, final comp approved. This sounds boring until a client asks for “the old face shadow from two weeks ago” and nobody knows which file that was.
Selling anime-style models or shader packs?
A polished look is only half the job. BlendedBoris adds a blockchain timestamp to your Blender files from inside Blender, so each approved version of a character, shader or outline rig carries dated proof of who made it, before it starts circulating on marketplaces or in client folders.
👉 Protect your Blender work with BlendedBoris
What are the most common mistakes in Toon Shading and Anime-Style Rendering in Blender?
This is where production quality usually collapses. The mistakes repeat across freelancers, student teams, and even small studios.
Mistake 1: treating the shader as the whole style
Why it happens: people expect nodes to fix weak shapes. The impact: flat or ugly renders that still scream “3D.” How to avoid it: art-direct silhouette, face planes, proportions, and light position before you chase node tricks.
Mistake 2: using realistic lighting logic
Why it happens: Blender training often starts with realism. The impact: muddy fills, weak shadow bands, and loss of graphic clarity. How to avoid it: simplify the rig. One key, one optional rim, and a deliberate shadow story beat generic three-point lighting in many anime scenes.
Mistake 3: ignoring eyes and eye-whites
Anime eyes carry emotion and style. Bad cast shadows on eye-whites can destroy the entire face. A Blender Stack Exchange question about unwanted shadows on anime eyes shows how technical this can get. Light and shadow linking help here: Cycles has had them since Blender 4.0 and EEVEE since Blender 4.3, so you can choose which objects a light affects and which objects block its shadows, for example to stop bangs or eyelids from dropping hard shadows onto the eye-whites.
Mistake 4: letting hair shading go noisy
Hair, whether cards or a groomed hair system, often needs fewer bands and a cleaner highlight shape than skin. If you push detail everywhere, the image stops reading as anime and starts reading as confused stylization.
Mistake 5: no style bible for teams
In SMEs and startups, more than one person often touches the asset. Without a short visual ruleset, the shadow threshold changes from shot to shot, line thickness drifts, and marketplace packs lose consistency. This is not just an art problem. It is also a commercial one, because inconsistent assets sell worse and trigger revision loops.
Mistake 6: weak file governance
This is the mistake most creative teams ignore until conflict starts. If your shader graph, texture flats, comp settings, and turntable renders are passed around on Slack, email, or random cloud folders, you lose track of origin, edit history, and permission scope. From CADChain’s legal-tech view, that is the creative equivalent of handing out untracked design files in a manufacturing chain. It is expensive later.
Here is a simple prevention list for EU SMEs and small creative teams:
- Name versions by approval stage, not only by date.
- Store author and owner separately if the creator works for a company or client.
- Record source files for shaders, outlines, comp nodes, and textures.
- Use written license terms for outsourced work, including marketplace resale rights.
- Keep evidence of first creation and subsequent revisions.
- Limit uncontrolled reshares of Blender files and exports.
What does a strong anime-render pipeline look like for startups and SMEs?
A startup does not need a huge pipeline. It needs a disciplined one. The best setup is often a light process that people will actually follow.
From Violetta Bonenkamp’s business angle, the useful question is not “Can we make this look cool?” It is “Can we repeat this look across products, campaigns, and collaborators without bleeding time or rights?” Dirk-Jan Bonenkamp would add another practical filter: “If a dispute appears in twelve months, can you show who created what, when, and under which terms?”
A workable 12-week rollout for a small team
- Weeks 1-2: collect references, define visual rules, choose Eevee or Cycles, and set file naming and authorship records.
- Weeks 3-4: build one master shader for skin, one for hair, one for cloth, and one outline method.
- Weeks 5-6: test on one hero character and one environment prop set.
- Weeks 7-8: create a style bible with screenshots of approved shadow placement, line width, and palette values.
- Weeks 9-10: stress test the look in animation, close-ups, and marketplace thumbnails.
- Weeks 11-12: lock export rules, archive versions, and attach usage rights for internal and external contributors.
What should your style bible include?
- Approved references with notes on what to match and what to avoid.
- Shader graphs with version labels.
- Shadow threshold values for skin, hair, fabric, and metal.
- Outline rules for close, medium, and wide shots.
- Lighting presets for turntables, portraits, and action scenes.
- Compositing notes for bloom, glare, halftone, or posterization if used.
- Rights notes showing who owns source files and who may reuse them.
How should you measure success?
A lot of teams say they want a better anime look, but they never define success. Then every review becomes subjective. Use a small dashboard instead.
Foundational metrics
- Time to approved look: how long from blank material to approved hero render.
- Revision count per shot: a high number usually means style rules are vague.
- Consistency score: compare line width, shadow placement, and palette across a batch.
- Render turnaround: especially if you sell fast iterations to clients.
Advanced metrics after 3 months
- Marketplace click-through rate: do anime thumbnails attract more traffic?
- Conversion rate by render style: does cel-shaded presentation sell better than realistic previews for your audience?
- Reuse rate of approved shaders: how often do artists rely on the master setup rather than rebuilding from scratch?
- Rights incident count: unlicensed reuse, missing source attribution, or uncertain ownership.
If you are an EU SME, add a simple compliance layer. Record whether outsourced artists transferred rights properly, whether stock textures allow commercial use, and whether client contracts cover derivative versions. Stylized assets often get repurposed far more than teams expect.
How does anime-style rendering connect to IP, copyright, and digital proof?
Here is the uncomfortable part. Many artists protect finished JPGs and ignore the source Blender files, shader node groups, line-pass setups, and version history that actually prove how the work came into being. That is backward.
From the CADChain founders’ perspective, blockchain is not magic and not a speculative gimmick. It is back-end evidence infrastructure. In creative work, the same logic applies: if a stylized asset becomes commercially useful, you want proof of creation time, version flow, authorship, and transfer records. That can support disputes over ownership, licensing, and unauthorized reuse.
For Europe-based teams, this matters in very ordinary business situations. Typical scenarios look like this:
- A Dutch animation startup outsources hair shaders to a freelancer in Poland and later cannot prove whether reuse rights were included.
- A German product studio commissions anime-style mascots for an explainer series and later wants to adapt them into a game.
- A French marketplace seller discovers near-identical cel-shaded materials in another store listing but has weak source-file evidence.
- An Italian SME licenses stylized 3D avatars for virtual events and then faces uncontrolled downstream redistribution.
A clear authorship and licensing chain helps in all of these cases. Copyright still matters. Contracts still matter. Marketplace terms still matter. But file-level evidence and version control make your legal position much stronger.
Blender’s license page is clear on ownership: “What you create with Blender is your sole property.” That covers your characters, shader graphs, outline rigs and renders. Proving it later is a separate job. BlendedBoris adds a blockchain timestamp to your Blender files from inside Blender, so each approved version of a stylized asset carries dated evidence of who made it and when. For the legal background, read copyright basics for 3D artists and whether 3D models automatically have copyright.
Dirk-Jan Bonenkamp’s legal view fits creative production better than many artists assume: if you cannot show a credible audit trail for a valuable digital file, you are already weaker in any dispute.
What works best in 2026 for anime-style rendering in Blender?
Production trends have become clearer. The best results usually come from a hybrid mindset, not from blindly following one tutorial.
Practice 1: Build around a reference pack, not memory
What it is: collect scene references for face shadows, hair shine, outline weight, and palette logic before opening nodes. Why it works: it prevents style drift and endless subjective feedback. How to do it: gather 10 to 20 stills, tag them by feature, reject anything inconsistent, then match one hero shot first.
Practice 2: Separate skin, hair, eyes, and cloth shader logic
What it is: avoid one universal toon material for all surfaces. Why it works: each material family reacts differently and needs its own threshold behavior. How to do it: duplicate the master graph into linked variants, then expose a few controlled parameters for artists.
Practice 3: Edit normals when lighting alone fails
What it is: use normal editing, helper meshes, or data-transfer tricks to force cleaner transitions. Why it works: anime shading often depends on idealized face planes, not literal geometry. How to do it: test on cheeks, jawline, bangs, and neck before rolling it out across the whole character.
Practice 4: Test on motion early
What it is: run short camera moves and head turns from day one. Why it works: many anime looks collapse outside a static portrait angle. How to do it: animate a 3 to 5 second turntable and a simple expression set before client approval.
Practice 5: Archive the source logic, not only the final frames
What it is: save node groups, lighting presets, outline rigs, comp files, and approval notes. Why it works: your commercial value sits in the reusable setup as much as in the final image. How to do it: package project files with authorship notes and usage terms at every approved release.
How should different business stages approach anime rendering?
Pre-seed or solo creator stage
Your reality: little time, little budget, and the need to get noticed quickly. Approach: use Eevee, two-tone shading, one outline method, and one signature palette. Prioritize thumbnails, reels, and marketplace previews. Defer complex comp stacks and multi-engine workflows. Success looks like a recognizable style that you can repeat in a week, not a masterpiece that took a month.
Small studio or seed-stage startup
Your reality: more deliverables, more collaborators, and client deadlines. Approach: formalize a master shader set, create a style bible, and define rights ownership early. Prioritize consistency and handoff clarity. Defer highly custom one-off tricks unless they can be documented. Success looks like any team member producing on-brand results without guesswork.
Established SME or Series A-level creative business
Your reality: asset reuse, subcontracting, multiple channels, and bigger commercial stakes. Approach: connect render rules with version control, contract language, and proof-of-authorship systems. Prioritize archive quality, licensing hygiene, and pipeline repeatability. Success looks like faster approvals, fewer disputes, and assets that keep earning across campaigns and products.
Want your stylized Blender work to stay commercially usable, not legally messy?
If your team creates reusable characters, shader packs, or branded 3D assets, put ownership records and licensing terms in place before the files spread across clients and contractors. BlendedBoris records blockchain timestamps for your Blender files from inside Blender, giving every approved version dated evidence of authorship.
👉 Start protecting your Blender assets
Glossary of terms that matter in this workflow
- Toon shading: a rendering approach that converts smooth lighting into discrete tone bands for a cartoon or cel-like look.
- Cel shading: another term for toon shading, often used in games and anime-style 3D art.
- NPR: non-photorealistic rendering, meaning styles that do not aim for photographic realism.
- Shader to RGB: a Blender Eevee node that converts shader output into color data for banding and stylization.
- ColorRamp constant interpolation: a setting that creates hard breaks between tones instead of smooth gradients.
- Toon BSDF: a Cycles shader node that creates cartoon-like diffuse or glossy light behavior.
- Custom normals: edited surface normal data used to shape shading beyond default geometry behavior.
- Inverted hull outline: a duplicated mesh with flipped normals, often scaled slightly to create an outline effect.
- Authorship proof: evidence showing who created a digital asset and when.
- Version trail: a record of edits, transfers, and approvals across the life of a file.
Closing thoughts and next steps
Toon shading and anime-style rendering in Blender reward discipline far more than flashy node graphs. The strongest results come from clear tone bands, designed shadow shapes, smart outline choices, controlled materials, and a workflow that holds up when the asset leaves your machine and enters a team, a client folder, or a marketplace listing.
For engineers, designers, startups, and SMEs, that last point matters more than people like to admit. A stylized render can be a brand asset, a sales asset, and an IP asset at the same time. That means your Blender craft and your file governance should grow together.
If your next question is how to push these anime scenes further with stronger keys, cleaner fills, cinematic depth, and more deliberate mood control, the natural next read is Blender Rendering & Lighting Masterclass. Once your toon shader works, lighting becomes the next place where good scenes turn into unforgettable ones.
People Also Ask:
What is toon shading in Blender?
Toon shading in Blender refers to a technique for creating non-photorealistic renders that imitate the 2D appearance of hand-drawn cartoons or anime. It uses simplified colors, limited shading gradients, and pronounced outlines to produce a stylized aesthetic. This can be achieved through Blender's shader nodes or add-ons designed for toon creation.
How can I create anime-style shadows in Blender?
Anime-style shadows in Blender are typically hard-edged and placed by design. In EEVEE, run a Diffuse (or Principled) BSDF through a Shader to RGB node into a ColorRamp set to Constant, then move the ramp stops to set where the shadow starts and how many tone bands you get. In Cycles, the Toon BSDF does a similar job with its Size and Smooth inputs. Light placement and custom normals then decide the shape of the shadow on the face.
Is Eevee or Cycles better for toon shading?
Eevee is generally better for toon shading due to its real-time rendering capabilities, which make it easier to achieve the flat-shaded, stylized look. Cycles, on the other hand, can produce more nuanced results but may require additional setup and longer render times for toon-style renders.
Can Geometry Nodes be used for toon shading?
Yes, Geometry Nodes can be used to enhance toon shading by manipulating the geometry for stylized effects such as exaggerated edges or outlines. While shading itself is typically controlled by materials and lighting, Geometry Nodes allow for a more precise adjustment of object shapes and features that complement toon aesthetics.
How do you add line art to a render in Blender?
Line art can be added using Blender’s Freestyle rendering tool. This feature highlights the edges and contours of objects based on the camera angle. By enabling Freestyle in the Render Properties and customizing its settings, you can create bold or intricate outlines that match your desired style. Freestyle lines appear in the final render only. The Grease Pencil Line Art modifier, added in Blender 2.93, builds lines from scene geometry that you can see and edit in the viewport.
What are the best resources for learning toon shading techniques?
Start with Blender’s own manual pages for Toon BSDF and Shader to RGB, then follow tutorial channels such as Vertex Arcade, whose anime toon shading video covers custom normals. Community forums like Blender Artists and Reddit’s r/blender are also valuable for exploring techniques shared by experienced users.
Are there any add-ons for creating toon shaders in Blender?
Yes, several add-ons are available, such as the paid Ultimate ToonShader Generator for EEVEE, sold on Superhive Market and BlenderKit, and specialized anime-style shader packs. These add-ons simplify the process by providing pre-configured shaders and settings to achieve professional results in less time. For free tools, see our list of the best free Blender add-ons.
What are common mistakes when creating toon shaders?
Common mistakes include overcomplicating the shader setup, using too many colors, unrealistic lighting that doesn’t fit a stylized scene, and inconsistent line thickness. Striving for simplicity and working within the limits of a cartoon-inspired aesthetic often yields better results.
Can Blender create manga-style renders?
Blender can create manga-style renders by combining toon shading techniques with freestyle lines and specific texturing methods. The key lies in achieving the black-and-white contrast and line density that are a hallmark of manga artwork.
What are the advantages of using Blender for anime-style rendering?
Blender offers powerful tools like shader nodes and Freestyle rendering for anime-style visuals. It is free and open source, which allows for endless customization, and it excels in integrating modeling, texturing, and animation in one platform. The ability to preview scenes in real-time using Eevee further streamlines the workflow for stylized renderings.
FAQ on Toon Shading and Anime-Style Rendering in Blender
What are the best tools for perfecting shadow placement in anime renders?
For precise shadow placement, combine normal editing techniques with helper meshes. Testing in Blender’s Eevee engine provides real-time feedback for shadow band adjustments. Data Transfer modifiers can stabilize transitions, especially for detailed facial or hair shadows, ensuring smooth and graphic results.
How can you optimize render settings for stylized scenes while maintaining quality?
Use GPU rendering and light baking for faster results. Reduce texture resolution without sacrificing detail, especially in anime-style renders where clarity matters. For more techniques, see Render Optimization Tips for Blender Scenes.
Why does Grease Pencil excel in 2D-to-3D anime scenes compared to Freestyle outlines?
Grease Pencil adds hand-drawn personality to hybrid 3D renders and bridges animation with artistic control. It works well for motion graphics or stylized shorts. Freestyle may need more adjustments but offers flexibility for illustration and production-grade outline precision.
What lighting setups work best for anime-style renders?
Focus on simplified rigs using one main key light with optional rim lighting. Position the key light to create graphic shadows across face planes and objects. Avoid generic three-point lighting, which can dilute the stylized mood needed for anime effects.
How do visual rules improve asset consistency in stylized workflows?
Set a clear style bible outlining shadow thresholds, line thickness, palettes, and shader parameters. This eliminates guesswork between collaborators and ensures consistent renders across animations or marketplace assets. Style rules reduce revision loops and streamline multi-shot approvals.
What role do simplified materials play in anime-style rendering?
Simplified materials prioritize clarity by avoiding roughness maps and unnecessary texture noise. Use graphics-focused presets for hair highlights, skin tones, and cloth folds. Cleaner transitions help maintain a distinctly anime look. Learn more on material clarity from PBR Materials in Blender.
How can Blender’s Toon BSDF and Shader to RGB nodes be combined effectively?
Toon BSDF works well for Cycles when blending cel shading with select realism. Shader to RGB with ColorRamp interpolation is ideal for Eevee-driven projects needing immediate feedback and sharp shadow banding. The two do not meet in one render, because Toon BSDF works in Cycles only and Shader to RGB in EEVEE only, so pick the engine first and test the look in both only if you deliver from both.
How do anime-style renders stand out in crowded visual markets?
Stylized assets age better and read instantly across social thumbnails, pitch decks, and mobile screens. A distinct anime look can earn attention faster than mid-tier realism, often serving animations, explainers, or game characters with reduced rendering complexity.
What file governance practices prevent IP issues in stylized projects?
Store first-edit evidence, approval files, and authorship proof at each stage. Limit untracked reshares of project assets. File trails protect ownership during redistribution, critical for European SMEs handling client or marketplace agreements.
Why is motion testing essential in anime-style rendering workflows?
Camera angles and simple animations, like turntables, expose flaws that static views may hide. Early motion testing ensures materials, lighting, and shadows remain consistent, avoiding surprises in final animation approvals or production passes.


